# System Architecture
Source: https://docs.prometheusprotocol.org/architecture
How Prometheus's on-chain architecture provides the trust and identity layers for an open 'Web of Agents'.
The Prometheus Protocol isn't just a set of tools; it's the technical architecture for an open agent economy. Our vertically integrated stack is **intentionally designed** to solve the core problems of trust and centralization, ensuring a secure and seamless flow from code submission to end-user interaction.
This page provides a high-level overview of the components that make the **"Web of Agents"** possible.
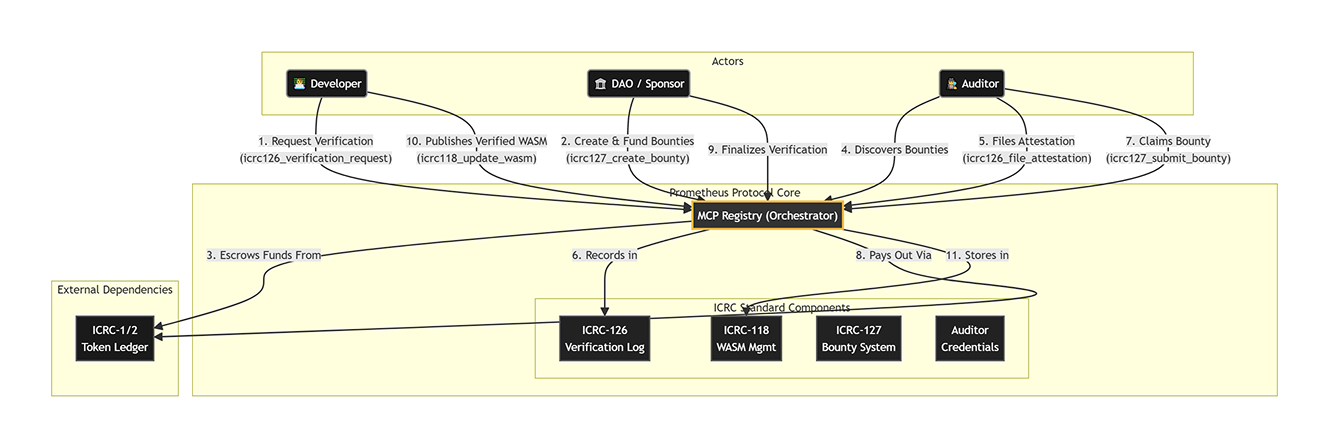 ### Core Components
The protocol is composed of several key on-chain services working in concert to provide the pillars of identity, trust, and payments.
An on-chain service that issues and validates credentials. It provides both
API Keys for programmatic clients and OAuth 2.1 tokens for interactive user
sessions.
The core of the trust layer. It manages the service registry, the audit and
bounty lifecycle, and the secure deployment pipeline that takes verified
code and deploys it to the mainnet.
A decentralized network of automated verifier bots that perform reproducible
builds using Docker. These bots monitor the registry for pending
verifications, rebuild WASMs from source, and file cryptographic
attestations on-chain—earning token rewards for their work.
An economic incentive layer built on ICRC-126 (attestations) and ICRC-127
(bounties). It manages bounty creation, verifier staking, consensus
tracking, and automated reward distribution for both build verification and
security audits.
***
### Identity & Interaction Model
A critical concept in the Prometheus architecture is the distinction between two types of identity:
1. **Protocol Participant Identity:** The identities of developers and auditors who build and secure the ecosystem.
2. **End-User & Agent Identity:** The identities of the final consumers who interact with the services listed in the App Store.
#### 1. Protocol Participants (The "Supply Side")
Developers, verifiers, and auditors interact directly with the protocol's core services to perform supply-chain functions. This on-chain, verifiable process is our answer to the need for an **"intentional design"** for the agent economy. It builds the foundation of trust necessary for an open ecosystem to thrive.
* **Actions:** Publishing code, performing automated builds, claiming bounties, submitting audit results.
* **Identity & Tools:** These actions are authorized using the blockchain's native identity system (principals). However, the tools used differ by role:
* **Developers** use the **Prometheus CLI** to perform command-line operations like publishing new service versions with `app-store-cli release`.
* **Verifiers** run **automated bots** that continuously monitor for pending verifications, perform Docker-based reproducible builds, and file attestations—earning token rewards.
* **Auditors** use the **Prometheus web UI** (the Audit Hub) to find and claim bounties, review code, and submit their security audit results.
This ensures that every critical action affecting the software supply chain is cryptographically signed and attributable to a specific on-chain identity, using the optimal tool for the job.
#### 2. End-Users & Agents (The "Demand Side")
When an end-user or an AI agent wants to use a service from the App Store, they need a more user-friendly and standards-based way to authenticate. This flexible, standards-based identity is the key to unlocking an open **"Web of Agents."** Unlike the locked-in identities of **"walled gardens,"** our Identity Provider acts as a universal passport, allowing any user or agent to securely interact with any service on the network.
* **Actions:** Calling a paid tool, granting payment allowances.
* **Identity:** The protocol's on-chain **Identity Provider** facilitates this. Service developers integrate with it to support two flows:
* **API Keys:** For programmatic agents to make authenticated requests.
* **OAuth 2.1:** For human users to have a familiar, secure login experience.
This creates a powerful separation: native on-chain identity forges the protocol's trusted foundation, while the flexible Identity Provider unlocks the open market that runs on top of it.
This diagram shows a more detailed view of how the core services communicate with each other:
### Core Components
The protocol is composed of several key on-chain services working in concert to provide the pillars of identity, trust, and payments.
An on-chain service that issues and validates credentials. It provides both
API Keys for programmatic clients and OAuth 2.1 tokens for interactive user
sessions.
The core of the trust layer. It manages the service registry, the audit and
bounty lifecycle, and the secure deployment pipeline that takes verified
code and deploys it to the mainnet.
A decentralized network of automated verifier bots that perform reproducible
builds using Docker. These bots monitor the registry for pending
verifications, rebuild WASMs from source, and file cryptographic
attestations on-chain—earning token rewards for their work.
An economic incentive layer built on ICRC-126 (attestations) and ICRC-127
(bounties). It manages bounty creation, verifier staking, consensus
tracking, and automated reward distribution for both build verification and
security audits.
***
### Identity & Interaction Model
A critical concept in the Prometheus architecture is the distinction between two types of identity:
1. **Protocol Participant Identity:** The identities of developers and auditors who build and secure the ecosystem.
2. **End-User & Agent Identity:** The identities of the final consumers who interact with the services listed in the App Store.
#### 1. Protocol Participants (The "Supply Side")
Developers, verifiers, and auditors interact directly with the protocol's core services to perform supply-chain functions. This on-chain, verifiable process is our answer to the need for an **"intentional design"** for the agent economy. It builds the foundation of trust necessary for an open ecosystem to thrive.
* **Actions:** Publishing code, performing automated builds, claiming bounties, submitting audit results.
* **Identity & Tools:** These actions are authorized using the blockchain's native identity system (principals). However, the tools used differ by role:
* **Developers** use the **Prometheus CLI** to perform command-line operations like publishing new service versions with `app-store-cli release`.
* **Verifiers** run **automated bots** that continuously monitor for pending verifications, perform Docker-based reproducible builds, and file attestations—earning token rewards.
* **Auditors** use the **Prometheus web UI** (the Audit Hub) to find and claim bounties, review code, and submit their security audit results.
This ensures that every critical action affecting the software supply chain is cryptographically signed and attributable to a specific on-chain identity, using the optimal tool for the job.
#### 2. End-Users & Agents (The "Demand Side")
When an end-user or an AI agent wants to use a service from the App Store, they need a more user-friendly and standards-based way to authenticate. This flexible, standards-based identity is the key to unlocking an open **"Web of Agents."** Unlike the locked-in identities of **"walled gardens,"** our Identity Provider acts as a universal passport, allowing any user or agent to securely interact with any service on the network.
* **Actions:** Calling a paid tool, granting payment allowances.
* **Identity:** The protocol's on-chain **Identity Provider** facilitates this. Service developers integrate with it to support two flows:
* **API Keys:** For programmatic agents to make authenticated requests.
* **OAuth 2.1:** For human users to have a familiar, secure login experience.
This creates a powerful separation: native on-chain identity forges the protocol's trusted foundation, while the flexible Identity Provider unlocks the open market that runs on top of it.
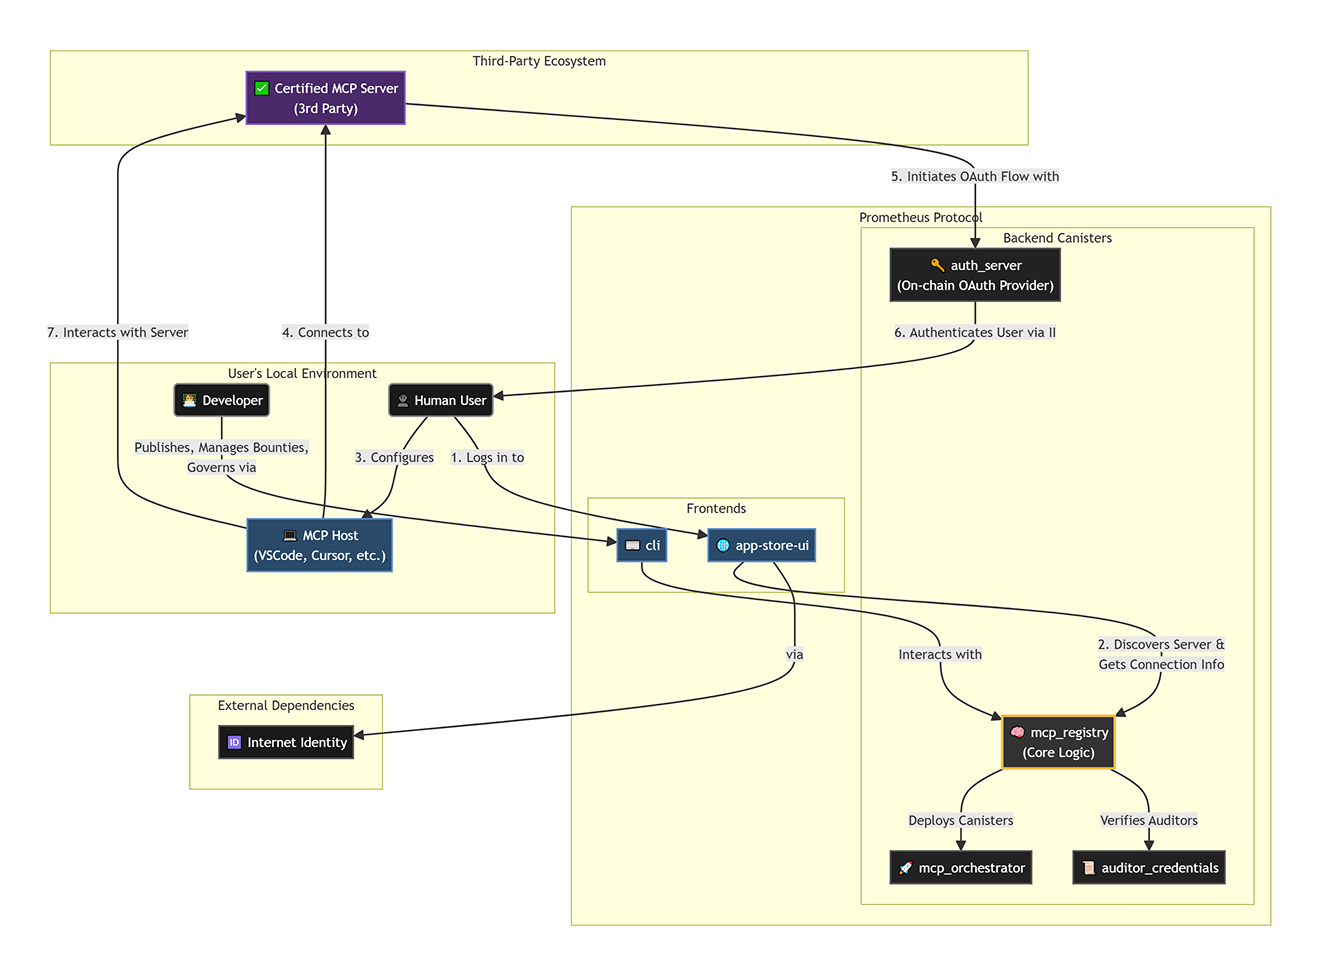
This diagram shows a more detailed view of how the core services communicate with each other:
 # Core Concepts
Source: https://docs.prometheusprotocol.org/core-concepts
How Prometheus provides the Passport, Bank Account, and Marketplace to enable the open agentic web.
The Prometheus Protocol is built on three interconnected pillars that work together to create a self-sustaining, trustworthy economic engine for AI agents. Understanding these concepts is key to understanding the power of the entire ecosystem.
A universal, standards-based authentication layer for both humans and AI
agents.
A decentralized app store and software supply chain to ensure service
quality and security.
A low-friction, programmable payment system designed for machine-to-machine
commerce.
***
## 1. The Passport: Secure Identity & Authorization
#### The Problem
For any economy to function, participants need a reliable way to identify themselves and authorize actions. How does a service know which user—or which AI agent—is making a request? How can a user grant permissions to an agent without handing over their primary credentials?
On the open web, an agent is **blind**—it can't prove who it is, and it can't trust who it's talking to.
#### The Prometheus Solution
Prometheus provides a **unified identity model** built on the user's Principal ID. This single identity can be authenticated using two distinct, purpose-built methods:
* **API Keys:** Long-lived credentials designed for programmatic use by autonomous agents, scripts, and backend services.
* **OAuth 2.1 (JWTs):** A standards-based flow for interactive logins, allowing human users to securely connect to services through a familiar browser-based experience.
This dual approach ensures that both humans and machines can securely interact with services, while developers only need to integrate a single authentication context on their backend.
This is the **universal key** that unlocks the open agentic web.
***
## 2. The Marketplace: Verifiable Trust & Discovery
#### The Problem
The core challenge of an open agent economy is preventing the "accidental emergence" of a chaotic, unsafe ecosystem. In a world of autonomous agents, how do you defend against fraud, malicious actors, and systemic risk without resorting to a centralized "walled garden"? How can you trust a third-party service when there's no central authority to vouch for it?
When AI agents can **manage token allowances, control canister-held funds, and execute cross-chain transactions**, the stakes become existential. A single malicious line in deployed code could drain user funds. Traditional trust signals (brand reputation, app store reviews, star ratings) don't work for this new paradigm.
#### The Prometheus Solution
We built a **fully automated, decentralized verification network** powered by reproducible builds and economic incentives. This is the **trusted marketplace** where agents can find and use services audited by a DAO of staked community members.
##### Automated Reproducible Builds
* **Git-Based Publishing:** Developers submit a Git commit hash, creating an undeniable link to their source code.
* **Docker-Based Verification:** The protocol uses deterministic Docker environments to rebuild the code from source. Multiple independent verifier bots perform these builds automatically—no human intervention required.
* **Cryptographic Proof:** Every build produces a WASM hash. If the hash from the automated rebuild matches the developer's submitted hash, the code is verified. This proves the deployed code matches the audited source.
* **Multiple Independent Verifiers:** Each version requires consensus from 5 of 9 independent verifiers to be marked as verified—providing Byzantine fault tolerance against malicious actors.
##### Economic Incentive Layer (ICRC-126 & ICRC-127)
* **Bounty System:** Developers create bounties (\~\$2.25 per verification) to incentivize automated verification.
* **Verifier Rewards:** Independent verifier bots earn tokens (\$0.25 per verification) for successfully performing reproducible builds and filing cryptographic attestations.
* **Staking & Slashing:** Verifiers must stake USDC collateral (0.30 USDC) to reserve bounties. If they abandon verification, their stake is burned—ensuring accountability.
* **Permissionless Participation:** Anyone can run a verifier bot and earn rewards. The more verifiers, the stronger the security.
##### Security Audits & Tiered Certificates
* **Tiered Audits:** Beyond build verification, a bounty system incentivizes independent security auditors to review the code for vulnerabilities.
* **Prometheus Certificate:** Passing these audits earns the service a certificate with Gold, Silver, or Bronze tier, providing a clear, on-chain signal of its quality and security.
* **Two-Layer Trust:** Build verification proves integrity (deployed = source), while security audits prove safety (source = secure).
***
## 3. The Bank Account: Direct & Efficient Payments
#### The Problem
On the open web, an agent is **broke**—it has no way to pay for services on-chain.
The agentic economy will be powered by **high-frequency micro-transactions**. This enables new economic models like the on-the-fly **"unbundling and rebundling"** of digital goods into hyper-personalized products. Traditional payment systems, with their high fees and slow settlement, are a complete barrier to this future.
#### The Prometheus Solution
Prometheus provides **wallet creation and management for AI agents**, plus a complete suite of agent-operable DeFi primitives.
* **Unified Allowance Pool:** A user grants a service a single, pre-approved spending allowance from their Principal.
* **Flexible Access:** Both API Key-authenticated agents and JWT-authenticated user sessions draw from this same allowance pool, simplifying fund management.
* **Low-Friction M2M Commerce:** This model is perfect for pay-as-you-go billing, enabling direct, programmable, and near-zero fee payments—the fuel for a truly autonomous economy.
* **DeFi Primitives:** Core wallet functionality, decentralized exchanges, market intelligence, and earning/speculation tools—everything an agent needs to manage capital and generate returns.
## The Flywheel Effect
These three pillars create a powerful flywheel for the open agentic web.
Our **Verifiable Trust** layer solves the safety problem, giving users the confidence to empower their agents. This confidence unlocks **Secure Identity** and **Direct Payments**, which in turn fuels a vibrant, competitive, and open **"Web of Agents."**
In short, we provide the trust that makes the open economy possible.
# Authenticating
Source: https://docs.prometheusprotocol.org/guides/agent-devs/authenticating
How to generate and use API keys to allow your agent to access protected or paid services.
Many services in the App Store, especially those that require payment, are protected. To use them, your agent must present a valid credential.
The primary method for programmatic clients like AI agents is a long-lived **API Key**. However, for user-facing applications (like a desktop app or IDE plugin), a browser-based **OAuth 2.1 Login** flow is also supported. This guide covers both.
### Primary Method: API Keys for Autonomous Agents
This process is designed for non-interactive use cases like backend services or autonomous agents. As the user running the agent, you will perform a one-time setup in the App Store UI to provision a key. Your agent then uses this key for all subsequent requests.
Before your agent can use a paid service, you must authorize it to spend funds on your behalf. This is done by setting an allowance.
1. Navigate to the service's detail page in the Prometheus App Store.
2. Find the "Access & Billing" section.
3. Click "Manage Allowance" and approve a spending limit with your wallet. This is a non-custodial `icrc2_approve` transaction; funds remain in your wallet until they are spent.
Once the allowance is set, you can create an API key.
1. In the same "Access & Billing" section, click "Create API Key".
2. Give the key a descriptive name (e.g., "My-Claude-Agent-Key").
3. The new key will be displayed on your screen.
**Copy this key immediately and store it securely!** For your security, this is the only time the full key will be visible.
With the API key copied, the final step is to provide it to your agent or SDK. The key must be sent in the `x-api-key` header of every request.
#### SDK Implementation (API Key)
If you are building a custom client with the `@modelcontextprotocol/sdk`, you provide the API key when you create the transport layer.
```typescript theme={null}
import { Client } from '@modelcontextprotocol/sdk/client/index.js';
import { StreamableHTTPClientTransport } from '@modelcontextprotocol/sdk/client/streamableHttp.js';
// The URL of the protected service from the App Store
const serviceUrl = 'https://.icp0.io/mcp/';
// Your securely stored API key
const apiKey = 'prom_sk_123abc...';
const client = new Client({ name: 'my-custom-agent', version: '1.0.0' });
// Pass the API key in the 'x-api-key' header when creating the transport
const transport = new StreamableHTTPClientTransport(new URL(serviceUrl), {
headers: {
'x-api-key': apiKey,
},
});
// This call now connects directly without any browser interaction.
await client.connect(transport);
```
***
### Optional: Interactive Login for User-Facing Applications
While API keys are ideal for autonomous agents, the Prometheus SDK also supports a browser-based OAuth 2.1 flow. This method is designed for applications where a **user is present** to interactively log in and grant consent.
#### The Seamless Login Flow
You do not need to manually register clients or handle tokens. The SDK manages the entire process.
Your application attempts to connect to the protected MCP server.
The SDK detects the need for authentication and automatically opens a
browser window, prompting the user to log in and grant your application
consent.
The user logs in with their identity and approves the permissions (e.g.,
"Allow this agent to spend tokens on my behalf").
Once consent is granted, the browser window closes. The SDK securely
receives an access token in the background and automatically retries the
connection, which now succeeds.
#### SDK Implementation (Interactive Login)
To trigger this flow, simply attempt to connect **without** providing an API key. The SDK handles the rest.
```typescript theme={null}
import { Client } from '@modelcontextprotocol/sdk/client/index.js';
import { StreamableHTTPClientTransport } from '@modelcontextprotocol/sdk/client/streamableHttp.js';
// The URL of the protected service from the App Store
const serviceUrl = 'https://.icp0.io/mcp/';
const client = new Client({ name: 'my-custom-agent', version: '1.0.0' });
// Create the transport WITHOUT any authentication headers
const transport = new StreamableHTTPClientTransport(new URL(serviceUrl));
// This single call handles everything.
// If authentication is needed, it will trigger the browser flow.
await client.connect(transport);
// You are now connected and authenticated.
// The SDK will automatically manage tokens for all subsequent calls.
const result = await client.callTool({ name: 'some_paid_tool' });
```
***
# Discovery
Source: https://docs.prometheusprotocol.org/guides/agent-devs/discovery
How to use the Prometheus App Store to find trusted services and evaluate their on-chain certificate of quality.
The Prometheus App Store is your central hub for discovering services to integrate with your AI agent. But it's more than just a search engine; it's a transparent, on-chain registry that allows you to verify the security and quality of any service before you use it.
### From Discovery to Certificate
After browsing the **[App Store](https://prometheusprotocol.org/audit)** and clicking on a service, you'll land on its App Info page. The most important feature here is the **Prometheus Certificate**, which you can access by clicking the "view certificate" link under the verification badge.
This certificate is the immutable, on-chain proof of the service's quality and security.
### Anatomy of a Prometheus Certificate
The certificate page provides a detailed breakdown of the service's audit results. Let's break down what you're seeing.
# Core Concepts
Source: https://docs.prometheusprotocol.org/core-concepts
How Prometheus provides the Passport, Bank Account, and Marketplace to enable the open agentic web.
The Prometheus Protocol is built on three interconnected pillars that work together to create a self-sustaining, trustworthy economic engine for AI agents. Understanding these concepts is key to understanding the power of the entire ecosystem.
A universal, standards-based authentication layer for both humans and AI
agents.
A decentralized app store and software supply chain to ensure service
quality and security.
A low-friction, programmable payment system designed for machine-to-machine
commerce.
***
## 1. The Passport: Secure Identity & Authorization
#### The Problem
For any economy to function, participants need a reliable way to identify themselves and authorize actions. How does a service know which user—or which AI agent—is making a request? How can a user grant permissions to an agent without handing over their primary credentials?
On the open web, an agent is **blind**—it can't prove who it is, and it can't trust who it's talking to.
#### The Prometheus Solution
Prometheus provides a **unified identity model** built on the user's Principal ID. This single identity can be authenticated using two distinct, purpose-built methods:
* **API Keys:** Long-lived credentials designed for programmatic use by autonomous agents, scripts, and backend services.
* **OAuth 2.1 (JWTs):** A standards-based flow for interactive logins, allowing human users to securely connect to services through a familiar browser-based experience.
This dual approach ensures that both humans and machines can securely interact with services, while developers only need to integrate a single authentication context on their backend.
This is the **universal key** that unlocks the open agentic web.
***
## 2. The Marketplace: Verifiable Trust & Discovery
#### The Problem
The core challenge of an open agent economy is preventing the "accidental emergence" of a chaotic, unsafe ecosystem. In a world of autonomous agents, how do you defend against fraud, malicious actors, and systemic risk without resorting to a centralized "walled garden"? How can you trust a third-party service when there's no central authority to vouch for it?
When AI agents can **manage token allowances, control canister-held funds, and execute cross-chain transactions**, the stakes become existential. A single malicious line in deployed code could drain user funds. Traditional trust signals (brand reputation, app store reviews, star ratings) don't work for this new paradigm.
#### The Prometheus Solution
We built a **fully automated, decentralized verification network** powered by reproducible builds and economic incentives. This is the **trusted marketplace** where agents can find and use services audited by a DAO of staked community members.
##### Automated Reproducible Builds
* **Git-Based Publishing:** Developers submit a Git commit hash, creating an undeniable link to their source code.
* **Docker-Based Verification:** The protocol uses deterministic Docker environments to rebuild the code from source. Multiple independent verifier bots perform these builds automatically—no human intervention required.
* **Cryptographic Proof:** Every build produces a WASM hash. If the hash from the automated rebuild matches the developer's submitted hash, the code is verified. This proves the deployed code matches the audited source.
* **Multiple Independent Verifiers:** Each version requires consensus from 5 of 9 independent verifiers to be marked as verified—providing Byzantine fault tolerance against malicious actors.
##### Economic Incentive Layer (ICRC-126 & ICRC-127)
* **Bounty System:** Developers create bounties (\~\$2.25 per verification) to incentivize automated verification.
* **Verifier Rewards:** Independent verifier bots earn tokens (\$0.25 per verification) for successfully performing reproducible builds and filing cryptographic attestations.
* **Staking & Slashing:** Verifiers must stake USDC collateral (0.30 USDC) to reserve bounties. If they abandon verification, their stake is burned—ensuring accountability.
* **Permissionless Participation:** Anyone can run a verifier bot and earn rewards. The more verifiers, the stronger the security.
##### Security Audits & Tiered Certificates
* **Tiered Audits:** Beyond build verification, a bounty system incentivizes independent security auditors to review the code for vulnerabilities.
* **Prometheus Certificate:** Passing these audits earns the service a certificate with Gold, Silver, or Bronze tier, providing a clear, on-chain signal of its quality and security.
* **Two-Layer Trust:** Build verification proves integrity (deployed = source), while security audits prove safety (source = secure).
***
## 3. The Bank Account: Direct & Efficient Payments
#### The Problem
On the open web, an agent is **broke**—it has no way to pay for services on-chain.
The agentic economy will be powered by **high-frequency micro-transactions**. This enables new economic models like the on-the-fly **"unbundling and rebundling"** of digital goods into hyper-personalized products. Traditional payment systems, with their high fees and slow settlement, are a complete barrier to this future.
#### The Prometheus Solution
Prometheus provides **wallet creation and management for AI agents**, plus a complete suite of agent-operable DeFi primitives.
* **Unified Allowance Pool:** A user grants a service a single, pre-approved spending allowance from their Principal.
* **Flexible Access:** Both API Key-authenticated agents and JWT-authenticated user sessions draw from this same allowance pool, simplifying fund management.
* **Low-Friction M2M Commerce:** This model is perfect for pay-as-you-go billing, enabling direct, programmable, and near-zero fee payments—the fuel for a truly autonomous economy.
* **DeFi Primitives:** Core wallet functionality, decentralized exchanges, market intelligence, and earning/speculation tools—everything an agent needs to manage capital and generate returns.
## The Flywheel Effect
These three pillars create a powerful flywheel for the open agentic web.
Our **Verifiable Trust** layer solves the safety problem, giving users the confidence to empower their agents. This confidence unlocks **Secure Identity** and **Direct Payments**, which in turn fuels a vibrant, competitive, and open **"Web of Agents."**
In short, we provide the trust that makes the open economy possible.
# Authenticating
Source: https://docs.prometheusprotocol.org/guides/agent-devs/authenticating
How to generate and use API keys to allow your agent to access protected or paid services.
Many services in the App Store, especially those that require payment, are protected. To use them, your agent must present a valid credential.
The primary method for programmatic clients like AI agents is a long-lived **API Key**. However, for user-facing applications (like a desktop app or IDE plugin), a browser-based **OAuth 2.1 Login** flow is also supported. This guide covers both.
### Primary Method: API Keys for Autonomous Agents
This process is designed for non-interactive use cases like backend services or autonomous agents. As the user running the agent, you will perform a one-time setup in the App Store UI to provision a key. Your agent then uses this key for all subsequent requests.
Before your agent can use a paid service, you must authorize it to spend funds on your behalf. This is done by setting an allowance.
1. Navigate to the service's detail page in the Prometheus App Store.
2. Find the "Access & Billing" section.
3. Click "Manage Allowance" and approve a spending limit with your wallet. This is a non-custodial `icrc2_approve` transaction; funds remain in your wallet until they are spent.
Once the allowance is set, you can create an API key.
1. In the same "Access & Billing" section, click "Create API Key".
2. Give the key a descriptive name (e.g., "My-Claude-Agent-Key").
3. The new key will be displayed on your screen.
**Copy this key immediately and store it securely!** For your security, this is the only time the full key will be visible.
With the API key copied, the final step is to provide it to your agent or SDK. The key must be sent in the `x-api-key` header of every request.
#### SDK Implementation (API Key)
If you are building a custom client with the `@modelcontextprotocol/sdk`, you provide the API key when you create the transport layer.
```typescript theme={null}
import { Client } from '@modelcontextprotocol/sdk/client/index.js';
import { StreamableHTTPClientTransport } from '@modelcontextprotocol/sdk/client/streamableHttp.js';
// The URL of the protected service from the App Store
const serviceUrl = 'https://.icp0.io/mcp/';
// Your securely stored API key
const apiKey = 'prom_sk_123abc...';
const client = new Client({ name: 'my-custom-agent', version: '1.0.0' });
// Pass the API key in the 'x-api-key' header when creating the transport
const transport = new StreamableHTTPClientTransport(new URL(serviceUrl), {
headers: {
'x-api-key': apiKey,
},
});
// This call now connects directly without any browser interaction.
await client.connect(transport);
```
***
### Optional: Interactive Login for User-Facing Applications
While API keys are ideal for autonomous agents, the Prometheus SDK also supports a browser-based OAuth 2.1 flow. This method is designed for applications where a **user is present** to interactively log in and grant consent.
#### The Seamless Login Flow
You do not need to manually register clients or handle tokens. The SDK manages the entire process.
Your application attempts to connect to the protected MCP server.
The SDK detects the need for authentication and automatically opens a
browser window, prompting the user to log in and grant your application
consent.
The user logs in with their identity and approves the permissions (e.g.,
"Allow this agent to spend tokens on my behalf").
Once consent is granted, the browser window closes. The SDK securely
receives an access token in the background and automatically retries the
connection, which now succeeds.
#### SDK Implementation (Interactive Login)
To trigger this flow, simply attempt to connect **without** providing an API key. The SDK handles the rest.
```typescript theme={null}
import { Client } from '@modelcontextprotocol/sdk/client/index.js';
import { StreamableHTTPClientTransport } from '@modelcontextprotocol/sdk/client/streamableHttp.js';
// The URL of the protected service from the App Store
const serviceUrl = 'https://.icp0.io/mcp/';
const client = new Client({ name: 'my-custom-agent', version: '1.0.0' });
// Create the transport WITHOUT any authentication headers
const transport = new StreamableHTTPClientTransport(new URL(serviceUrl));
// This single call handles everything.
// If authentication is needed, it will trigger the browser flow.
await client.connect(transport);
// You are now connected and authenticated.
// The SDK will automatically manage tokens for all subsequent calls.
const result = await client.callTool({ name: 'some_paid_tool' });
```
***
# Discovery
Source: https://docs.prometheusprotocol.org/guides/agent-devs/discovery
How to use the Prometheus App Store to find trusted services and evaluate their on-chain certificate of quality.
The Prometheus App Store is your central hub for discovering services to integrate with your AI agent. But it's more than just a search engine; it's a transparent, on-chain registry that allows you to verify the security and quality of any service before you use it.
### From Discovery to Certificate
After browsing the **[App Store](https://prometheusprotocol.org/audit)** and clicking on a service, you'll land on its App Info page. The most important feature here is the **Prometheus Certificate**, which you can access by clicking the "view certificate" link under the verification badge.
This certificate is the immutable, on-chain proof of the service's quality and security.
### Anatomy of a Prometheus Certificate
The certificate page provides a detailed breakdown of the service's audit results. Let's break down what you're seeing.
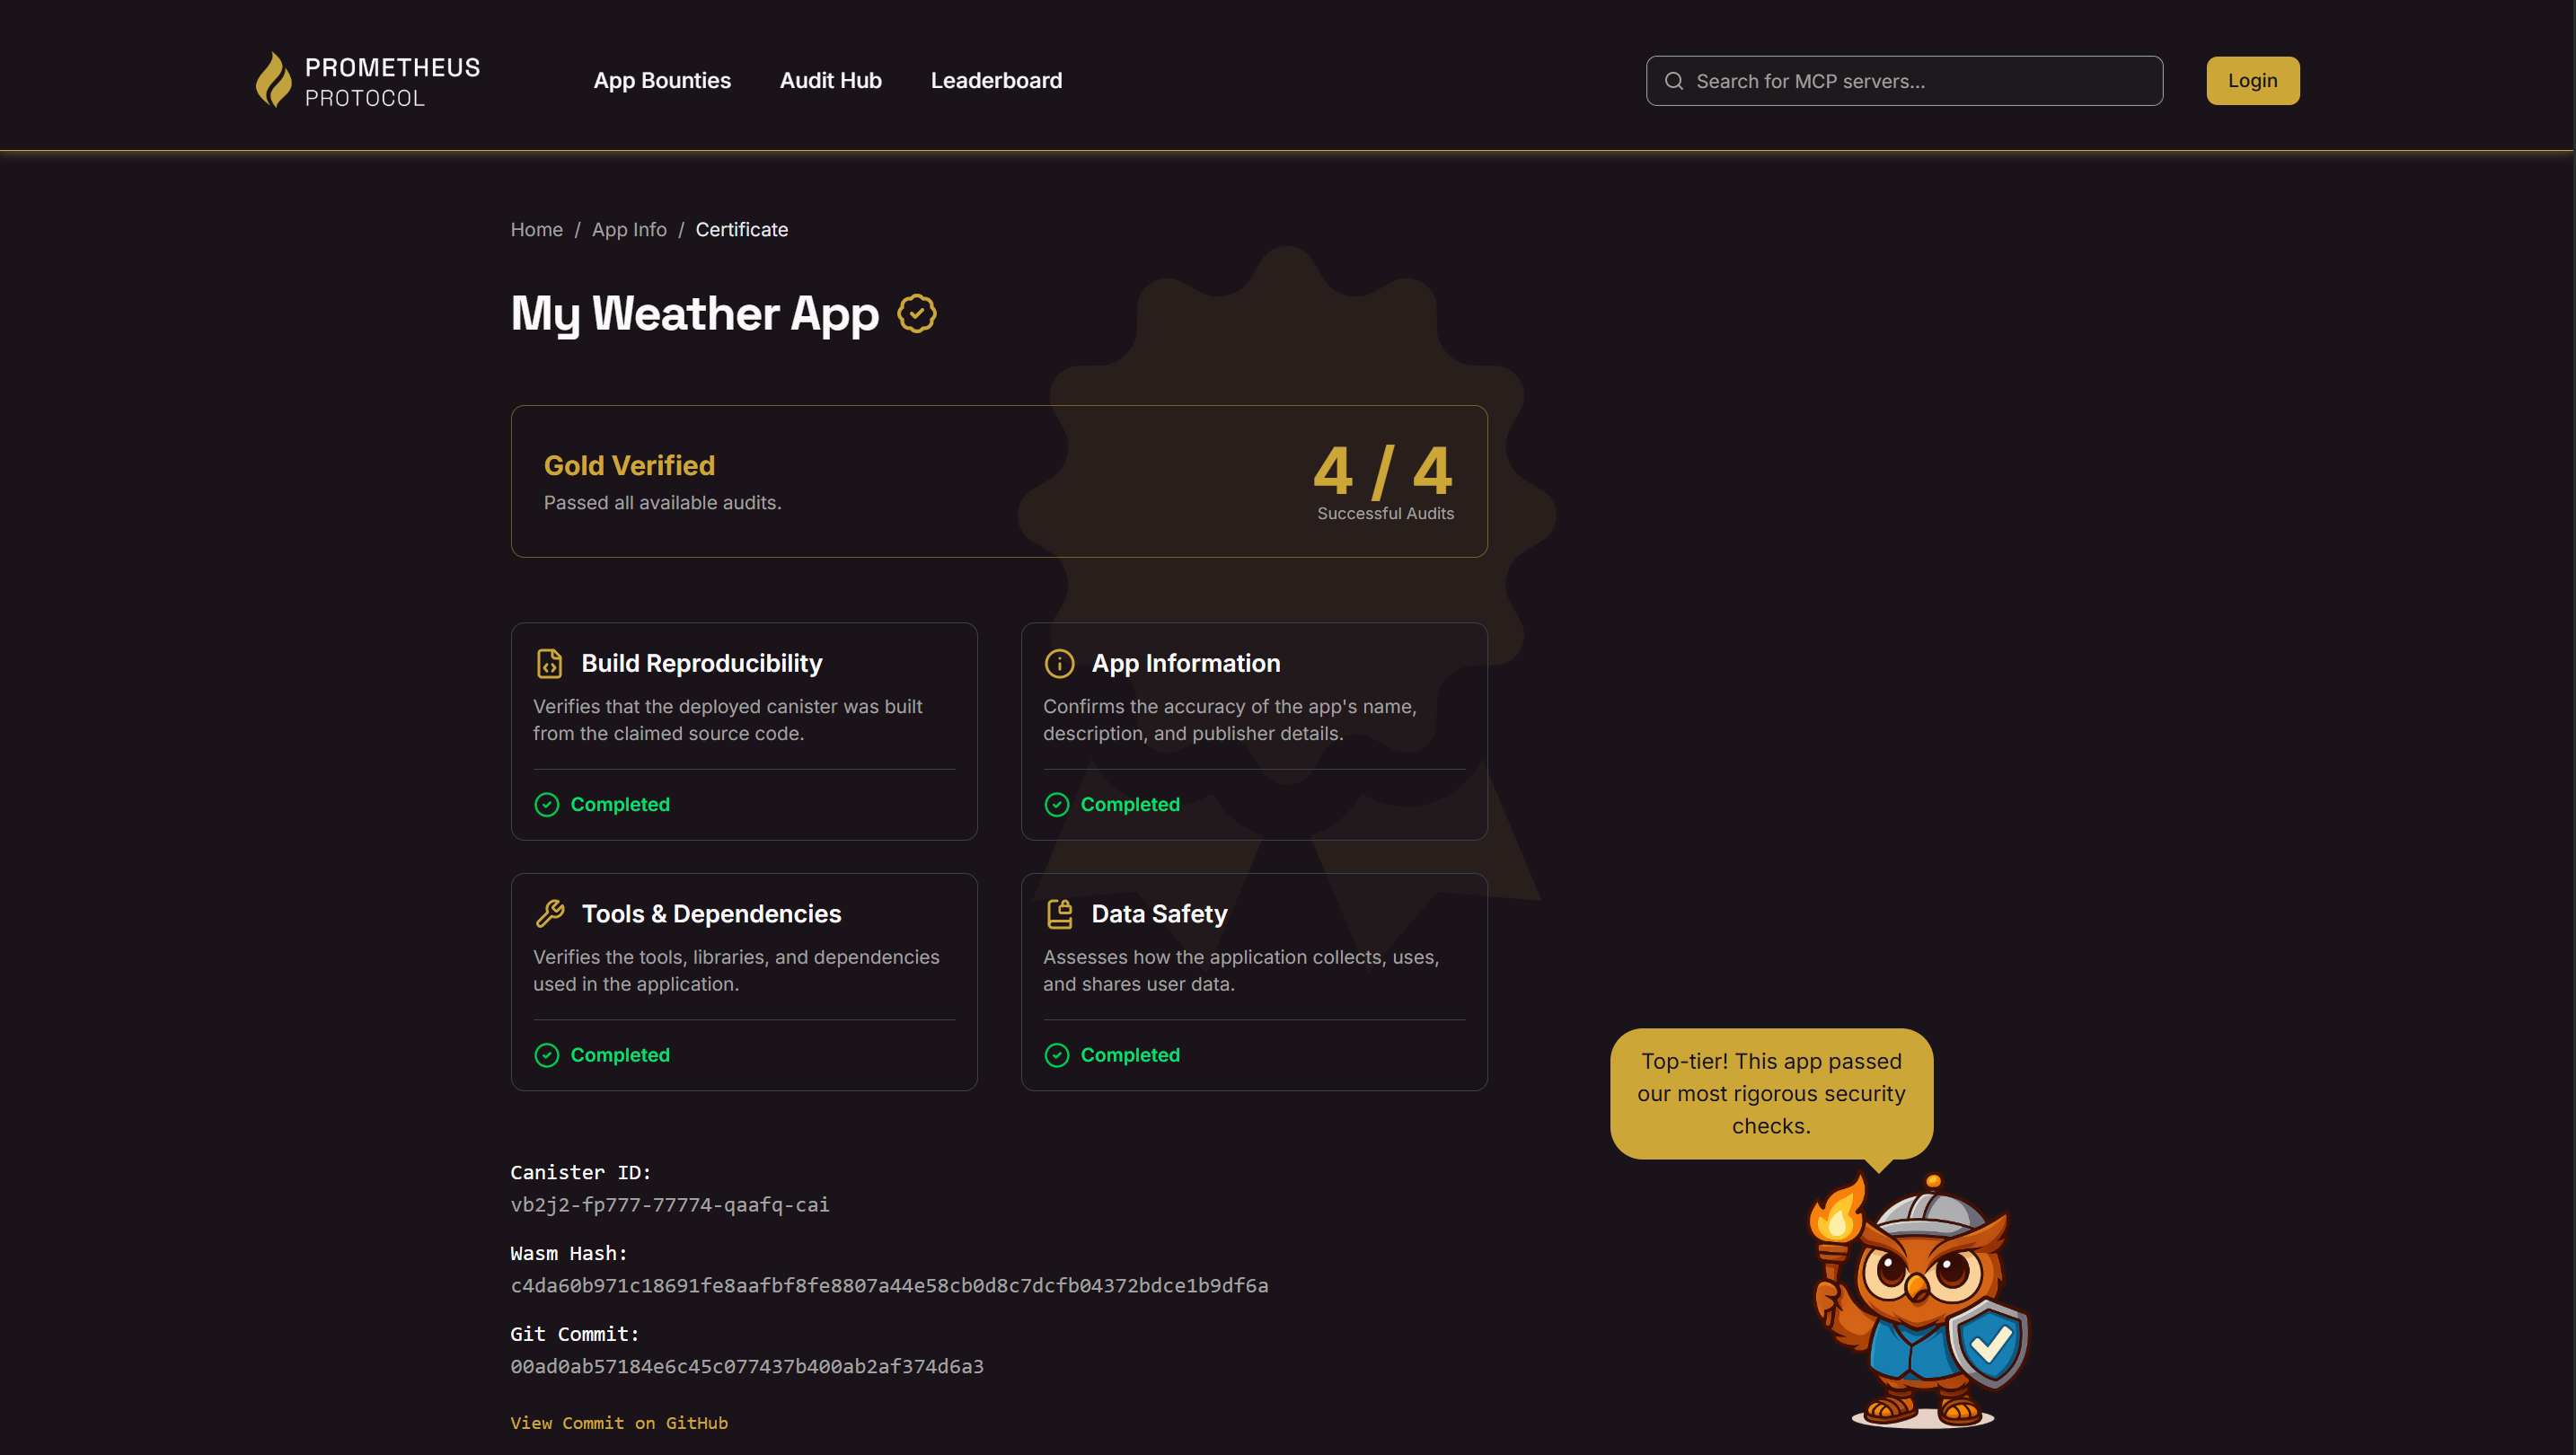 An example of a "Gold Verified" Prometheus Certificate.
When evaluating a certificate, focus on these key areas:
1. **Verification Tier:**
The badge at the top represents the service's overall level of trust, based on the audits it has passed.
* **Gold:** The highest tier. The service has a reproducible build and has passed all declarative audits, including App Information, Tools & Dependencies, and Data Safety.
* **Silver:** A high level of trust. The service has a reproducible build and has passed audits for App Information and Tools & Dependencies.
* **Bronze:** The foundational tier of trust. The service has a reproducible build and has passed the App Information audit.
* **Unranked:** The service has not yet passed the minimum audits required for a Bronze tier.
2. **Audit Checklist:**
This section shows the status of individual, declarative audits. A service must pass a specific combination of these to achieve a verification tier.
* **Build Reproducibility:** Verifies that the deployed canister was built from the claimed source code. This is the cornerstone of on-chain trust and is required for any tier.
* **App Information:** Confirms the accuracy of the app's name, description, and publisher details.
* **Tools & Dependencies:** Verifies the tools, libraries, and dependencies used in the application.
* **Data Safety:** Assesses how the application collects, uses, and shares user data.
3. **Cryptographic Provenance:**
This is the core of the on-chain trust. It provides a verifiable link between the source code, the compiled code, and the running service.
* **Wasm Hash:** The unique cryptographic fingerprint of the compiled code that was audited and deployed.
* **Git Commit:** The specific commit hash from the source code repository that corresponds to the deployed Wasm. You can click **"View Commit on GitHub"** to inspect the exact source code that was audited.
* **Canister ID:** The on-chain address of the live, running service.
A strong Prometheus Certificate, with a high verification tier and complete provenance data, is your guarantee that the service you're about to use is exactly what it claims to be.
***
After you've discovered a service and verified its trustworthiness, the next step is to connect to it. If the service requires payment or authentication, you'll need to generate credentials to connect.
# Overview
Source: https://docs.prometheusprotocol.org/guides/agent-devs/overview
Connect your AI agent to a universe of trusted, verified tools from the Prometheus App Store.
Welcome! This guide is for anyone who wants to connect an AI application to the powerful, verified services available in the Prometheus App Store.
The core problem for any advanced AI is trust. How can your agent safely use a third-party tool without risking data integrity or security? The Prometheus Protocol solves this by providing a decentralized App Store of services that have undergone a rigorous, on-chain verification process.
There are two primary ways to connect to these services, depending on your needs.
The most common method. If you use an application that already supports MCP,
you just need to find a service and follow the guided setup.
For advanced integration, you can use our TypeScript SDK to build a native
MCP client directly into your application.
***
### Connecting via an Existing Application
Dozens of popular AI applications and developer tools already support the Model Context Protocol (MCP). This includes clients like:
* Claude (Desktop & Code)
* Cursor
* Gemini CLI
* Raycast
* VS Code (via extensions)
* And many more...
For these applications, the process is incredibly simple, as the App Store provides tailored instructions for each one.
Browse the **[Prometheus App Store](https://prometheusprotocol.org)** to
find a service with the tools your agent needs.
On the service's detail page, click the prominent **Connect** button. This
will open a modal window with specific setup instructions.
Inside the modal, you'll see a series of tabs for different MCP clients
(e.g., Cursor, VS Code, Claude Desktop). Select the tab corresponding to
your application.
The App Store will provide the exact steps and, in most cases, a
pre-configured JSON snippet for you to copy and paste directly into your
application's settings.
An example of a "Gold Verified" Prometheus Certificate.
When evaluating a certificate, focus on these key areas:
1. **Verification Tier:**
The badge at the top represents the service's overall level of trust, based on the audits it has passed.
* **Gold:** The highest tier. The service has a reproducible build and has passed all declarative audits, including App Information, Tools & Dependencies, and Data Safety.
* **Silver:** A high level of trust. The service has a reproducible build and has passed audits for App Information and Tools & Dependencies.
* **Bronze:** The foundational tier of trust. The service has a reproducible build and has passed the App Information audit.
* **Unranked:** The service has not yet passed the minimum audits required for a Bronze tier.
2. **Audit Checklist:**
This section shows the status of individual, declarative audits. A service must pass a specific combination of these to achieve a verification tier.
* **Build Reproducibility:** Verifies that the deployed canister was built from the claimed source code. This is the cornerstone of on-chain trust and is required for any tier.
* **App Information:** Confirms the accuracy of the app's name, description, and publisher details.
* **Tools & Dependencies:** Verifies the tools, libraries, and dependencies used in the application.
* **Data Safety:** Assesses how the application collects, uses, and shares user data.
3. **Cryptographic Provenance:**
This is the core of the on-chain trust. It provides a verifiable link between the source code, the compiled code, and the running service.
* **Wasm Hash:** The unique cryptographic fingerprint of the compiled code that was audited and deployed.
* **Git Commit:** The specific commit hash from the source code repository that corresponds to the deployed Wasm. You can click **"View Commit on GitHub"** to inspect the exact source code that was audited.
* **Canister ID:** The on-chain address of the live, running service.
A strong Prometheus Certificate, with a high verification tier and complete provenance data, is your guarantee that the service you're about to use is exactly what it claims to be.
***
After you've discovered a service and verified its trustworthiness, the next step is to connect to it. If the service requires payment or authentication, you'll need to generate credentials to connect.
# Overview
Source: https://docs.prometheusprotocol.org/guides/agent-devs/overview
Connect your AI agent to a universe of trusted, verified tools from the Prometheus App Store.
Welcome! This guide is for anyone who wants to connect an AI application to the powerful, verified services available in the Prometheus App Store.
The core problem for any advanced AI is trust. How can your agent safely use a third-party tool without risking data integrity or security? The Prometheus Protocol solves this by providing a decentralized App Store of services that have undergone a rigorous, on-chain verification process.
There are two primary ways to connect to these services, depending on your needs.
The most common method. If you use an application that already supports MCP,
you just need to find a service and follow the guided setup.
For advanced integration, you can use our TypeScript SDK to build a native
MCP client directly into your application.
***
### Connecting via an Existing Application
Dozens of popular AI applications and developer tools already support the Model Context Protocol (MCP). This includes clients like:
* Claude (Desktop & Code)
* Cursor
* Gemini CLI
* Raycast
* VS Code (via extensions)
* And many more...
For these applications, the process is incredibly simple, as the App Store provides tailored instructions for each one.
Browse the **[Prometheus App Store](https://prometheusprotocol.org)** to
find a service with the tools your agent needs.
On the service's detail page, click the prominent **Connect** button. This
will open a modal window with specific setup instructions.
Inside the modal, you'll see a series of tabs for different MCP clients
(e.g., Cursor, VS Code, Claude Desktop). Select the tab corresponding to
your application.
The App Store will provide the exact steps and, in most cases, a
pre-configured JSON snippet for you to copy and paste directly into your
application's settings.
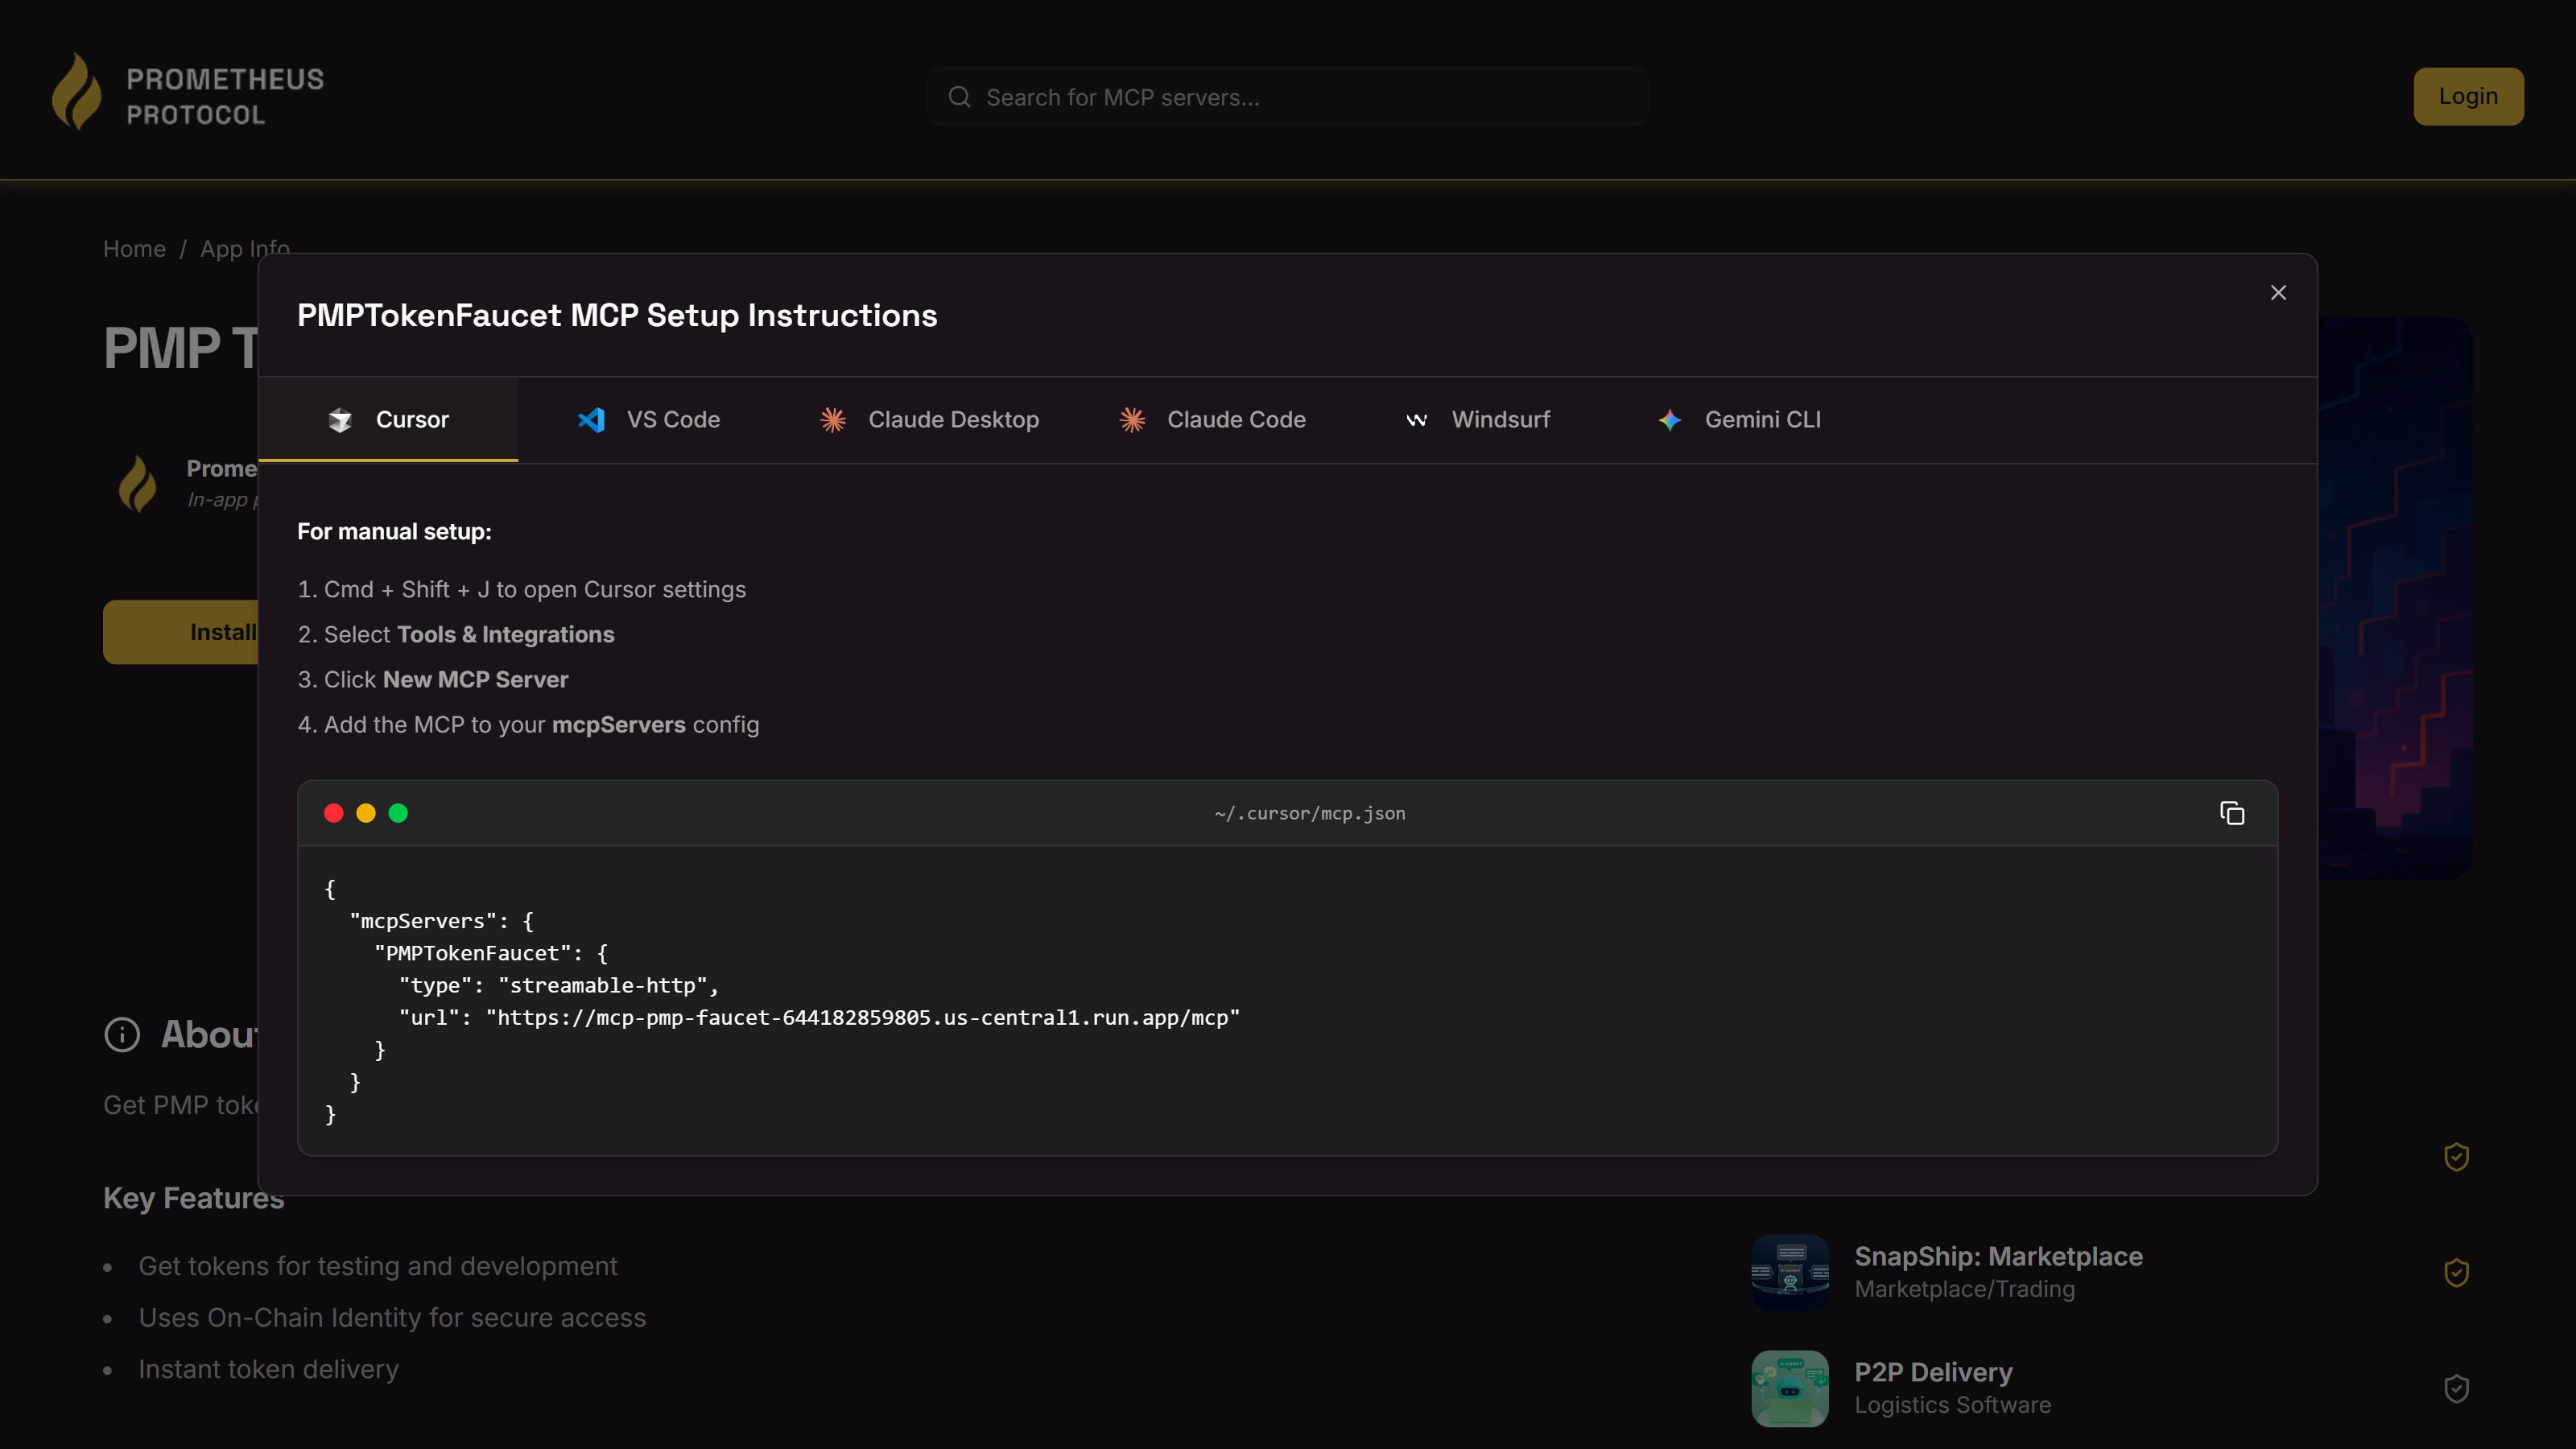 The 'Connect' modal provides specific, copy-pasteable instructions for each
supported MCP client.
***
### Building a Custom MCP Client (Advanced)
If you are developing your own AI agent or application from scratch, you can implement a native MCP client for the deepest level of integration.
The `@modelcontextprotocol/sdk` provides the necessary tools:
```bash theme={null}
npm install @modelcontextprotocol/sdk
```
All Prometheus-verified services use a `StreamableHTTPClientTransport`. The following code snippet is the correct way to establish a connection, including a fallback to the older SSE transport for compatibility.
```typescript theme={null}
import { Client } from '@modelcontextprotocol/sdk/client/index.js';
import { StreamableHTTPClientTransport } from '@modelcontextprotocol/sdk/client/streamableHttp.js';
import { SSEClientTransport } from '@modelcontextprotocol/sdk/client/sse.js';
async function connectToService(url: string) {
const baseUrl = new URL(url);
let client: Client | undefined = undefined;
try {
// Primary Method: Streamable HTTP
client = new Client({
name: 'my-custom-agent',
version: '1.0.0',
});
const transport = new StreamableHTTPClientTransport(baseUrl);
await client.connect(transport);
console.log('Connected using Streamable HTTP transport');
} catch (error) {
// Fallback Method: SSE
console.log(
'Streamable HTTP connection failed, falling back to SSE transport',
);
client = new Client({
name: 'my-custom-agent-sse',
version: '1.0.0',
});
const sseTransport = new SSEClientTransport(baseUrl);
await client.connect(sseTransport);
console.log('Connected using SSE transport');
}
return client;
}
```
Once connected, you can use the `client` object to interact with the service's tools, prompts, and resources as shown in the **[MCP TypeScript SDK reference](https://github.com/modelcontextprotocol/typescript-sdk)**.
# Payments
Source: https://docs.prometheusprotocol.org/guides/agent-devs/payments
Understand the user-controlled token allowance system for using paid tools.
Many services in the App Store are monetized. The Prometheus Protocol handles this through a secure and user-friendly **token allowance system**. As an agent developer or user, it's important to understand this flow.
The core principle is that **the user is always in control**. A service can never take funds without explicit permission. This permission is granted by the user in the form of an "allowance"—a specific amount of a token that a specific service is allowed to withdraw over time.
### The Proactive Approach: Allocation During Login
The easiest way to handle payments is during the initial authentication flow.
When a user connects to a *paid* service for the first time, the OAuth consent screen will include an extra, optional step for payment allocation.
After the standard login and consent, the user will be prompted to set an
allowance for the service.
A dropdown will show the token(s) the service accepts.
The user enters an amount, setting the maximum total that the service can
draw from their wallet for future tool calls.
By setting an allowance up-front, all subsequent paid tool calls will work seamlessly until the allowance is depleted.
### The Reactive Approach: Handling Insufficient Funds
What happens if a user skips the initial allocation, or if their allowance runs out?
In this case, a call to a paid tool will fail, but it will fail gracefully. The MCP server will return a text message explaining the situation and providing a direct link to the **Prometheus Approvals Dashboard**.
This response will include a direct link to the **Prometheus Approvals
Dashboard**, a secure web application where the user can manage their
allowances for all services.
# Finding Audits
Source: https://docs.prometheusprotocol.org/guides/auditors/finding-audits
How to use the Audit Hub to find and select services to audit.
The Audit Hub is your central marketplace for work within the Prometheus ecosystem. It's a real-time, on-chain queue of all services that have been submitted by developers and are awaiting verification.
### Anatomy of an Audit Listing
When you navigate to the Audit Hub, the "Open Bounties" tab shows all the individual audit tasks that are available to be claimed. Each item in this list provides the key information you need to decide if you want to take on the job.
The 'Connect' modal provides specific, copy-pasteable instructions for each
supported MCP client.
***
### Building a Custom MCP Client (Advanced)
If you are developing your own AI agent or application from scratch, you can implement a native MCP client for the deepest level of integration.
The `@modelcontextprotocol/sdk` provides the necessary tools:
```bash theme={null}
npm install @modelcontextprotocol/sdk
```
All Prometheus-verified services use a `StreamableHTTPClientTransport`. The following code snippet is the correct way to establish a connection, including a fallback to the older SSE transport for compatibility.
```typescript theme={null}
import { Client } from '@modelcontextprotocol/sdk/client/index.js';
import { StreamableHTTPClientTransport } from '@modelcontextprotocol/sdk/client/streamableHttp.js';
import { SSEClientTransport } from '@modelcontextprotocol/sdk/client/sse.js';
async function connectToService(url: string) {
const baseUrl = new URL(url);
let client: Client | undefined = undefined;
try {
// Primary Method: Streamable HTTP
client = new Client({
name: 'my-custom-agent',
version: '1.0.0',
});
const transport = new StreamableHTTPClientTransport(baseUrl);
await client.connect(transport);
console.log('Connected using Streamable HTTP transport');
} catch (error) {
// Fallback Method: SSE
console.log(
'Streamable HTTP connection failed, falling back to SSE transport',
);
client = new Client({
name: 'my-custom-agent-sse',
version: '1.0.0',
});
const sseTransport = new SSEClientTransport(baseUrl);
await client.connect(sseTransport);
console.log('Connected using SSE transport');
}
return client;
}
```
Once connected, you can use the `client` object to interact with the service's tools, prompts, and resources as shown in the **[MCP TypeScript SDK reference](https://github.com/modelcontextprotocol/typescript-sdk)**.
# Payments
Source: https://docs.prometheusprotocol.org/guides/agent-devs/payments
Understand the user-controlled token allowance system for using paid tools.
Many services in the App Store are monetized. The Prometheus Protocol handles this through a secure and user-friendly **token allowance system**. As an agent developer or user, it's important to understand this flow.
The core principle is that **the user is always in control**. A service can never take funds without explicit permission. This permission is granted by the user in the form of an "allowance"—a specific amount of a token that a specific service is allowed to withdraw over time.
### The Proactive Approach: Allocation During Login
The easiest way to handle payments is during the initial authentication flow.
When a user connects to a *paid* service for the first time, the OAuth consent screen will include an extra, optional step for payment allocation.
After the standard login and consent, the user will be prompted to set an
allowance for the service.
A dropdown will show the token(s) the service accepts.
The user enters an amount, setting the maximum total that the service can
draw from their wallet for future tool calls.
By setting an allowance up-front, all subsequent paid tool calls will work seamlessly until the allowance is depleted.
### The Reactive Approach: Handling Insufficient Funds
What happens if a user skips the initial allocation, or if their allowance runs out?
In this case, a call to a paid tool will fail, but it will fail gracefully. The MCP server will return a text message explaining the situation and providing a direct link to the **Prometheus Approvals Dashboard**.
This response will include a direct link to the **Prometheus Approvals
Dashboard**, a secure web application where the user can manage their
allowances for all services.
# Finding Audits
Source: https://docs.prometheusprotocol.org/guides/auditors/finding-audits
How to use the Audit Hub to find and select services to audit.
The Audit Hub is your central marketplace for work within the Prometheus ecosystem. It's a real-time, on-chain queue of all services that have been submitted by developers and are awaiting verification.
### Anatomy of an Audit Listing
When you navigate to the Audit Hub, the "Open Bounties" tab shows all the individual audit tasks that are available to be claimed. Each item in this list provides the key information you need to decide if you want to take on the job.
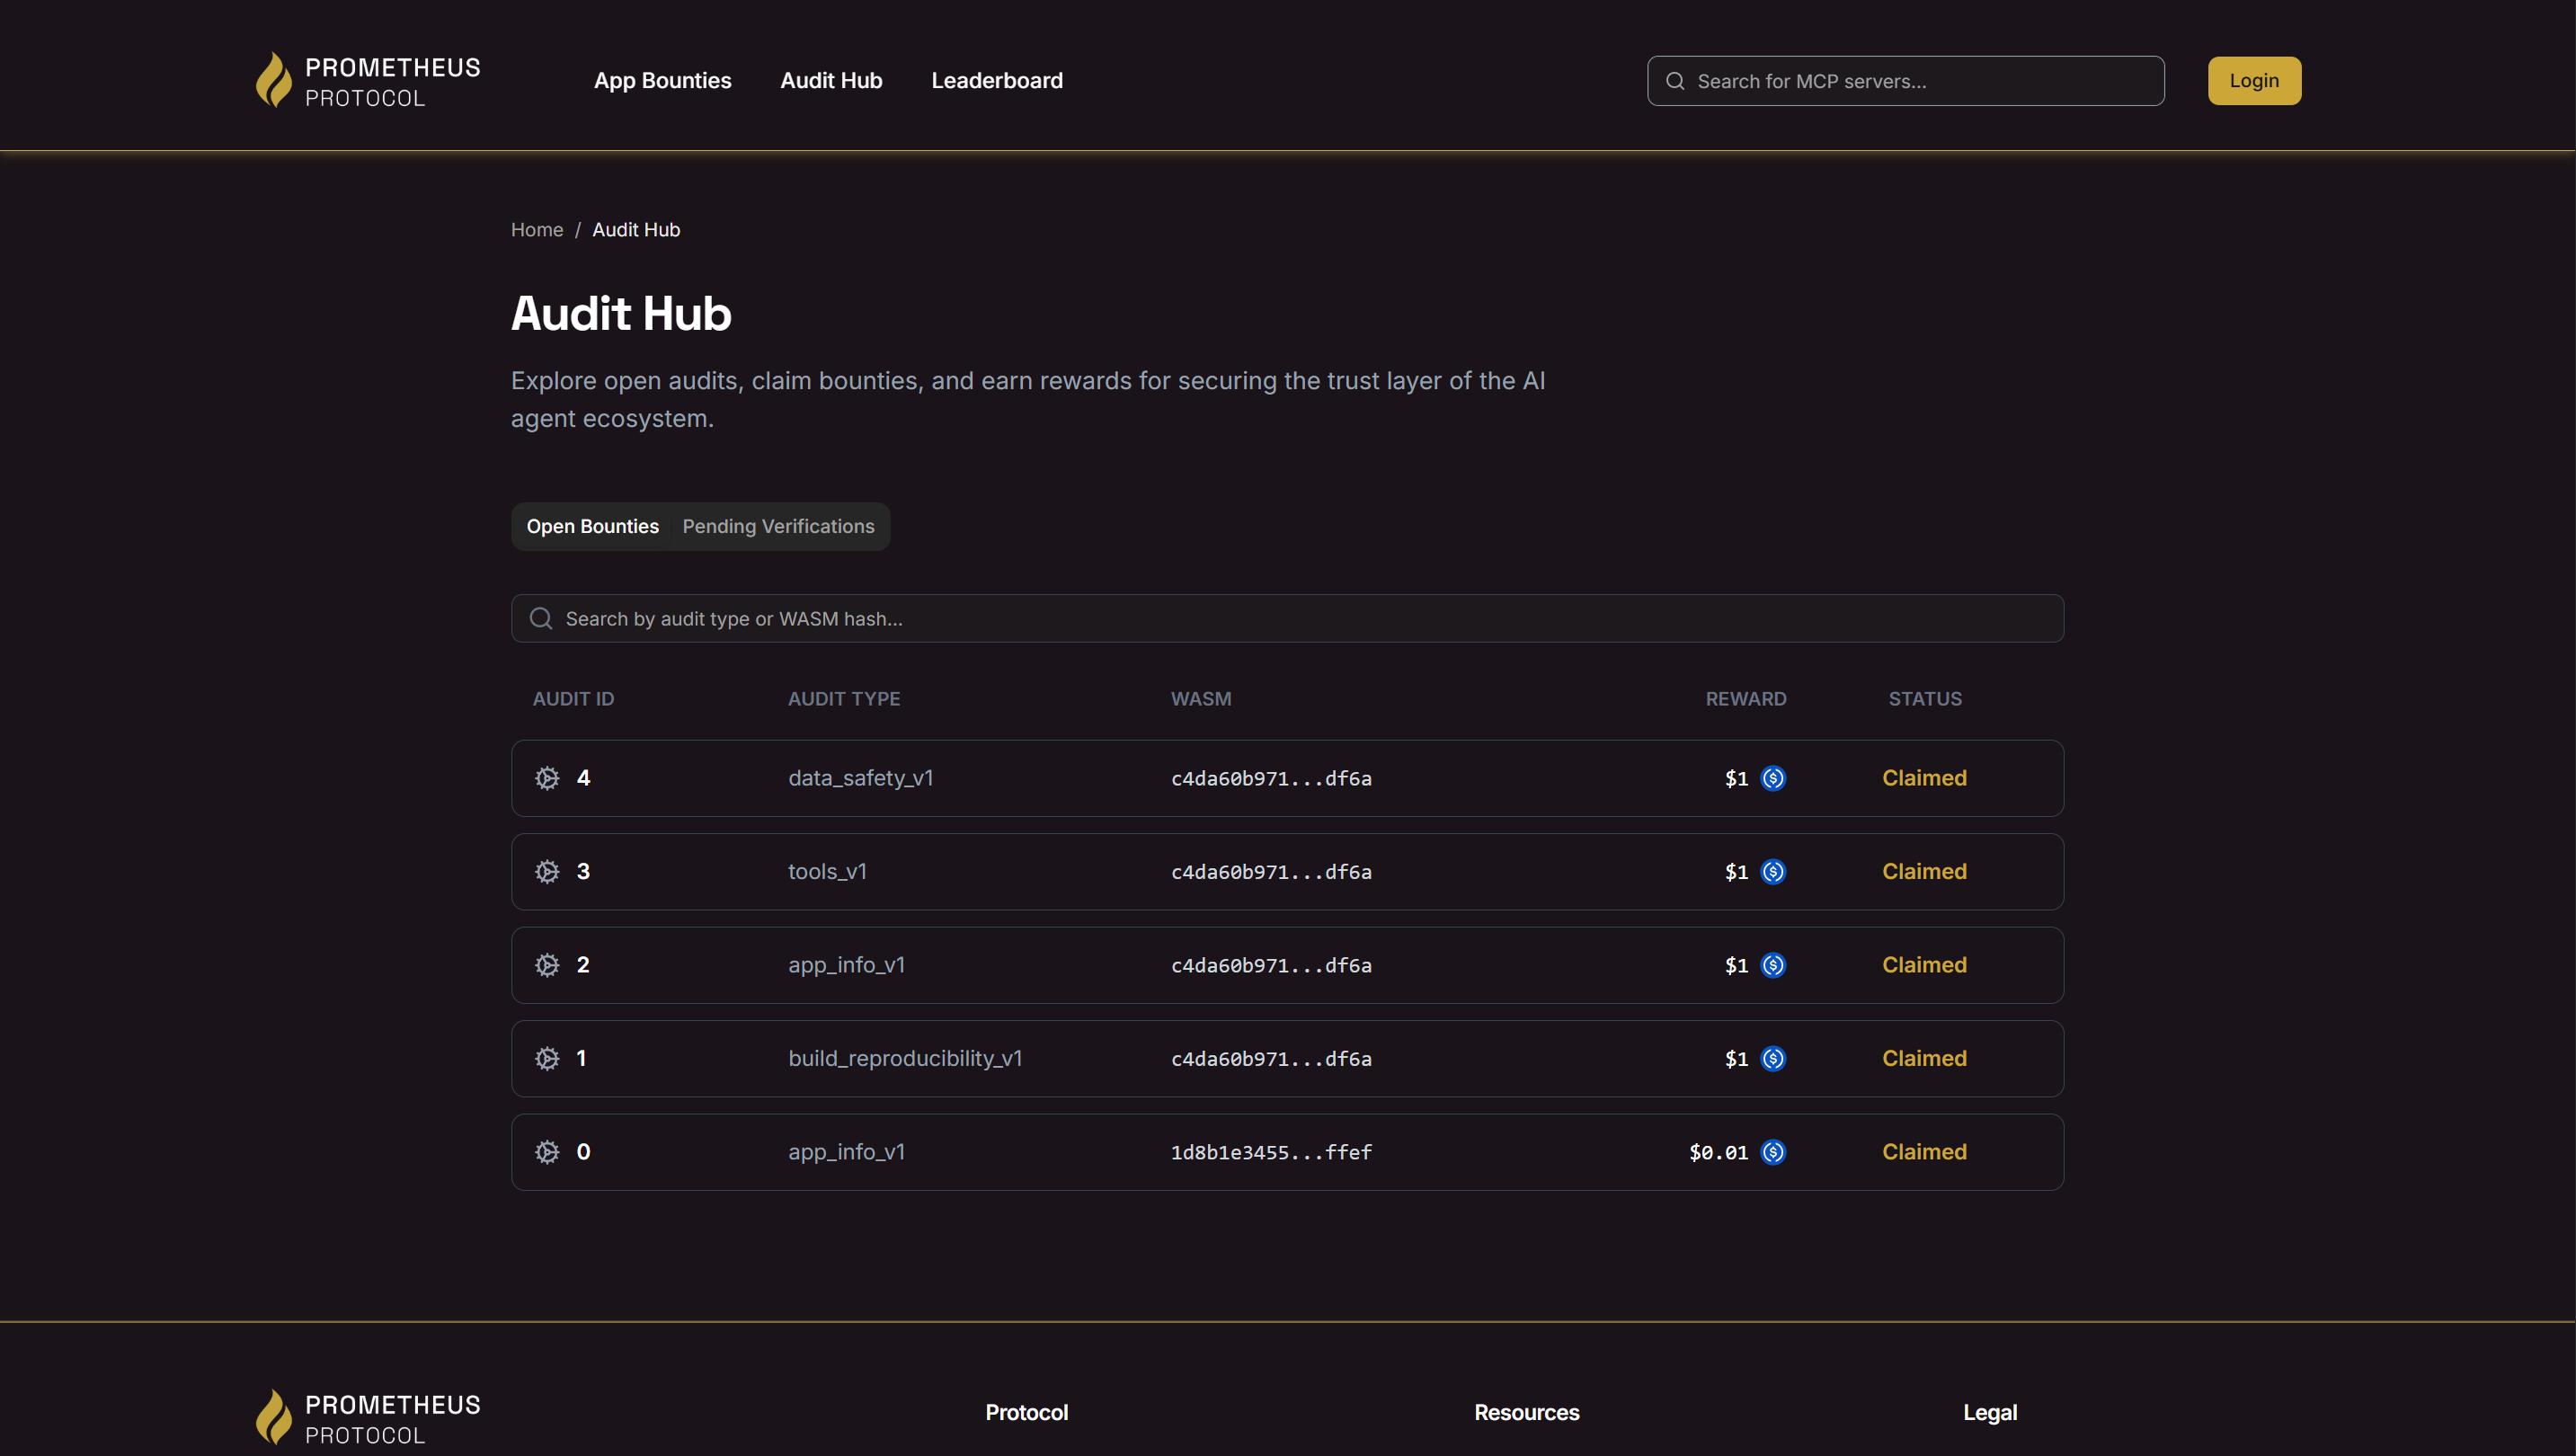 The Audit Hub, showing a list of open and claimed bounties.
Here’s a breakdown of the columns in the list:
* **AUDIT ID:** A unique identifier for this specific audit bounty.
* **AUDIT TYPE:** The specific declarative audit required (e.g., `data_safety_v1`, `build_reproducibility_v1`). This tells you what kind of review is needed.
* **WASM:** The cryptographic hash of the compiled code that needs to be audited. You'll notice that multiple audit types can be associated with the same WASM hash; these are all part of the verification process for a single service version.
* **REWARD:** The bounty you will earn for successfully completing the audit.
* **STATUS:** The current state of the audit.
* **Open:** The audit is available for any qualified auditor to claim. (Note: The screenshot shows claimed audits, but open ones will appear similarly).
* **Claimed:** The audit has been reserved by another auditor.
You can use the search bar to filter by a specific audit type or WASM hash to find work that matches your skills and interests.
***
Once you've found an audit you want to perform, the next step is to claim it.
# Managing Your Profile
Source: https://docs.prometheusprotocol.org/guides/auditors/managing-your-profile
How to access your account details, check your earnings, and view your audit history.
Once you've logged in to the Prometheus Protocol, you can easily access your account information and track your audit performance directly from the main navigation.
### The Account Menu
Instead of a separate dashboard page, all your key information is available in the account dropdown menu. By clicking on your profile icon in the top-right corner, you can open this menu for a quick summary of your status.
The Audit Hub, showing a list of open and claimed bounties.
Here’s a breakdown of the columns in the list:
* **AUDIT ID:** A unique identifier for this specific audit bounty.
* **AUDIT TYPE:** The specific declarative audit required (e.g., `data_safety_v1`, `build_reproducibility_v1`). This tells you what kind of review is needed.
* **WASM:** The cryptographic hash of the compiled code that needs to be audited. You'll notice that multiple audit types can be associated with the same WASM hash; these are all part of the verification process for a single service version.
* **REWARD:** The bounty you will earn for successfully completing the audit.
* **STATUS:** The current state of the audit.
* **Open:** The audit is available for any qualified auditor to claim. (Note: The screenshot shows claimed audits, but open ones will appear similarly).
* **Claimed:** The audit has been reserved by another auditor.
You can use the search bar to filter by a specific audit type or WASM hash to find work that matches your skills and interests.
***
Once you've found an audit you want to perform, the next step is to claim it.
# Managing Your Profile
Source: https://docs.prometheusprotocol.org/guides/auditors/managing-your-profile
How to access your account details, check your earnings, and view your audit history.
Once you've logged in to the Prometheus Protocol, you can easily access your account information and track your audit performance directly from the main navigation.
### The Account Menu
Instead of a separate dashboard page, all your key information is available in the account dropdown menu. By clicking on your profile icon in the top-right corner, you can open this menu for a quick summary of your status.
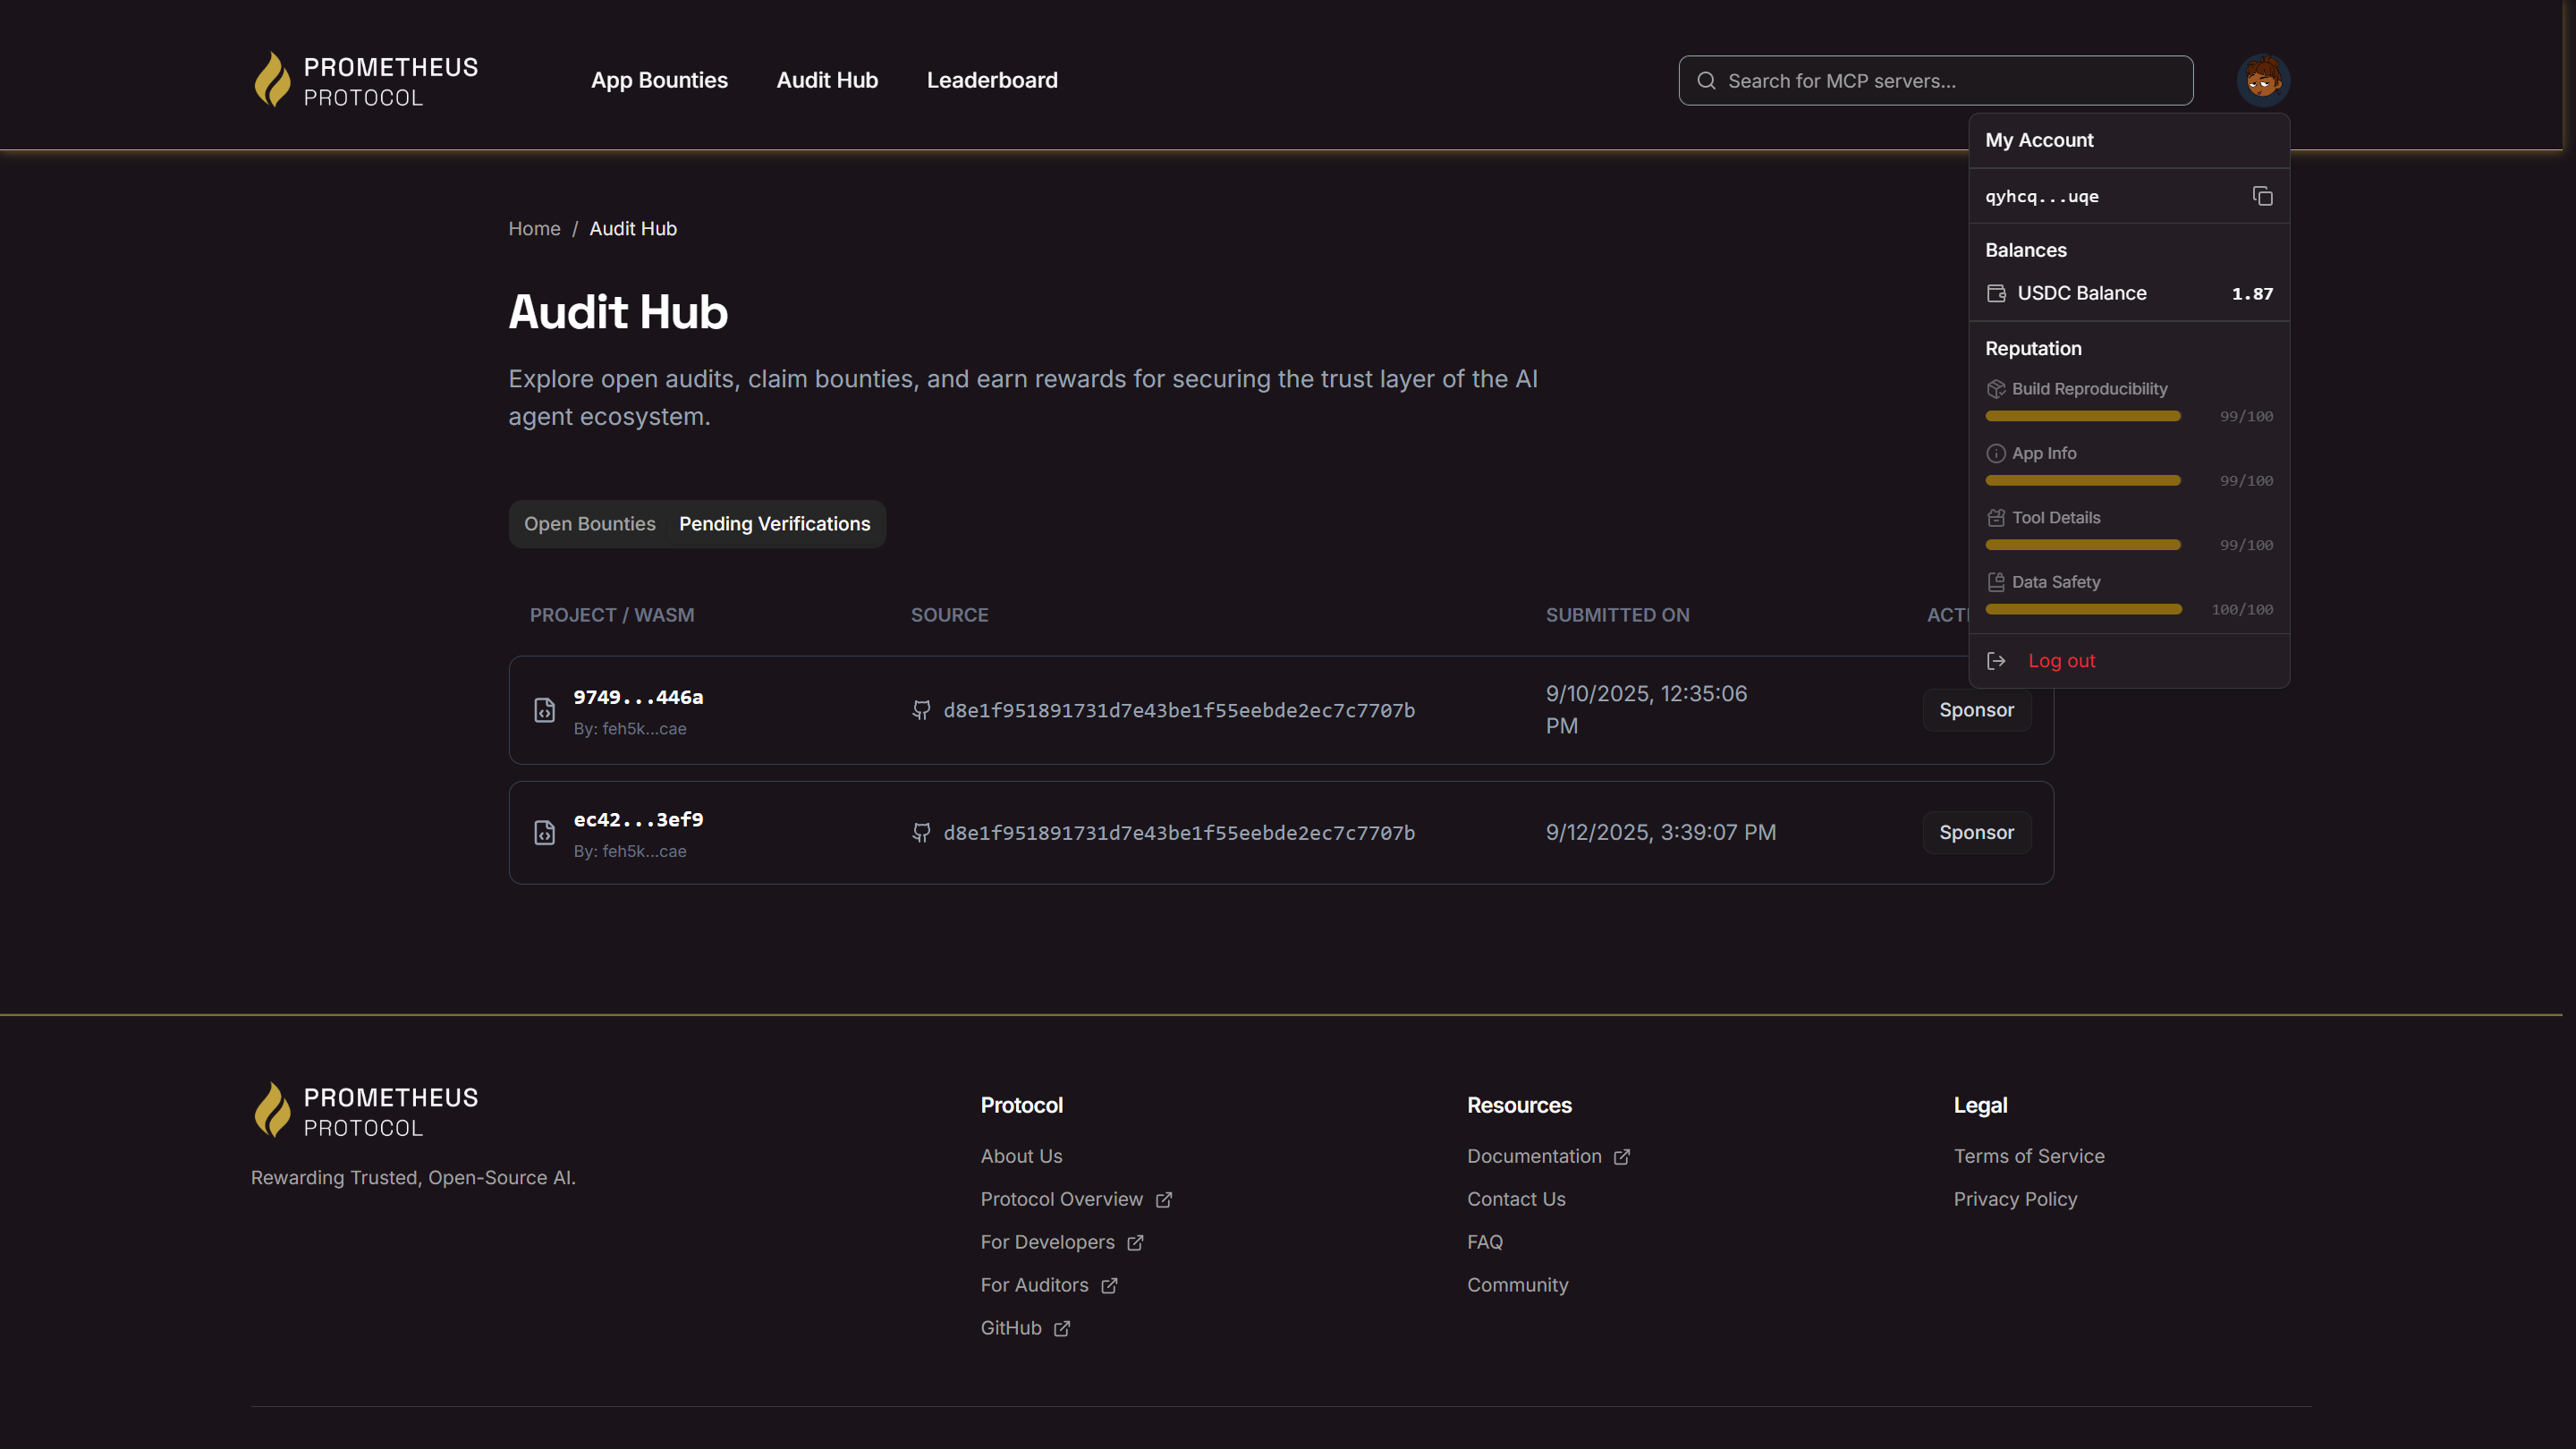 The account menu provides an at-a-glance view of your balances and audit history.
Here’s a breakdown of what you'll find in the menu:
* **My Account:** This section displays your full Principal ID, which acts as your unique identifier across the protocol. You can easily copy it to your clipboard.
* **Balances:** This shows your current balance of USDC and other tokens available in your connected wallet.
* **Audit History:** View your completed audits, pending reviews, and earned rewards. This provides a real-time record of your contributions to the ecosystem.
* **Performance Metrics:** Track your audit success rate, average completion time, and total earnings over time.
This menu gives you a real-time, consolidated view of your activity and earnings within the Prometheus ecosystem.
# Overview
Source: https://docs.prometheusprotocol.org/guides/auditors/overview
Learn how to become a trusted auditor, claim bounties, and help secure the Prometheus ecosystem.
Welcome, security expert! This guide is for auditors and community members who form the human trust layer of the Prometheus Protocol. You are the gatekeepers of quality and security for the entire decentralized AI economy.
Your role is to review services submitted by developers, verify their integrity, and provide on-chain attestations of their quality. In return for your expertise, you earn rewards in USDC.
### The Core Mechanism: Economic Staking
To participate as an auditor, you stake **USDC collateral** when claiming audit bounties. This creates accountability—if you abandon an audit or submit fraudulent results, your stake can be slashed. This economic security model ensures high-quality audits without requiring centralized oversight.
### The Auditor Journey
This guide will walk you through the complete lifecycle of participating in the protocol.
Log in to the [Audit Hub](https://prometheusprotocol.org/audit-hub) with Internet Identity. You'll be able to browse available audits immediately—no special permissions required.
Browse the Audit Hub—a real-time marketplace of services waiting for security review, each with a specific reward bounty paid in USDC.
Stake USDC collateral to claim an audit, perform your off-chain security analysis, and submit your on-chain attestation directly through the web app. Once approved, you receive your stake back plus the bounty reward.
Track your earnings, view your audit history, and monitor your performance metrics in the auditor dashboard.
Ready to help secure the ecosystem?
# Performing Audits
Source: https://docs.prometheusprotocol.org/guides/auditors/performing-audits
The step-by-step process for staking, claiming, and submitting an audit.
When you find an open audit in the Hub that matches your skills, you can claim it. This reserves the work for you exclusively and guarantees you the reward if you complete it successfully and on time.
For any "Open" audit, there will be a clear **"Claim Bounty"** button. Clicking this begins the staking process.
A confirmation modal will appear, providing a final summary before you commit your stake. It will clearly state:
* The bounty being claimed.
* The required stake amount and the specific reputation token needed.
* The time limit for completion (e.g., "72-hour lock").
* Your available balance of that reputation token.
Once you confirm, your reputation tokens are staked and locked until the audit is completed or the time limit expires. You cannot get them back early.
After claiming, the audit's status will change to "Claimed by You" and a countdown timer will appear.
The actual audit work is performed **off-chain**. You will use your standard toolkit to review the service's source code (linked from the audit page on GitHub), run tests, and identify any issues.
Once your review is complete, you will return to the Audit Hub. On the audit's detail page, you will submit your findings. This is your **on-chain attestation**, which may include a score, a report, and a final pass/fail recommendation.
Upon successful submission, the reward is transferred to your account, and your staked reputation tokens are returned.
***
After completing audits, you can track your earnings and reputation on your personal dashboard.
# Managing
Source: https://docs.prometheusprotocol.org/guides/service-devs/managing
Learn how to manage your treasury, enable analytics, and perform other day-to-day operational tasks.
Your service is deployed, monetized, and published in the App Store. Now what? This guide covers the common operational tasks you'll perform to manage your live service.
### Managing Your Treasury
If you've enabled monetization, your service's canister acts as a secure, on-chain treasury, collecting all funds paid by your users. The project template includes several built-in functions to manage these funds.
You can call these functions directly using the `dfx` command-line tool.
* **`get_owner()`**: View the principal that currently owns and controls the canister.
* **`set_owner(new_owner)`**: Transfer ownership of the canister to a new principal. (Owner only)
* **`get_treasury_balance(ledger_id)`**: Check the canister's balance of any ICRC-1 token.
* **`withdraw(ledger_id, amount, destination)`**: Withdraw funds from the treasury to any account. (Owner only)
#### Example: Checking Your Balance
To check your service's balance of a specific token, you need your service's canister ID and the token's ledger canister ID.
```bash theme={null}
# Replace placeholders with your actual values
dfx canister call get_treasury_balance '(principal "")'
```
#### Example: Withdrawing Funds
To withdraw funds, you'll also need the amount and the destination account.
```bash theme={null}
# dfx canister call '(arg1, arg2, ...)'
dfx canister call withdraw '(principal "", 100_000_000, record { owner = principal ""; subaccount = null })'
```
***
### Enabling Proof of Usage Rewards (Beacon)
You can participate in the protocol's rewards program by enabling the optional usage beacon. This allows your service to submit **Proof of Usage** data, making you eligible for ecosystem rewards.
**What data is collected?**
The beacon periodically sends aggregated, privacy-preserving usage metrics to a on-chain service. Specifically, it collects:
* Tool invocation counts
* Total token amounts processed by your tools
It is designed to be privacy-preserving and **does not** collect any sensitive user data, tool inputs, or IP addresses.
**Prerequisite:** Your service's WASM must be verified and listed in the App
Store for its beacon data to be accepted. This is a security measure to
prevent abuse of the rewards system.
#### How to Enable the Beacon
Enabling the beacon requires a code change. Because the Prometheus Protocol manages all deployments to ensure code is verified, you must publish a new version of your service to activate it.
Open `src/main.mo` in your editor, find the beacon section, and uncomment the block of code that initializes the `beaconContext`.
```ts src/main.mo theme={null}
// --- OPT-IN: USAGE ANALYTICS (BEACON) ---
let beaconCanisterId = Principal.fromText("vt46d-j7777-77774-qaagq-cai");
transient let beaconContext : Beacon.BeaconContext = Beacon.init(
beaconCanisterId, // Public beacon canister ID
?(15 * 60), // Send a beacon every 15 minutes (more frequent = more cycles cost)
);
```
Save the file, build the new wasm (e.g., `dfx deploy`), and commit the update to your Git repository. The publishing process is tied to your commit history.
```bash theme={null}
git add .
git commit -m "feat: enable usage beacon"
```
You must now re-publish your service. This will submit your new code for verification and, once approved, the protocol will deploy it as a new version.
Follow the same steps in the **[Publishing guide](/guides/service-devs/publishing)**, making sure to use your **new Git commit hash**. This ensures that the change is audited and transparently recorded on-chain.
Your server will now submit Proof of Usage data, making it eligible for reward programs once the new version is verified and deployed.
***
### You've Completed the Guide!
Congratulations on completing the Service Developer guide. You now have the knowledge to build, monetize, verify, and manage a service on the Prometheus Protocol.
# Monetization
Source: https://docs.prometheusprotocol.org/guides/service-devs/monetization
Learn how to add paid tools by integrating the Prometheus identity and payment pillars.
A basic MCP server is useful, but a monetized one can become a self-sustaining business. This guide will show you how to activate the pre-built monetization features in your project template, enabling your service to accept payments from both human users and automated agents.
### The Unified Identity & Payment Model
Our platform uses a unified identity and payment model that securely supports both interactive and programmatic (machine-to-machine) use cases.
Think of it like a debit card system for the decentralized web. A user's **Principal** is their bank account, which holds their funds. They authorize services to draw from this account using two types of credentials: a short-lived **JWT** for interactive sessions, and a long-lived **API Key** for automated services.
The entire system is built on a single, non-custodial principle:
* **Identity is the Principal:** The user's on-chain identity is always their Principal ID.
* **Payment is the Allowance:** A user grants a spending allowance (via `icrc2_approve`) from their Principal to your service. This allowance is the single source of truth for all payments.
The credential a user presents—whether a JWT or an API Key—simply acts as a cryptographic proof that they are the owner of the Principal. The payment logic in your service is identical in both cases: it verifies the credential, identifies the user's Principal, and attempts to draw from that Principal's pre-approved allowance.
By following the steps below, your service will automatically support both access methods.
***
### Step 1: Activate Monetization in Your Code
Your project template contains all the necessary code for monetization, but it's commented out by default. In this step, you'll activate it.
Open the `src/main.mo` file in your editor. You will need to uncomment three sections of code.
Find the `tools` array and uncomment the `payment` block inside the `get_weather` tool definition. This tells the MCP SDK that calling this tool requires a valid payment from an authenticated Principal.
```ts src/main.mo theme={null}
let tools : [MCP.Tool] = [
// ...
{
// ...
payment = ?{
amount = 100_000; // The cost to call this tool
ledger = Principal.fromText("icrc1_ledger_canister_id"); // The token ledger to use
};
},
// ...
];
```
Uncomment the `allowanceUrl` in the `mcpConfig`. This URL is returned to clients and AI agents, directing users to the web dashboard where they can manage their token allowances and API keys for your service.
```ts src/main.mo theme={null}
let mcpConfig : MCP.Config = {
// ...
allowanceUrl = ?"https://prometheusprotocol.org/app/your_app_namespace";
};
```
Finally, find and uncomment the large block of code that initializes the `authContext`. This is the core logic that integrates your server with the Prometheus identity layer, enabling it to validate access tokens (both JWTs and API Keys) on incoming requests.
```ts src/main.mo theme={null}
// URL of the Prometheus OAuth 2.1 provider
let issuerUrl = "https://bfggx-7yaaa-aaaai-q32gq-cai.icp0.io";
// URL of the OAuth flow (should be same frontend that manages allowances)
let frontendUrl = "https://prometheusprotocol.org/oauth";
// The scopes your service requires. "openid" is always required.
let requiredScopes = ["openid"];
// Function to transform the response for jwks client
public query func transformJwksResponse({
context : Blob;
response : IC.HttpRequestResult;
}) : async IC.HttpRequestResult {
{
response with headers = []; // not interested in the headers
};
};
// Initialize the auth context with the issuer URL and required scopes.
transient let authContext : ?AuthTypes.AuthContext = ?AuthState.init(
Principal.fromActor(self),
owner,
issuerUrl,
requiredScopes,
transformJwksResponse,
);
```
### Step 2: Deploy the Updated Server
Now that the code is activated, save the `src/main.mo` file and deploy the new logic to your local replica.
```bash theme={null}
npm run deploy
```
Your server's tools are now protected. If you try to call them from the MCP Inspector without a valid credential, the calls will fail.
### Step 3: Generate and Test an API Key
With the authentication context active, your service can now issue and validate API keys out of the box. You can test this programmatic access flow by calling your canister directly with `dfx` to generate a key. The key will be linked to your current `dfx` identity.
Run the following command, replacing `` with the ID from the `npm run deploy` output.
```bash theme={null}
dfx canister call create_my_api_key '("My Test Key", vec {})'
```
The command will return your new API key.
**Save this key immediately!** This is the only time it will be visible.
You can now use this key to call a protected tool. The key must be passed in via the `x-api-key` header.
1. Open the MCP Inspector if it's not already open: `npx @modelcontextprotocol/inspector`
2. Set transport type to Streamable HTTP, and enter the URL of your local server (e.g., `http://127.0.0.1:4943/mcp?canisterId=tnszz-sh777-77774-qaasa-cai`).
3. Click the Authentication button, and set API Token Authentication using `x-api-key` as the header name and your generated API key as the value.
4. Click Connect.
If successful, your server will return the weather data, proving that your API key authentication and payment logic is working correctly.
***
🎉 **Congratulations!** Your server is now a fully monetized service. You've enabled and tested programmatic access via API Keys and you know how to add browser-based login for interactive web apps.
Next, you'll learn how to manage your service post-launch, including withdrawing funds from your treasury and enabling usage analytics.
# Multi-Tenant Pattern Guide
Source: https://docs.prometheusprotocol.org/guides/service-devs/multi-tenant-pattern
Building Shared MCP Services with Principal-Based Segregation
## What is Multi-Tenant?
A multi-tenant MCP server is **one canister** that serves **many users**, where each user's data is segregated by their principal ID.
```mermaid theme={null}
flowchart TD
UA["👤 User A"]
UB["👤 User B"]
UC["👤 User C"]
subgraph Shared["📦 Shared Canister"]
direction TB
DA["User A Todos"]
DB["User B Todos"]
DC["User C Todos"]
end
UA ==> Shared
UB ==> Shared
UC ==> Shared
style UA fill:#4a90e2,stroke:#2d3748,stroke-width:2px,color:#fff
style UB fill:#4a90e2,stroke:#2d3748,stroke-width:2px,color:#fff
style UC fill:#4a90e2,stroke:#2d3748,stroke-width:2px,color:#fff
style Shared fill:#48bb78,stroke:#2d3748,stroke-width:2px,color:#fff
style DA fill:#4a5568,stroke:#718096,stroke-width:1px,color:#fff
style DB fill:#4a5568,stroke:#718096,stroke-width:1px,color:#fff
style DC fill:#4a5568,stroke:#718096,stroke-width:1px,color:#fff
```
**When to Use:**
* ✅ Todo/task lists, notes, calendars, settings
* ❌ Token custody, financial operations, per-user contracts
**Trade-offs:**
* **Pros:** Cost-effective, simple deployment, shared resources
* **Cons:** Shared storage limits, requires careful access control
***
## Example: Multi-Tenant Todo List
Let's build a simple todo list MCP where each user has their own isolated tasks.
### 1. Define Your Data Model
```motoko theme={null}
// src/Types.mo
module {
public type Todo = {
id: Text;
title: Text;
completed: Bool;
createdAt: Int;
};
public type UserData = {
todos: [Todo];
createdAt: Int;
};
};
```
### 2. Set Up Principal-Based Storage
```motoko theme={null}
// src/main.mo
import Map "mo:map/Map";
import { phash } "mo:map/Map";
import Principal "mo:base/Principal";
import Time "mo:base/Time";
import Array "mo:base/Array";
actor TodoMCP {
// Store each user's data by their principal
stable var userData = Map.new();
// Helper to get or create user data
private func getUserData(caller: Principal) : Types.UserData {
switch (Map.get(userData, phash, caller)) {
case (?data) data;
case (null) {
let newData: Types.UserData = {
todos = [];
createdAt = Time.now();
};
Map.set(userData, phash, caller, newData);
newData
};
};
};
// Helper to update user data
private func setUserData(caller: Principal, data: Types.UserData) {
Map.set(userData, phash, caller, data);
};
}
```
### 3. Create MCP Tools
```motoko theme={null}
// Tool 1: Add Todo
public func todo_add(title: Text, auth: ?AuthTypes.AuthInfo) : async Result.Result {
// Get authenticated user's principal
let caller = switch (auth) {
case (?authInfo) authInfo.principal;
case (null) { return #err("Authentication required") };
};
// Get user's data (creates if new user)
var data = getUserData(caller);
// Create new todo
let newTodo: Types.Todo = {
id = Principal.toText(caller) # "-" # Int.toText(Time.now());
title = title;
completed = false;
createdAt = Time.now();
};
// Add to user's todos
data := {
data with
todos = Array.append(data.todos, [newTodo]);
};
// Save updated data
setUserData(caller, data);
#ok(newTodo.id)
};
// Tool 2: List Todos
public func todo_list(auth: ?AuthTypes.AuthInfo) : async Result.Result<[Types.Todo], Text> {
let caller = switch (auth) {
case (?authInfo) authInfo.principal;
case (null) { return #err("Authentication required") };
};
let data = getUserData(caller);
#ok(data.todos)
};
// Tool 3: Toggle Todo
public func todo_toggle(id: Text, auth: ?AuthTypes.AuthInfo) : async Result.Result<(), Text> {
let caller = switch (auth) {
case (?authInfo) authInfo.principal;
case (null) { return #err("Authentication required") };
};
var data = getUserData(caller);
// Find and toggle the todo
let updatedTodos = Array.map(
data.todos,
func(todo) {
if (todo.id == id) {
{ todo with completed = not todo.completed }
} else {
todo
}
}
);
data := { data with todos = updatedTodos };
setUserData(caller, data);
#ok()
};
// Tool 4: Delete Todo
public func todo_delete(id: Text, auth: ?AuthTypes.AuthInfo) : async Result.Result<(), Text> {
let caller = switch (auth) {
case (?authInfo) authInfo.principal;
case (null) { return #err("Authentication required") };
};
var data = getUserData(caller);
// Remove the todo
let filteredTodos = Array.filter(
data.todos,
func(todo) { todo.id != id }
);
data := { data with todos = filteredTodos };
setUserData(caller, data);
#ok()
};
```
### 4. Register with MCP Server
```motoko theme={null}
import Mcp "mo:mcp-motoko-sdk/mcp/Mcp";
import McpTypes "mo:mcp-motoko-sdk/mcp/Types";
// Define tool schemas
let todoAddTool: McpTypes.Tool = {
name = "todo_add";
title = ?"Add Todo";
description = ?"Create a new todo item in your personal list";
payment = null;
inputSchema = Json.obj([
("type", Json.str("object")),
("properties", Json.obj([
("title", Json.obj([
("type", Json.str("string")),
("description", Json.str("Todo title"))
]))
])),
("required", Json.arr([Json.str("title")]))
]);
outputSchema = ?Json.obj([
("type", Json.str("object")),
("properties", Json.obj([
("id", Json.obj([("type", Json.str("string"))]))
]))
]);
};
// Register all tools
let mcpConfig: McpTypes.McpConfig = {
self = Principal.fromActor(self);
serverInfo = {
name = "io.example.todo";
title = "Multi-Tenant Todo List";
version = "1.0.0";
};
tools = [todoAddTool, todoListTool, todoToggleTool, todoDeleteTool];
toolImplementations = [
("todo_add", handleTodoAdd),
("todo_list", handleTodoList),
("todo_toggle", handleTodoToggle),
("todo_delete", handleTodoDelete)
];
// ... other MCP config
};
let mcpServer = Mcp.createServer(mcpConfig);
```
***
## Key Security Principles
### 1. Always Check the Caller
```motoko theme={null}
// ✅ CORRECT - Each user only accesses their own data
let caller = switch (auth) {
case (?authInfo) authInfo.principal;
case (null) { return #err("Authentication required") };
};
let data = getUserData(caller); // Automatically scoped to this user
// ❌ WRONG - Never search across all users
for ((principal, data) in userData.entries()) {
// This can leak data from other users!
}
```
### 2. No Cross-User Access
```motoko theme={null}
// ❌ NEVER allow accessing another user's data
public func get_user_todos(userId: Text) : async [Types.Todo] {
// This is dangerous! Any user could access anyone's data
}
// ✅ ALWAYS use the authenticated principal
public func get_my_todos(auth: ?AuthTypes.AuthInfo) : async [Types.Todo] {
let caller = switch (auth) {
case (?authInfo) authInfo.principal;
case (null) { return #err("Authentication required") };
};
let data = getUserData(caller);
data.todos
}
```
### 3. Validate All Inputs
```motoko theme={null}
// Check title length
if (title.size() == 0) {
return #err("Title cannot be empty");
};
if (title.size() > 500) {
return #err("Title too long (max 500 characters)");
};
```
***
## Testing Your Multi-Tenant App
### 1. Deploy Locally
```bash theme={null}
dfx start --background
dfx deploy
```
### 2. Create API Keys for Different Users
```bash theme={null}
# User 1
dfx identity use alice
dfx canister call todo_mcp create_my_api_key '("Test Key", vec {})'
# Save the key: KEY_ALICE="..."
# User 2
dfx identity use bob
dfx canister call todo_mcp create_my_api_key '("Test Key", vec {})'
# Save the key: KEY_BOB="..."
```
# Overview
Source: https://docs.prometheusprotocol.org/guides/service-devs/overview
Your complete guide to building, monetizing, and verifying a service on the Prometheus Protocol.
Welcome, MCP server developer!
This guide will walk you through the entire lifecycle of a service: from a local "Hello, World" to a monetized, globally-available application listed in the decentralized App Store.
### The Developer Journey
The path to launching a successful, trusted service on the protocol involves these key stages. This guide is structured to walk you through each one.
Deploy a basic, functional MCP server to your local environment in minutes
and test it with the MCP Inspector.
Integrate our on-chain OAuth 2.1 provider and enable the token allowance
system to add paid, protected tools to your service.
Submit your service for a decentralized audit. A successful verification
earns you a **Prometheus Certificate** and a live deployment on the main
network.
Learn how to manage your service post-launch, including withdrawing funds
from your treasury and enabling usage analytics.
### Your Toolkit
Your project template comes pre-configured with a command-line tool, accessible via `npm run` scripts.
```bash theme={null}
npm run app-store [options]
```
This tool manages the trust and verification lifecycle. You'll use it to
publish your service for auditing and deployment.
Ready to get started? Let's deploy your first server.
# Publishing
Source: https://docs.prometheusprotocol.org/guides/service-devs/publishing
Submit your service for automated reproducible build verification and deployment to mainnet.
Once your service is built and tested, the final step is to publish it. This makes it discoverable in the Prometheus App Store and automatically triggers the decentralized verification process.
This guide will walk you through using the `app-store-cli` to get your service verified and deployed on the main network.
### The Automated Verification Process
Publishing triggers a fully automated workflow that gets your code from your machine to a live mainnet canister with cryptographic proof of integrity:
1. **Publish:** You submit your service's Git commit hash and metadata to the protocol using `app-store-cli release`.
2. **Bounty Creation:** The protocol automatically creates verification bounties (\~\$2.25 per version) to incentivize independent verifiers.
3. **Automated Build Verification:** Multiple independent verifier bots detect your submission, clone your repository, rebuild your WASM in deterministic Docker environments, and compare hashes.
4. **Consensus:** The system requires 5 of 9 independent verifiers to agree on the same WASM hash for verification to succeed.
5. **Attestations:** Verifiers file cryptographic attestations on-chain (ICRC-126) and claim their bounty rewards (ICRC-127).
6. **Deploy:** Once verified, the protocol automatically creates a new canister on your behalf and deploys the verified WASM to the main network.
7. **Security Audits (Optional):** You can add additional bounties to incentivize security auditors to review your code for vulnerabilities, earning higher certificate tiers (Gold, Silver, Bronze).
The entire process from publishing to verification typically completes in **1-5 minutes** with zero human intervention.
### Step 1: Ensure Your Code is Committed
The verification process is anchored to a specific Git commit. Make sure all your changes are committed and pushed to GitHub:
```bash theme={null}
git add .
git commit -m "Ready for publishing"
git push
```
The `app-store-cli release` command will automatically capture your commit hash and update your `prometheus.yml` file.
### Step 2: Configure Your Manifest (One Time Setup)
If you haven't already, initialize your `prometheus.yml` configuration file:
```bash theme={null}
# Using the npm script
npm run app-store init -y
# Direct CLI command
npx @prometheus-protocol/app-store-cli init -y
```
Open the generated `prometheus.yml` file and configure:
* Your service metadata (name, description, category)
* Public **`icon_url`** and **`banner_url`** for the App Store listing (see below for hosting tips)
**Note:** The `git_commit` and `wasm_path` fields will be automatically updated by the `release` command, so you don't need to manually set them.
### Step 3: Host Your App's Visual Assets
Your app's icon and banner need to be accessible via public URLs to be displayed in the App Store. The easiest and most professional way to host these is by using **GitHub Releases**.
1. **Navigate to Releases:** In your GitHub repository, click on the **"Releases"** tab on the right-hand side.
2. **Draft a New Release:** Click the **"Draft a new release"** button.
3. **Create a Tag:** In the "Choose a tag" box, type a new tag for your assets (e.g., `v1.0.0-assets`) and click "Create new tag". Give it a title like "App Store Assets".
4. **Upload Images:** Drag and drop your `icon.png` and `banner.png` files into the attachments box.
5. **Publish Release:** Click the **"Publish release"** button.
6. **Copy URLs:** On the release page, your images will be listed as assets. **Right-click** on each asset's filename and select **"Copy Link Address"**. These are the permanent, public URLs you'll need for your `prometheus.yml` manifest.
### Step 4: Publish Your Service (One Command)
Now you're ready to publish! The `release` command handles everything automatically:
```bash theme={null}
# Using the npm script (replace "1.0.0" with your version)
npm run app-store release "1.0.0"
# Direct CLI command (replace "1.0.0" with your version)
npx @prometheus-protocol/app-store-cli release "1.0.0"
```
**What this command does automatically:**
1. ✅ Updates the version number in your source code (`src/main.mo`)
2. ✅ Commits and pushes the version change to GitHub
3. ✅ Captures the commit hash and updates `prometheus.yml`
4. ✅ Commits and pushes the `prometheus.yml` update
5. ✅ Builds your WASM using the reproducible build system
6. ✅ Publishes to the registry and creates verification bounties
**That's it!** The entire workflow is handled by a single command.
### Step 5: Monitor the Verification Status
Once you've published, your submission automatically triggers the verification network. Multiple independent verifier bots will:
1. Clone your repository at the exact commit hash
2. Rebuild your WASM in deterministic Docker environments
3. Compare the built WASM hash with your submitted hash
4. File cryptographic attestations on-chain
5. Claim their bounty rewards
You can track this process in real-time:
1. Go to **[https://prometheusprotocol.org/audit-hub](https://prometheusprotocol.org/audit-hub)**
2. Find your service and view the verification progress
3. Watch as verifiers complete their builds and file attestations
**Consensus typically takes 1-5 minutes.** Once 5 of 9 verifiers agree, your WASM is marked as verified and automatically deployed to mainnet.
#### Understanding the Verification Process
**Build Verification (Automated):**
* Free for users to verify (reproducible builds are public infrastructure)
* \~\$2.25 cost per version for bounty rewards to verifiers
* Proves **integrity**: deployed code matches source code
* Required for all published services
**Security Audits (Optional):**
* Additional bounties for human security experts
* Proves **safety**: source code is free from vulnerabilities
* Required for Gold/Silver/Bronze certificate tiers
* Can be added after build verification completes
#### Speeding Up Security Audits
If you want to achieve a higher certificate tier (Gold, Silver, or Bronze), you'll need security audits in addition to build verification:
* **Add a Bounty:** Use the app store UI to add security audit bounties to your submission, making it more attractive for human auditors.
* **Request a Bounty:** If you don't want to fund it yourself, you can post in our Discord and ask if another community member is willing to sponsor your audit.
Build verification happens automatically, but security audits require human review and may take longer.
***
🎉 **Congratulations!** Your MCP server is a trusted, verified, and discoverable part of the Prometheus ecosystem.
# Quick Start
Source: https://docs.prometheusprotocol.org/guides/service-devs/quickstart
Go from zero to a running local MCP server in minutes.
This guide will walk you through the fastest way to get a new MCP server running on your local machine. By the end, you'll have a deployed, testable service.
### Prerequisites
Before you begin, make sure you have the following tools installed on your system:
* **DFX:** The DFINITY Canister SDK. [Installation Guide](https://internetcomputer.org/docs/current/developer-docs/setup/install/).
* **Node.js:** Version 18.0 or higher. [Download](https://nodejs.org/).
* **MOPS:** The Motoko Package Manager. [Installation Guide](https://mops.one/docs/install).
* **Git:** The version control system. [Download](https://git-scm.com/).
### Step 1: Scaffold Your Project
First, create a new project using our template. This sets up a complete, ready-to-run MCP server.
```bash theme={null}
# Creates a new project in a directory called `my-mcp-server`
npx create-motoko-mcp-server my-mcp-server
# Navigate into your new project directory
cd my-mcp-server
```
### Step 2: Initialize Your Repository
The Prometheus publishing process is tied to your Git history. Initialize a repository and make your first commit now so you're ready to publish later.
```bash theme={null}
# Initialize a new Git repository
git init
# Stage all the new files
git add .
# Make your first commit
git commit -m "Initial commit from template"
```
### Step 3: Install Dependencies
Next, you need to install the project's dependencies. The template uses both Node.js for scripting and MOPS for Motoko packages.
Run the following commands from your project's root directory:
```bash theme={null}
# Install Node.js dependencies
npm install
# Install Motoko dependencies
npm run mops:install
```
### Step 4: Deploy Your Server
Now, you'll deploy the server to a local, simulated version of the blockchain network.
1. **Start the Local Replica:**
This command starts the local development network in the background.
If you already have the local replica running from another project, you
can skip this step. You can check its status by running `dfx ping` in your
terminal. If it returns a healthy status, you're good to go.
```bash theme={null}
npm run start
```
2. **Deploy to the Local Replica:**
This command compiles your Motoko code and deploys it to the local network.
You must run this command in a **new terminal window**, as the local
replica will be running in your current one.
```bash theme={null}
npm run deploy
```
After a moment, the CLI will output the canister ID of your deployed server. Keep this ID handy for the next step.
### Step 5: Test with the MCP Inspector
The MCP Inspector is a web-based tool for interacting with your server's tools.
1. **Launch the Inspector:**
This command starts the Inspector web app.
```bash theme={null}
npm run inspector
```
2. **Connect to Your Server:**
The Inspector needs the URL of your local server. Construct the URL using the canister ID from the `deploy` step.
```
# Replace `your_canister_id` with the actual ID from the deploy output
http://127.0.0.1:4943/mcp/?canisterId=your_canister_id
```
Paste this URL into the Inspector's connection bar. You can now see and call the default `get_weather` tool.
***
🎉 **Congratulations!** You have a working MCP server running locally.
The next sections cover advanced topics like adding authentication and connecting to the payments system.
# Wrapper Pattern Guide
Source: https://docs.prometheusprotocol.org/guides/service-devs/wrapper-pattern
Creating an AI Agent Identity for Your Canister Backend
# Wrapper Pattern Guide
Build an MCP canister that wraps existing backend logic, providing AI agents with high-level tools and identity management.
## What is the Wrapper Pattern?
The wrapper pattern creates an **MCP server canister** that acts as an identity-owning interface to your existing backend canister(s). It orchestrates complex multi-step workflows so AI agents don't have to.
```mermaid theme={null}
flowchart TD
Agent["🤖 AI Agent
The account menu provides an at-a-glance view of your balances and audit history.
Here’s a breakdown of what you'll find in the menu:
* **My Account:** This section displays your full Principal ID, which acts as your unique identifier across the protocol. You can easily copy it to your clipboard.
* **Balances:** This shows your current balance of USDC and other tokens available in your connected wallet.
* **Audit History:** View your completed audits, pending reviews, and earned rewards. This provides a real-time record of your contributions to the ecosystem.
* **Performance Metrics:** Track your audit success rate, average completion time, and total earnings over time.
This menu gives you a real-time, consolidated view of your activity and earnings within the Prometheus ecosystem.
# Overview
Source: https://docs.prometheusprotocol.org/guides/auditors/overview
Learn how to become a trusted auditor, claim bounties, and help secure the Prometheus ecosystem.
Welcome, security expert! This guide is for auditors and community members who form the human trust layer of the Prometheus Protocol. You are the gatekeepers of quality and security for the entire decentralized AI economy.
Your role is to review services submitted by developers, verify their integrity, and provide on-chain attestations of their quality. In return for your expertise, you earn rewards in USDC.
### The Core Mechanism: Economic Staking
To participate as an auditor, you stake **USDC collateral** when claiming audit bounties. This creates accountability—if you abandon an audit or submit fraudulent results, your stake can be slashed. This economic security model ensures high-quality audits without requiring centralized oversight.
### The Auditor Journey
This guide will walk you through the complete lifecycle of participating in the protocol.
Log in to the [Audit Hub](https://prometheusprotocol.org/audit-hub) with Internet Identity. You'll be able to browse available audits immediately—no special permissions required.
Browse the Audit Hub—a real-time marketplace of services waiting for security review, each with a specific reward bounty paid in USDC.
Stake USDC collateral to claim an audit, perform your off-chain security analysis, and submit your on-chain attestation directly through the web app. Once approved, you receive your stake back plus the bounty reward.
Track your earnings, view your audit history, and monitor your performance metrics in the auditor dashboard.
Ready to help secure the ecosystem?
# Performing Audits
Source: https://docs.prometheusprotocol.org/guides/auditors/performing-audits
The step-by-step process for staking, claiming, and submitting an audit.
When you find an open audit in the Hub that matches your skills, you can claim it. This reserves the work for you exclusively and guarantees you the reward if you complete it successfully and on time.
For any "Open" audit, there will be a clear **"Claim Bounty"** button. Clicking this begins the staking process.
A confirmation modal will appear, providing a final summary before you commit your stake. It will clearly state:
* The bounty being claimed.
* The required stake amount and the specific reputation token needed.
* The time limit for completion (e.g., "72-hour lock").
* Your available balance of that reputation token.
Once you confirm, your reputation tokens are staked and locked until the audit is completed or the time limit expires. You cannot get them back early.
After claiming, the audit's status will change to "Claimed by You" and a countdown timer will appear.
The actual audit work is performed **off-chain**. You will use your standard toolkit to review the service's source code (linked from the audit page on GitHub), run tests, and identify any issues.
Once your review is complete, you will return to the Audit Hub. On the audit's detail page, you will submit your findings. This is your **on-chain attestation**, which may include a score, a report, and a final pass/fail recommendation.
Upon successful submission, the reward is transferred to your account, and your staked reputation tokens are returned.
***
After completing audits, you can track your earnings and reputation on your personal dashboard.
# Managing
Source: https://docs.prometheusprotocol.org/guides/service-devs/managing
Learn how to manage your treasury, enable analytics, and perform other day-to-day operational tasks.
Your service is deployed, monetized, and published in the App Store. Now what? This guide covers the common operational tasks you'll perform to manage your live service.
### Managing Your Treasury
If you've enabled monetization, your service's canister acts as a secure, on-chain treasury, collecting all funds paid by your users. The project template includes several built-in functions to manage these funds.
You can call these functions directly using the `dfx` command-line tool.
* **`get_owner()`**: View the principal that currently owns and controls the canister.
* **`set_owner(new_owner)`**: Transfer ownership of the canister to a new principal. (Owner only)
* **`get_treasury_balance(ledger_id)`**: Check the canister's balance of any ICRC-1 token.
* **`withdraw(ledger_id, amount, destination)`**: Withdraw funds from the treasury to any account. (Owner only)
#### Example: Checking Your Balance
To check your service's balance of a specific token, you need your service's canister ID and the token's ledger canister ID.
```bash theme={null}
# Replace placeholders with your actual values
dfx canister call get_treasury_balance '(principal "")'
```
#### Example: Withdrawing Funds
To withdraw funds, you'll also need the amount and the destination account.
```bash theme={null}
# dfx canister call '(arg1, arg2, ...)'
dfx canister call withdraw '(principal "", 100_000_000, record { owner = principal ""; subaccount = null })'
```
***
### Enabling Proof of Usage Rewards (Beacon)
You can participate in the protocol's rewards program by enabling the optional usage beacon. This allows your service to submit **Proof of Usage** data, making you eligible for ecosystem rewards.
**What data is collected?**
The beacon periodically sends aggregated, privacy-preserving usage metrics to a on-chain service. Specifically, it collects:
* Tool invocation counts
* Total token amounts processed by your tools
It is designed to be privacy-preserving and **does not** collect any sensitive user data, tool inputs, or IP addresses.
**Prerequisite:** Your service's WASM must be verified and listed in the App
Store for its beacon data to be accepted. This is a security measure to
prevent abuse of the rewards system.
#### How to Enable the Beacon
Enabling the beacon requires a code change. Because the Prometheus Protocol manages all deployments to ensure code is verified, you must publish a new version of your service to activate it.
Open `src/main.mo` in your editor, find the beacon section, and uncomment the block of code that initializes the `beaconContext`.
```ts src/main.mo theme={null}
// --- OPT-IN: USAGE ANALYTICS (BEACON) ---
let beaconCanisterId = Principal.fromText("vt46d-j7777-77774-qaagq-cai");
transient let beaconContext : Beacon.BeaconContext = Beacon.init(
beaconCanisterId, // Public beacon canister ID
?(15 * 60), // Send a beacon every 15 minutes (more frequent = more cycles cost)
);
```
Save the file, build the new wasm (e.g., `dfx deploy`), and commit the update to your Git repository. The publishing process is tied to your commit history.
```bash theme={null}
git add .
git commit -m "feat: enable usage beacon"
```
You must now re-publish your service. This will submit your new code for verification and, once approved, the protocol will deploy it as a new version.
Follow the same steps in the **[Publishing guide](/guides/service-devs/publishing)**, making sure to use your **new Git commit hash**. This ensures that the change is audited and transparently recorded on-chain.
Your server will now submit Proof of Usage data, making it eligible for reward programs once the new version is verified and deployed.
***
### You've Completed the Guide!
Congratulations on completing the Service Developer guide. You now have the knowledge to build, monetize, verify, and manage a service on the Prometheus Protocol.
# Monetization
Source: https://docs.prometheusprotocol.org/guides/service-devs/monetization
Learn how to add paid tools by integrating the Prometheus identity and payment pillars.
A basic MCP server is useful, but a monetized one can become a self-sustaining business. This guide will show you how to activate the pre-built monetization features in your project template, enabling your service to accept payments from both human users and automated agents.
### The Unified Identity & Payment Model
Our platform uses a unified identity and payment model that securely supports both interactive and programmatic (machine-to-machine) use cases.
Think of it like a debit card system for the decentralized web. A user's **Principal** is their bank account, which holds their funds. They authorize services to draw from this account using two types of credentials: a short-lived **JWT** for interactive sessions, and a long-lived **API Key** for automated services.
The entire system is built on a single, non-custodial principle:
* **Identity is the Principal:** The user's on-chain identity is always their Principal ID.
* **Payment is the Allowance:** A user grants a spending allowance (via `icrc2_approve`) from their Principal to your service. This allowance is the single source of truth for all payments.
The credential a user presents—whether a JWT or an API Key—simply acts as a cryptographic proof that they are the owner of the Principal. The payment logic in your service is identical in both cases: it verifies the credential, identifies the user's Principal, and attempts to draw from that Principal's pre-approved allowance.
By following the steps below, your service will automatically support both access methods.
***
### Step 1: Activate Monetization in Your Code
Your project template contains all the necessary code for monetization, but it's commented out by default. In this step, you'll activate it.
Open the `src/main.mo` file in your editor. You will need to uncomment three sections of code.
Find the `tools` array and uncomment the `payment` block inside the `get_weather` tool definition. This tells the MCP SDK that calling this tool requires a valid payment from an authenticated Principal.
```ts src/main.mo theme={null}
let tools : [MCP.Tool] = [
// ...
{
// ...
payment = ?{
amount = 100_000; // The cost to call this tool
ledger = Principal.fromText("icrc1_ledger_canister_id"); // The token ledger to use
};
},
// ...
];
```
Uncomment the `allowanceUrl` in the `mcpConfig`. This URL is returned to clients and AI agents, directing users to the web dashboard where they can manage their token allowances and API keys for your service.
```ts src/main.mo theme={null}
let mcpConfig : MCP.Config = {
// ...
allowanceUrl = ?"https://prometheusprotocol.org/app/your_app_namespace";
};
```
Finally, find and uncomment the large block of code that initializes the `authContext`. This is the core logic that integrates your server with the Prometheus identity layer, enabling it to validate access tokens (both JWTs and API Keys) on incoming requests.
```ts src/main.mo theme={null}
// URL of the Prometheus OAuth 2.1 provider
let issuerUrl = "https://bfggx-7yaaa-aaaai-q32gq-cai.icp0.io";
// URL of the OAuth flow (should be same frontend that manages allowances)
let frontendUrl = "https://prometheusprotocol.org/oauth";
// The scopes your service requires. "openid" is always required.
let requiredScopes = ["openid"];
// Function to transform the response for jwks client
public query func transformJwksResponse({
context : Blob;
response : IC.HttpRequestResult;
}) : async IC.HttpRequestResult {
{
response with headers = []; // not interested in the headers
};
};
// Initialize the auth context with the issuer URL and required scopes.
transient let authContext : ?AuthTypes.AuthContext = ?AuthState.init(
Principal.fromActor(self),
owner,
issuerUrl,
requiredScopes,
transformJwksResponse,
);
```
### Step 2: Deploy the Updated Server
Now that the code is activated, save the `src/main.mo` file and deploy the new logic to your local replica.
```bash theme={null}
npm run deploy
```
Your server's tools are now protected. If you try to call them from the MCP Inspector without a valid credential, the calls will fail.
### Step 3: Generate and Test an API Key
With the authentication context active, your service can now issue and validate API keys out of the box. You can test this programmatic access flow by calling your canister directly with `dfx` to generate a key. The key will be linked to your current `dfx` identity.
Run the following command, replacing `` with the ID from the `npm run deploy` output.
```bash theme={null}
dfx canister call create_my_api_key '("My Test Key", vec {})'
```
The command will return your new API key.
**Save this key immediately!** This is the only time it will be visible.
You can now use this key to call a protected tool. The key must be passed in via the `x-api-key` header.
1. Open the MCP Inspector if it's not already open: `npx @modelcontextprotocol/inspector`
2. Set transport type to Streamable HTTP, and enter the URL of your local server (e.g., `http://127.0.0.1:4943/mcp?canisterId=tnszz-sh777-77774-qaasa-cai`).
3. Click the Authentication button, and set API Token Authentication using `x-api-key` as the header name and your generated API key as the value.
4. Click Connect.
If successful, your server will return the weather data, proving that your API key authentication and payment logic is working correctly.
***
🎉 **Congratulations!** Your server is now a fully monetized service. You've enabled and tested programmatic access via API Keys and you know how to add browser-based login for interactive web apps.
Next, you'll learn how to manage your service post-launch, including withdrawing funds from your treasury and enabling usage analytics.
# Multi-Tenant Pattern Guide
Source: https://docs.prometheusprotocol.org/guides/service-devs/multi-tenant-pattern
Building Shared MCP Services with Principal-Based Segregation
## What is Multi-Tenant?
A multi-tenant MCP server is **one canister** that serves **many users**, where each user's data is segregated by their principal ID.
```mermaid theme={null}
flowchart TD
UA["👤 User A"]
UB["👤 User B"]
UC["👤 User C"]
subgraph Shared["📦 Shared Canister"]
direction TB
DA["User A Todos"]
DB["User B Todos"]
DC["User C Todos"]
end
UA ==> Shared
UB ==> Shared
UC ==> Shared
style UA fill:#4a90e2,stroke:#2d3748,stroke-width:2px,color:#fff
style UB fill:#4a90e2,stroke:#2d3748,stroke-width:2px,color:#fff
style UC fill:#4a90e2,stroke:#2d3748,stroke-width:2px,color:#fff
style Shared fill:#48bb78,stroke:#2d3748,stroke-width:2px,color:#fff
style DA fill:#4a5568,stroke:#718096,stroke-width:1px,color:#fff
style DB fill:#4a5568,stroke:#718096,stroke-width:1px,color:#fff
style DC fill:#4a5568,stroke:#718096,stroke-width:1px,color:#fff
```
**When to Use:**
* ✅ Todo/task lists, notes, calendars, settings
* ❌ Token custody, financial operations, per-user contracts
**Trade-offs:**
* **Pros:** Cost-effective, simple deployment, shared resources
* **Cons:** Shared storage limits, requires careful access control
***
## Example: Multi-Tenant Todo List
Let's build a simple todo list MCP where each user has their own isolated tasks.
### 1. Define Your Data Model
```motoko theme={null}
// src/Types.mo
module {
public type Todo = {
id: Text;
title: Text;
completed: Bool;
createdAt: Int;
};
public type UserData = {
todos: [Todo];
createdAt: Int;
};
};
```
### 2. Set Up Principal-Based Storage
```motoko theme={null}
// src/main.mo
import Map "mo:map/Map";
import { phash } "mo:map/Map";
import Principal "mo:base/Principal";
import Time "mo:base/Time";
import Array "mo:base/Array";
actor TodoMCP {
// Store each user's data by their principal
stable var userData = Map.new();
// Helper to get or create user data
private func getUserData(caller: Principal) : Types.UserData {
switch (Map.get(userData, phash, caller)) {
case (?data) data;
case (null) {
let newData: Types.UserData = {
todos = [];
createdAt = Time.now();
};
Map.set(userData, phash, caller, newData);
newData
};
};
};
// Helper to update user data
private func setUserData(caller: Principal, data: Types.UserData) {
Map.set(userData, phash, caller, data);
};
}
```
### 3. Create MCP Tools
```motoko theme={null}
// Tool 1: Add Todo
public func todo_add(title: Text, auth: ?AuthTypes.AuthInfo) : async Result.Result {
// Get authenticated user's principal
let caller = switch (auth) {
case (?authInfo) authInfo.principal;
case (null) { return #err("Authentication required") };
};
// Get user's data (creates if new user)
var data = getUserData(caller);
// Create new todo
let newTodo: Types.Todo = {
id = Principal.toText(caller) # "-" # Int.toText(Time.now());
title = title;
completed = false;
createdAt = Time.now();
};
// Add to user's todos
data := {
data with
todos = Array.append(data.todos, [newTodo]);
};
// Save updated data
setUserData(caller, data);
#ok(newTodo.id)
};
// Tool 2: List Todos
public func todo_list(auth: ?AuthTypes.AuthInfo) : async Result.Result<[Types.Todo], Text> {
let caller = switch (auth) {
case (?authInfo) authInfo.principal;
case (null) { return #err("Authentication required") };
};
let data = getUserData(caller);
#ok(data.todos)
};
// Tool 3: Toggle Todo
public func todo_toggle(id: Text, auth: ?AuthTypes.AuthInfo) : async Result.Result<(), Text> {
let caller = switch (auth) {
case (?authInfo) authInfo.principal;
case (null) { return #err("Authentication required") };
};
var data = getUserData(caller);
// Find and toggle the todo
let updatedTodos = Array.map(
data.todos,
func(todo) {
if (todo.id == id) {
{ todo with completed = not todo.completed }
} else {
todo
}
}
);
data := { data with todos = updatedTodos };
setUserData(caller, data);
#ok()
};
// Tool 4: Delete Todo
public func todo_delete(id: Text, auth: ?AuthTypes.AuthInfo) : async Result.Result<(), Text> {
let caller = switch (auth) {
case (?authInfo) authInfo.principal;
case (null) { return #err("Authentication required") };
};
var data = getUserData(caller);
// Remove the todo
let filteredTodos = Array.filter(
data.todos,
func(todo) { todo.id != id }
);
data := { data with todos = filteredTodos };
setUserData(caller, data);
#ok()
};
```
### 4. Register with MCP Server
```motoko theme={null}
import Mcp "mo:mcp-motoko-sdk/mcp/Mcp";
import McpTypes "mo:mcp-motoko-sdk/mcp/Types";
// Define tool schemas
let todoAddTool: McpTypes.Tool = {
name = "todo_add";
title = ?"Add Todo";
description = ?"Create a new todo item in your personal list";
payment = null;
inputSchema = Json.obj([
("type", Json.str("object")),
("properties", Json.obj([
("title", Json.obj([
("type", Json.str("string")),
("description", Json.str("Todo title"))
]))
])),
("required", Json.arr([Json.str("title")]))
]);
outputSchema = ?Json.obj([
("type", Json.str("object")),
("properties", Json.obj([
("id", Json.obj([("type", Json.str("string"))]))
]))
]);
};
// Register all tools
let mcpConfig: McpTypes.McpConfig = {
self = Principal.fromActor(self);
serverInfo = {
name = "io.example.todo";
title = "Multi-Tenant Todo List";
version = "1.0.0";
};
tools = [todoAddTool, todoListTool, todoToggleTool, todoDeleteTool];
toolImplementations = [
("todo_add", handleTodoAdd),
("todo_list", handleTodoList),
("todo_toggle", handleTodoToggle),
("todo_delete", handleTodoDelete)
];
// ... other MCP config
};
let mcpServer = Mcp.createServer(mcpConfig);
```
***
## Key Security Principles
### 1. Always Check the Caller
```motoko theme={null}
// ✅ CORRECT - Each user only accesses their own data
let caller = switch (auth) {
case (?authInfo) authInfo.principal;
case (null) { return #err("Authentication required") };
};
let data = getUserData(caller); // Automatically scoped to this user
// ❌ WRONG - Never search across all users
for ((principal, data) in userData.entries()) {
// This can leak data from other users!
}
```
### 2. No Cross-User Access
```motoko theme={null}
// ❌ NEVER allow accessing another user's data
public func get_user_todos(userId: Text) : async [Types.Todo] {
// This is dangerous! Any user could access anyone's data
}
// ✅ ALWAYS use the authenticated principal
public func get_my_todos(auth: ?AuthTypes.AuthInfo) : async [Types.Todo] {
let caller = switch (auth) {
case (?authInfo) authInfo.principal;
case (null) { return #err("Authentication required") };
};
let data = getUserData(caller);
data.todos
}
```
### 3. Validate All Inputs
```motoko theme={null}
// Check title length
if (title.size() == 0) {
return #err("Title cannot be empty");
};
if (title.size() > 500) {
return #err("Title too long (max 500 characters)");
};
```
***
## Testing Your Multi-Tenant App
### 1. Deploy Locally
```bash theme={null}
dfx start --background
dfx deploy
```
### 2. Create API Keys for Different Users
```bash theme={null}
# User 1
dfx identity use alice
dfx canister call todo_mcp create_my_api_key '("Test Key", vec {})'
# Save the key: KEY_ALICE="..."
# User 2
dfx identity use bob
dfx canister call todo_mcp create_my_api_key '("Test Key", vec {})'
# Save the key: KEY_BOB="..."
```
# Overview
Source: https://docs.prometheusprotocol.org/guides/service-devs/overview
Your complete guide to building, monetizing, and verifying a service on the Prometheus Protocol.
Welcome, MCP server developer!
This guide will walk you through the entire lifecycle of a service: from a local "Hello, World" to a monetized, globally-available application listed in the decentralized App Store.
### The Developer Journey
The path to launching a successful, trusted service on the protocol involves these key stages. This guide is structured to walk you through each one.
Deploy a basic, functional MCP server to your local environment in minutes
and test it with the MCP Inspector.
Integrate our on-chain OAuth 2.1 provider and enable the token allowance
system to add paid, protected tools to your service.
Submit your service for a decentralized audit. A successful verification
earns you a **Prometheus Certificate** and a live deployment on the main
network.
Learn how to manage your service post-launch, including withdrawing funds
from your treasury and enabling usage analytics.
### Your Toolkit
Your project template comes pre-configured with a command-line tool, accessible via `npm run` scripts.
```bash theme={null}
npm run app-store [options]
```
This tool manages the trust and verification lifecycle. You'll use it to
publish your service for auditing and deployment.
Ready to get started? Let's deploy your first server.
# Publishing
Source: https://docs.prometheusprotocol.org/guides/service-devs/publishing
Submit your service for automated reproducible build verification and deployment to mainnet.
Once your service is built and tested, the final step is to publish it. This makes it discoverable in the Prometheus App Store and automatically triggers the decentralized verification process.
This guide will walk you through using the `app-store-cli` to get your service verified and deployed on the main network.
### The Automated Verification Process
Publishing triggers a fully automated workflow that gets your code from your machine to a live mainnet canister with cryptographic proof of integrity:
1. **Publish:** You submit your service's Git commit hash and metadata to the protocol using `app-store-cli release`.
2. **Bounty Creation:** The protocol automatically creates verification bounties (\~\$2.25 per version) to incentivize independent verifiers.
3. **Automated Build Verification:** Multiple independent verifier bots detect your submission, clone your repository, rebuild your WASM in deterministic Docker environments, and compare hashes.
4. **Consensus:** The system requires 5 of 9 independent verifiers to agree on the same WASM hash for verification to succeed.
5. **Attestations:** Verifiers file cryptographic attestations on-chain (ICRC-126) and claim their bounty rewards (ICRC-127).
6. **Deploy:** Once verified, the protocol automatically creates a new canister on your behalf and deploys the verified WASM to the main network.
7. **Security Audits (Optional):** You can add additional bounties to incentivize security auditors to review your code for vulnerabilities, earning higher certificate tiers (Gold, Silver, Bronze).
The entire process from publishing to verification typically completes in **1-5 minutes** with zero human intervention.
### Step 1: Ensure Your Code is Committed
The verification process is anchored to a specific Git commit. Make sure all your changes are committed and pushed to GitHub:
```bash theme={null}
git add .
git commit -m "Ready for publishing"
git push
```
The `app-store-cli release` command will automatically capture your commit hash and update your `prometheus.yml` file.
### Step 2: Configure Your Manifest (One Time Setup)
If you haven't already, initialize your `prometheus.yml` configuration file:
```bash theme={null}
# Using the npm script
npm run app-store init -y
# Direct CLI command
npx @prometheus-protocol/app-store-cli init -y
```
Open the generated `prometheus.yml` file and configure:
* Your service metadata (name, description, category)
* Public **`icon_url`** and **`banner_url`** for the App Store listing (see below for hosting tips)
**Note:** The `git_commit` and `wasm_path` fields will be automatically updated by the `release` command, so you don't need to manually set them.
### Step 3: Host Your App's Visual Assets
Your app's icon and banner need to be accessible via public URLs to be displayed in the App Store. The easiest and most professional way to host these is by using **GitHub Releases**.
1. **Navigate to Releases:** In your GitHub repository, click on the **"Releases"** tab on the right-hand side.
2. **Draft a New Release:** Click the **"Draft a new release"** button.
3. **Create a Tag:** In the "Choose a tag" box, type a new tag for your assets (e.g., `v1.0.0-assets`) and click "Create new tag". Give it a title like "App Store Assets".
4. **Upload Images:** Drag and drop your `icon.png` and `banner.png` files into the attachments box.
5. **Publish Release:** Click the **"Publish release"** button.
6. **Copy URLs:** On the release page, your images will be listed as assets. **Right-click** on each asset's filename and select **"Copy Link Address"**. These are the permanent, public URLs you'll need for your `prometheus.yml` manifest.
### Step 4: Publish Your Service (One Command)
Now you're ready to publish! The `release` command handles everything automatically:
```bash theme={null}
# Using the npm script (replace "1.0.0" with your version)
npm run app-store release "1.0.0"
# Direct CLI command (replace "1.0.0" with your version)
npx @prometheus-protocol/app-store-cli release "1.0.0"
```
**What this command does automatically:**
1. ✅ Updates the version number in your source code (`src/main.mo`)
2. ✅ Commits and pushes the version change to GitHub
3. ✅ Captures the commit hash and updates `prometheus.yml`
4. ✅ Commits and pushes the `prometheus.yml` update
5. ✅ Builds your WASM using the reproducible build system
6. ✅ Publishes to the registry and creates verification bounties
**That's it!** The entire workflow is handled by a single command.
### Step 5: Monitor the Verification Status
Once you've published, your submission automatically triggers the verification network. Multiple independent verifier bots will:
1. Clone your repository at the exact commit hash
2. Rebuild your WASM in deterministic Docker environments
3. Compare the built WASM hash with your submitted hash
4. File cryptographic attestations on-chain
5. Claim their bounty rewards
You can track this process in real-time:
1. Go to **[https://prometheusprotocol.org/audit-hub](https://prometheusprotocol.org/audit-hub)**
2. Find your service and view the verification progress
3. Watch as verifiers complete their builds and file attestations
**Consensus typically takes 1-5 minutes.** Once 5 of 9 verifiers agree, your WASM is marked as verified and automatically deployed to mainnet.
#### Understanding the Verification Process
**Build Verification (Automated):**
* Free for users to verify (reproducible builds are public infrastructure)
* \~\$2.25 cost per version for bounty rewards to verifiers
* Proves **integrity**: deployed code matches source code
* Required for all published services
**Security Audits (Optional):**
* Additional bounties for human security experts
* Proves **safety**: source code is free from vulnerabilities
* Required for Gold/Silver/Bronze certificate tiers
* Can be added after build verification completes
#### Speeding Up Security Audits
If you want to achieve a higher certificate tier (Gold, Silver, or Bronze), you'll need security audits in addition to build verification:
* **Add a Bounty:** Use the app store UI to add security audit bounties to your submission, making it more attractive for human auditors.
* **Request a Bounty:** If you don't want to fund it yourself, you can post in our Discord and ask if another community member is willing to sponsor your audit.
Build verification happens automatically, but security audits require human review and may take longer.
***
🎉 **Congratulations!** Your MCP server is a trusted, verified, and discoverable part of the Prometheus ecosystem.
# Quick Start
Source: https://docs.prometheusprotocol.org/guides/service-devs/quickstart
Go from zero to a running local MCP server in minutes.
This guide will walk you through the fastest way to get a new MCP server running on your local machine. By the end, you'll have a deployed, testable service.
### Prerequisites
Before you begin, make sure you have the following tools installed on your system:
* **DFX:** The DFINITY Canister SDK. [Installation Guide](https://internetcomputer.org/docs/current/developer-docs/setup/install/).
* **Node.js:** Version 18.0 or higher. [Download](https://nodejs.org/).
* **MOPS:** The Motoko Package Manager. [Installation Guide](https://mops.one/docs/install).
* **Git:** The version control system. [Download](https://git-scm.com/).
### Step 1: Scaffold Your Project
First, create a new project using our template. This sets up a complete, ready-to-run MCP server.
```bash theme={null}
# Creates a new project in a directory called `my-mcp-server`
npx create-motoko-mcp-server my-mcp-server
# Navigate into your new project directory
cd my-mcp-server
```
### Step 2: Initialize Your Repository
The Prometheus publishing process is tied to your Git history. Initialize a repository and make your first commit now so you're ready to publish later.
```bash theme={null}
# Initialize a new Git repository
git init
# Stage all the new files
git add .
# Make your first commit
git commit -m "Initial commit from template"
```
### Step 3: Install Dependencies
Next, you need to install the project's dependencies. The template uses both Node.js for scripting and MOPS for Motoko packages.
Run the following commands from your project's root directory:
```bash theme={null}
# Install Node.js dependencies
npm install
# Install Motoko dependencies
npm run mops:install
```
### Step 4: Deploy Your Server
Now, you'll deploy the server to a local, simulated version of the blockchain network.
1. **Start the Local Replica:**
This command starts the local development network in the background.
If you already have the local replica running from another project, you
can skip this step. You can check its status by running `dfx ping` in your
terminal. If it returns a healthy status, you're good to go.
```bash theme={null}
npm run start
```
2. **Deploy to the Local Replica:**
This command compiles your Motoko code and deploys it to the local network.
You must run this command in a **new terminal window**, as the local
replica will be running in your current one.
```bash theme={null}
npm run deploy
```
After a moment, the CLI will output the canister ID of your deployed server. Keep this ID handy for the next step.
### Step 5: Test with the MCP Inspector
The MCP Inspector is a web-based tool for interacting with your server's tools.
1. **Launch the Inspector:**
This command starts the Inspector web app.
```bash theme={null}
npm run inspector
```
2. **Connect to Your Server:**
The Inspector needs the URL of your local server. Construct the URL using the canister ID from the `deploy` step.
```
# Replace `your_canister_id` with the actual ID from the deploy output
http://127.0.0.1:4943/mcp/?canisterId=your_canister_id
```
Paste this URL into the Inspector's connection bar. You can now see and call the default `get_weather` tool.
***
🎉 **Congratulations!** You have a working MCP server running locally.
The next sections cover advanced topics like adding authentication and connecting to the payments system.
# Wrapper Pattern Guide
Source: https://docs.prometheusprotocol.org/guides/service-devs/wrapper-pattern
Creating an AI Agent Identity for Your Canister Backend
# Wrapper Pattern Guide
Build an MCP canister that wraps existing backend logic, providing AI agents with high-level tools and identity management.
## What is the Wrapper Pattern?
The wrapper pattern creates an **MCP server canister** that acts as an identity-owning interface to your existing backend canister(s). It orchestrates complex multi-step workflows so AI agents don't have to.
```mermaid theme={null}
flowchart TD
Agent["🤖 AI Agent
(Claude, GPT, Custom)"]
Agent -->|MCP Protocol
HTTP/JSON-RPC| MCP
subgraph MCP["📦 MCP Wrapper Canister"]
Auth["🔐 Authentication
API Keys, OAuth"]
Tools["🛠️ High-Level Tools
swap, quote, claim"]
Orch["⚙️ Orchestration
Multi-step workflows"]
Auth --> Tools
Tools --> Orch
end
MCP -->|Candid Interface| Backend["🏦 Your Backend Canister
(DEX, Ledger, Custom Logic)"]
style Agent fill:#4a90e2,stroke:#2d3748,stroke-width:2px,color:#fff
style MCP fill:#48bb78,stroke:#2d3748,stroke-width:2px,color:#fff
style Auth fill:#4a5568,stroke:#718096,stroke-width:1px,color:#fff
style Tools fill:#4a5568,stroke:#718096,stroke-width:1px,color:#fff
style Orch fill:#4a5568,stroke:#718096,stroke-width:1px,color:#fff
style Backend fill:#38b2ac,stroke:#2d3748,stroke-width:2px,color:#fff
```
**When to Use:**
* ✅ Complex workflows (DEX swaps, multi-step approvals)
* ✅ Need canister identity to hold allowances
* ✅ Wrapping existing protocols (DeFi, governance)
* ❌ Simple CRUD operations (use multi-tenant instead)
***
## Example: DEX Swap Wrapper
Let's wrap a DEX canister to provide a simple "swap" tool that handles all the complexity.
### What the User Wants
```
"Swap 10 ICP for ckBTC"
```
### What the Wrapper Does
```motoko theme={null}
// Behind the scenes, the wrapper orchestrates:
// 1. Check wrapper's ICP balance
// 2. If insufficient, pull ICP from user's wallet
// 3. Approve DEX to spend ICP
// 4. Get swap quote
// 5. Execute swap
// 6. Return ckBTC to user
```
***
## Step-by-Step Implementation
### 1. Set Up Your Project
```bash theme={null}
# Clone the ArcSwap template
git clone https://github.com/jneums/arcswap.git my-wrapper
cd my-wrapper
# Install dependencies
npm install
npm run mops:install
```
### 2. Define Your Tool Context
```motoko theme={null}
// src/tools/ToolContext.mo
module {
public type ToolContext = {
canisterPrincipal: Principal; // This canister's identity
owner: Principal; // Authorized user
dexCanisterId: Principal; // Backend DEX
icpLedgerId: Principal; // ICP ledger
ckBtcLedgerId: Principal; // ckBTC ledger
};
};
```
### 3. Create Your Swap Tool
```motoko theme={null}
// src/tools/dex_swap.mo
import McpTypes "mo:mcp-motoko-sdk/mcp/Types";
import AuthTypes "mo:mcp-motoko-sdk/auth/Types";
import Result "mo:base/Result";
import Principal "mo:base/Principal";
module {
// Define the tool schema
public func config() : McpTypes.Tool = {
name = "dex_swap";
title = ?"Execute DEX Swap";
description = ?"Swap tokens using the DEX";
payment = null;
inputSchema = Json.obj([
("type", Json.str("object")),
("properties", Json.obj([
("fromToken", Json.obj([
("type", Json.str("string")),
("description", Json.str("Token to swap from (e.g., 'ICP')"))
])),
("amount", Json.obj([
("type", Json.str("string")),
("description", Json.str("Amount to swap"))
])),
("toToken", Json.obj([
("type", Json.str("string")),
("description", Json.str("Token to swap to (e.g., 'ckBTC')"))
])),
("userWallet", Json.obj([
("type", Json.str("string")),
("description", Json.str("User's wallet principal"))
]))
])),
("required", Json.arr([
Json.str("fromToken"),
Json.str("amount"),
Json.str("toToken"),
Json.str("userWallet")
]))
]);
outputSchema = ?Json.obj([
("type", Json.str("object")),
("properties", Json.obj([
("txId", Json.obj([("type", Json.str("string"))])),
("amountOut", Json.obj([("type", Json.str("string"))])),
("status", Json.obj([("type", Json.str("string"))]))
]))
]);
};
// Implement the tool handler
public func handle(
context: ToolContext.ToolContext
) : (
McpTypes.JsonValue,
?AuthTypes.AuthInfo,
(Result.Result) -> ()
) -> async () {
func(args, auth, cb) : async () {
// Helper functions
func makeError(message: Text) {
cb(#ok({
content = [#text({ text = message })];
isError = true;
structuredContent = null
}));
};
func ok(structured: Json.Json) {
cb(#ok({
content = [#text({ text = Json.stringify(structured, null) })];
isError = false;
structuredContent = ?structured
}));
};
// 1. Check authorization
let ownerPrincipal = switch (auth) {
case (?authInfo) authInfo.principal;
case (null) { return makeError("Authentication required") };
};
if (ownerPrincipal != context.owner) {
return makeError("Unauthorized: Only owner can execute swaps");
};
// 2. Parse inputs
let amount = switch (Json.getAsText(args, "amount")) {
case (#ok a) {
switch (Nat.fromText(a)) {
case (?n) n;
case (null) { return makeError("Invalid amount") };
}
};
case _ { return makeError("Missing amount") };
};
let userWallet = switch (Json.getAsText(args, "userWallet")) {
case (#ok w) {
switch (Principal.fromText(w)) {
case (p) p;
case (_) { return makeError("Invalid wallet principal") };
}
};
case _ { return makeError("Missing userWallet") };
};
// 3. Check wrapper's balance
let icpLedger = actor(Principal.toText(context.icpLedgerId)) : ICRC1.Self;
let wrapperBalance = await icpLedger.icrc1_balance_of({
owner = context.canisterPrincipal;
subaccount = null;
});
let fee = 10_000; // ICP fee
let totalNeeded = amount + fee;
// 4. Pull funds if needed
if (wrapperBalance < totalNeeded) {
let amountToPull = totalNeeded - wrapperBalance;
let transferResult = await icpLedger.icrc2_transfer_from({
from = { owner = userWallet; subaccount = null };
to = { owner = context.canisterPrincipal; subaccount = null };
amount = amountToPull;
fee = ?fee;
memo = null;
created_at_time = null;
});
switch (transferResult) {
case (#Ok(_)) {};
case (#Err(e)) {
return makeError("Failed to pull funds: " # debug_show(e));
};
};
};
// 5. Approve DEX
let approveResult = await icpLedger.icrc2_approve({
spender = { owner = context.dexCanisterId; subaccount = null };
amount = amount;
expires_at = ?(Time.now() + 300_000_000_000); // 5 min expiry
fee = ?fee;
memo = null;
created_at_time = null;
});
switch (approveResult) {
case (#Ok(_)) {};
case (#Err(e)) {
return makeError("Failed to approve DEX: " # debug_show(e));
};
};
// 6. Execute swap
let dex = actor(Principal.toText(context.dexCanisterId)) : DEX.Self;
let swapResult = await dex.swap({
fromToken = "ICP";
toToken = "ckBTC";
amount = amount;
slippage = 0.5; // 0.5%
});
switch (swapResult) {
case (#Ok(result)) {
let output = Json.obj([
("txId", Json.str(Nat.toText(result.txId))),
("amountOut", Json.str(Nat.toText(result.amountOut))),
("status", Json.str("success"))
]);
ok(output);
};
case (#Err(e)) {
makeError("Swap failed: " # e);
};
};
};
};
};
```
### 4. Register in Main Actor
```motoko theme={null}
// src/main.mo
import Mcp "mo:mcp-motoko-sdk/mcp/Mcp";
import McpTypes "mo:mcp-motoko-sdk/mcp/Types";
import DexSwap "tools/dex_swap";
shared ({ caller = deployer }) actor class WrapperMCP() = self {
var owner: Principal = deployer;
// Initialize tool context
let toolContext: ToolContext.ToolContext = {
canisterPrincipal = Principal.fromActor(self);
owner = owner;
dexCanisterId = Principal.fromText("your-dex-canister-id");
icpLedgerId = Principal.fromText("ryjl3-tyaaa-aaaaa-aaaba-cai");
ckBtcLedgerId = Principal.fromText("mxzaz-hqaaa-aaaar-qaada-cai");
};
// Register tools
let tools: [McpTypes.Tool] = [
DexSwap.config(),
];
let mcpConfig: McpTypes.McpConfig = {
self = Principal.fromActor(self);
serverInfo = {
name = "io.example.dex-wrapper";
title = "DEX Swap Wrapper";
version = "1.0.0";
};
tools = tools;
toolImplementations = [
("dex_swap", DexSwap.handle(toolContext)),
];
// ... rest of config
};
let mcpServer = Mcp.createServer(mcpConfig);
// HTTP handlers
public query func http_request(req: HttpTypes.HttpRequest) : async HttpTypes.HttpResponse {
// ... HttpHandler.http_request
};
public shared func http_request_update(req: HttpTypes.HttpRequest) : async HttpTypes.HttpResponse {
// ... HttpHandler.http_request_update
};
};
```
***
## Key Security Principles
### 1. Owner-Only Operations
```motoko theme={null}
// ✅ CORRECT - Check that caller is the authorized owner
if (ownerPrincipal != context.owner) {
return makeError("Unauthorized");
};
// ❌ WRONG - Allowing any authenticated user
if (ownerPrincipal == null) {
return makeError("Authentication required");
};
// Missing ownership check!
```
### 2. Use Allowances, Not Direct Transfers
```motoko theme={null}
// ✅ CORRECT - Pull exact amount needed via allowance
let result = await ledger.icrc2_transfer_from({
from = { owner = userWallet; subaccount = null };
to = { owner = context.canisterPrincipal; subaccount = null };
amount = amountNeeded;
// ...
});
// ❌ WRONG - Asking user to send funds first
// "Please send tokens to this canister, then call the swap function"
// This is dangerous and bad UX
```
### 3. Set Expiry Times
```motoko theme={null}
// ✅ CORRECT - Approvals should expire
expires_at = ?(Time.now() + 300_000_000_000); // 5 minutes
// ❌ WRONG - Infinite approval
expires_at = null; // Never expires - security risk!
```
### 4. Don't Store User Funds
```motoko theme={null}
// ✅ CORRECT - Pull, use, and return in same operation
// Pull funds → Approve → Execute → Return remainder
// ❌ WRONG - Storing user funds long-term
stable var userBalances = Map.new();
// This creates custody responsibilities
```
***
## Testing Your Wrapper
### 1. Deploy Locally
```bash theme={null}
dfx start --background
dfx deploy
```
### 2. Create API Key
```bash theme={null}
dfx canister call wrapper_mcp create_my_api_key '("Test Key", vec {})'
# Save the returned key
```
### 3. Test the Swap
```bash theme={null}
npm run inspector
```
Then connect to your local canister and test the tools interactively.
***
## Common Patterns
### Pattern 1: Multi-Step Workflows
```motoko theme={null}
// Check → Pull → Approve → Execute → Return
func orchestrateSwap() : async Result {
let balance = await checkBalance();
if (balance < needed) {
let pulled = await pullFunds(needed - balance);
};
let approved = await approve(dex, amount);
let swapped = await executeSwap(params);
let returned = await returnRemainder();
#ok(swapped)
};
```
### Pattern 2: Quote Before Execute
```motoko theme={null}
// Tool 1: Get Quote (query)
public func dex_quote(...) : async Result {
let dex = actor(...) : DEX.Self;
await dex.get_quote(fromToken, toToken, amount)
};
// Tool 2: Execute with Quote (update)
public func dex_swap(quoteId: Text, ...) : async Result {
// User reviews quote, then executes
};
```
### Pattern 3: Claim Rewards
```motoko theme={null}
// Wrapper checks rewards and claims on behalf of user
public func claim_rewards(...) : async Result {
let rewards = await protocol.check_rewards(userWallet);
if (rewards > 0) {
await protocol.claim_to(userWallet);
#ok(rewards)
} else {
#err("No rewards available")
}
};
```
***
## Comparison with Multi-Tenant Pattern
| Feature | Wrapper Pattern | Multi-Tenant Pattern |
| -------------- | ----------------------------- | ----------------------------- |
| **Purpose** | Orchestrate complex workflows | Store user data |
| **Identity** | Canister holds allowances | Users identified by principal |
| **Use Cases** | DEX swaps, DeFi, governance | Todo lists, notes, settings |
| **Complexity** | High (multi-step operations) | Low (CRUD operations) |
| **Backend** | Wraps existing protocols | Self-contained logic |
***
## Next Steps
* **For simple data storage:** See the [Multi-Tenant Pattern Guide](./multi-tenant-pattern)
* **Deploy to production:** Use `dfx deploy --network ic`
* **Add to App Store:** Submit via `prometheus submit`
# Getting Started as a Verifier
Source: https://docs.prometheusprotocol.org/guides/verifiers/getting-started
Step-by-step guide to setting up your verifier bot and earning token rewards.
This guide will walk you through everything you need to start earning token rewards by running a verifier bot. The entire setup process takes about 15-30 minutes.
## Prerequisites
Before you begin, you'll need:
* A VPS or cloud instance (2 CPU, 4GB RAM minimum) - \$5-10/month
* Recommended: DigitalOcean, Linode, AWS EC2, or any Linux VPS
* Docker installed on your server
* 10-20 USDC for initial stake pool
* Internet Identity for dashboard authentication
## Step 1: Set Up Your Verifier Dashboard Account
### 1.1 Create Your Account
1. Visit **[prometheusprotocol.org/verifiers](https://prometheusprotocol.org/verifiers)**
2. Click the **"Login"** button and log in with Internet Identity
3. Complete the verifier onboarding flow
### 1.2 Deposit Your Initial Stake
Your stake pool is used as collateral for reserving bounties. We recommend starting with 10-20 USDC:
1. In the dashboard, click **"Deposit Stake"**
2. Enter the amount (e.g., 10 USDC)
3. Confirm the deposit transaction
The deposit is processed automatically—no manual approvals needed.
**How much to stake?**
* **10 USDC** = \~30 concurrent verifications (beginner)
* **20 USDC** = \~60 concurrent verifications (active)
* **50+ USDC** = 150+ concurrent verifications (professional)
Each verification requires 0.30 USDC collateral, which is returned upon completion.
### 1.3 Generate API Credentials
Your bot will use API credentials to interact with the protocol:
1. In the dashboard, navigate to **"API Credentials"**
2. Click **"Generate New API Key"**
3. Give it a descriptive name (e.g., "Production Bot 1")
4. **Copy and save the API key securely** - it won't be shown again
**Why use separate API keys?**
* **Selective revocation:** If a bot is compromised, revoke only that specific key without affecting other bots
* **Per-key metrics:** Monitor performance and earnings separately for each bot (coming soon)
* **Multi-bot management:** Run bots on different servers with isolated credentials
**Security Note:** API keys can reserve bounties and submit attestations, but cannot withdraw funds without WebAuthn confirmation in the dashboard.
## Step 2: Set Up Your Server
### 2.1 Install Docker
If Docker isn't already installed on your VPS:
```bash theme={null}
# For Ubuntu/Debian
curl -fsSL https://get.docker.com -o get-docker.sh
sudo sh get-docker.sh
sudo usermod -aG docker $USER
# Log out and back in for group changes to take effect
# Verify installation
docker --version
docker-compose --version
```
### 2.2 Clone the Verifier Bot Repository
```bash theme={null}
# Clone the Prometheus Protocol repository
git clone https://github.com/prometheus-protocol/prometheus-protocol.git
cd prometheus-protocol/packages/apps/verifier-bot
```
**Alternative: Use the Public Docker Image**
If you prefer not to build from source, you can use the pre-built public Docker image:
```bash theme={null}
# Pull the latest verifier bot image
docker pull ghcr.io/prometheus-protocol/verifier-bot:latest
# Run directly with environment variables
docker run -d \
--name verifier-bot \
-e VERIFIER_API_KEY=your_api_key_here \
-e NETWORK=ic \
ghcr.io/prometheus-protocol/verifier-bot:latest
```
This image is automatically built and published from the main repository.
### 2.3 Configure Environment Variables
Create your `.env` file with your API credentials:
```bash theme={null}
cd deployment
cp .env.example .env
nano .env # or use your preferred editor
```
Edit the `.env` file and set:
```bash theme={null}
# Your API key from the dashboard
VERIFIER_API_KEY=your_api_key_here
# Network configuration (local for testing, ic for production)
NETWORK=ic
# Optional: GitHub token for private repos (if needed)
GITHUB_TOKEN=your_github_token_here
```
**Save and close the file.**
## Step 3: Build and Run Your Verifier Bot
### 3.1 Build Docker Images
First, build the base Docker images for reproducible builds:
```bash theme={null}
# From the deployment directory
docker-compose build --no-cache
```
This builds the deterministic Docker environment that will be used for all verifications.
### 3.2 Start Your Verifier Bot
```bash theme={null}
docker-compose up -d
```
**What this does:**
* Starts your verifier bot in the background (daemon mode)
* Bot begins polling for pending verifications every 60 seconds
* Automatically reserves bounties, performs builds, and claims rewards
### 3.3 Monitor Your Bot
Check that your bot is running correctly:
```bash theme={null}
# View logs in real-time
docker-compose logs -f
# Check running containers
docker ps
# View recent logs
docker-compose logs --tail=100
```
You should see output like:
```
verifier-bot | Found 3 pending verification(s)
verifier-bot | Reserving bounty 12345...
verifier-bot | Building WASM from https://github.com/example/repo.git @ abc123...
verifier-bot | Build completed in 8.3 seconds
verifier-bot | Hash match: ✅ 0x1234abcd...
verifier-bot | Filing attestation...
verifier-bot | Claiming bounty...
verifier-bot | ✅ Reward transferred to verifier
```
## Step 4: Monitor Your Earnings
### 4.1 Dashboard Overview
Return to the **Verifier Dashboard** to monitor your operations:
**Real-time Metrics:**
* Total verifications completed
* Active stakes and locks
* Earned rewards (available for withdrawal)
* Performance metrics and uptime
* Recent verification history
### 4.2 Withdraw Earnings
When you're ready to withdraw your earnings:
1. In the dashboard, navigate to **"Earnings"**
2. Click **"Withdraw"**
3. Enter the amount you want to withdraw
4. Confirm with WebAuthn
5. USDC is transferred to your wallet
**Note:** You can withdraw anytime. Withdrawn funds are immediately available in your wallet.
## Step 5: Scaling Your Operation
### 5.1 Running Multiple Bots
To increase throughput, you can run multiple bots on different servers:
1. Set up additional VPS instances
2. Follow steps 2-3 for each instance
3. Use the **same API key** - all bots share your dashboard stake pool
4. Monitor all bots from one centralized dashboard
### 5.2 Optimizing Performance
**Tips for maximizing earnings:**
* Use SSD storage for faster git clones and builds
* Place VPS in regions close to GitHub servers (US-East, EU-West)
* Monitor the dashboard for peak verification times
* Add more stake during high-demand periods
* Keep Docker images up to date
### 5.3 Auto-Restart on Failure
Configure automatic restarts if your bot crashes:
```bash theme={null}
# Edit docker-compose.yml and add:
restart: unless-stopped
# Then restart:
docker-compose down
docker-compose up -d
```
## Troubleshooting
### Bot Not Finding Verifications
**Check:**
* API key is correctly set in `.env`
* Network is set to `ic` (not `local`)
* Bot has internet connectivity
* Docker containers are running: `docker ps`
### Insufficient Stake Errors
**Solution:**
* Check your available stake in the dashboard
* Deposit more USDC to your stake pool
* Each verification requires 0.30 USDC collateral
### Build Failures
**Check:**
* Docker has sufficient disk space: `df -h`
* Docker images are up to date: `docker-compose pull`
* Logs for specific error messages: `docker-compose logs --tail=500`
### Stake Not Returning
**Possible causes:**
* Verification is still in progress (check dashboard)
* Network issues prevented claim transaction (bot will retry)
* 1-hour timeout expired (stake was slashed for abandonment)
**Fix:**
* Check "Active Stakes" in dashboard for details
* Ensure bot is running and connected
* Contact support if stake appears stuck
## Advanced Configuration
### Custom Polling Interval
Edit `packages/apps/verifier-bot/src/index.ts`:
```typescript theme={null}
// Change polling interval (default: 60 seconds)
setInterval(pollAndVerify, 30_000); // 30 seconds
```
Rebuild and restart:
```bash theme={null}
docker-compose build --no-cache
docker-compose up -d
```
### Monitoring with External Tools
Set up Prometheus/Grafana monitoring:
1. Export metrics from your bot
2. Configure Prometheus to scrape metrics
3. Create Grafana dashboards for:
* Verifications per hour
* Success rate
* Earnings over time
* Stake utilization
## Security Best Practices
* Never commit `.env` files to git - Use separate API keys for testing and
production - Rotate API keys periodically - Revoke compromised keys
immediately in the dashboard
* Keep your VPS updated: `sudo apt update && sudo apt upgrade` - Use SSH keys
instead of passwords - Configure firewall rules (only necessary ports open) -
Enable automatic security updates
* Check dashboard daily for anomalies - Set up alerts for failed verifications
* Review bot logs weekly - Monitor stake utilization
## Getting Help
* **Documentation:** [docs.prometheusprotocol.org](https://docs.prometheusprotocol.org)
* **Discord Community:** [discord.gg/TbqgYERjYw](https://discord.gg/TbqgYERjYw)
* **GitHub Issues:** [github.com/prometheus-protocol/prometheus-protocol](https://github.com/prometheus-protocol/prometheus-protocol)
* **Support Email:** [support@prometheusprotocol.org](mailto:support@prometheusprotocol.org)
***
🎉 **Congratulations!** You're now earning passive income by securing the open agent economy. Your bot will continue verifying builds automatically while you monitor earnings in the dashboard.
# Verifiers Overview
Source: https://docs.prometheusprotocol.org/guides/verifiers/overview
Learn how to earn token rewards by running automated verifier bots that perform reproducible builds.
Verifiers are a critical part of the Prometheus Protocol's decentralized trust infrastructure. By running automated verifier bots, you help ensure that deployed code matches audited source code—while earning token rewards for your contribution.
### What Verifiers Do
Verifiers operate automated bots that:
1. **Monitor for pending verifications** in the MCP Registry
2. **Clone Git repositories** at specific commit hashes
3. **Rebuild WASM files** in deterministic Docker environments
4. **Compare cryptographic hashes** to verify reproducibility
5. **File on-chain attestations** (ICRC-126) with build results
6. **Claim bounty rewards** (ICRC-127) automatically
The entire process is **fully automated**—no manual code review required. Your bot does all the work while you earn passive income.
### Why Verifiers Matter
In a world where AI agents manage real economic value (token allowances, canister-held funds, cross-chain transactions), **trust is everything**. Verifiers provide cryptographic proof that:
* The code running in production matches the source code on GitHub
* Multiple independent parties verified the same WASM hash
* No malicious code was injected between development and deployment
This creates a **Byzantine fault-tolerant** verification network where consensus from 5 of 9 independent verifiers is required for approval.
Verifiers stake USDC collateral (0.30 USDC per verification) which is
slashed if they abandon work—ensuring accountability without centralized
oversight.
Anyone can run a verifier bot. Just stake USDC, configure Docker, and start
earning. No special permissions or approvals needed.
Bots handle everything: git clone, docker build, hash comparison,
attestation filing, and bounty claiming. Set it up once, earn continuously.
Developers set bounty amounts (\~\$0.25 per verification). Verifiers compete
to claim bounties quickly, creating a healthy competitive market.
### The Economic Model
**For Verifiers:**
* **Earn per verification:** \$0.25 USDC per successful build verification
* **Low operational costs:** \~\$0.01-0.05 in compute (VPS, electricity, bandwidth)
* **Healthy margins:** 5-25x markup on actual costs
* **Volume-based profitability:** Process many verifications automatically for steady income
* **Stake once, use everywhere:** Centralized stake pool in your dashboard covers all verifications
**Example Earnings:**
* **Casual verifier** (20-50 verifications/day): $5-12.50/day = $150-375/month
* **Active verifier** (100-200/day): $25-50/day = $750-1,500/month
* **Professional operation** (multiple bots, 500+/day): $125+/day = $3,750+/month
**Operational Requirements:**
* VPS or cloud instance: \$5-10/month (2 CPU, 4GB RAM)
* Initial stake pool: 10-20 USDC recommended (handles 30-60 concurrent verifications)
* Docker for isolated builds
* Verifier dashboard account at prometheusprotocol.org/verifiers
### How It Works
#### 1. Developer Publishes
A developer publishes a new MCP server version using `app-store-cli release`:
* Submits Git commit hash and WASM hash to the MCP Registry
* Creates 9 verification bounties (\~$0.25 each = $2.25 total)
* WASM becomes visible in `list_pending_verifications()` endpoint
#### 2. Your Bot Detects Work
Your verifier bot continuously polls for pending verifications:
```typescript theme={null}
const pending = await listPendingVerifications();
// Returns WASMs that need verification
```
#### 3. Reserve & Stake
Your bot reserves a bounty by staking USDC collateral:
```typescript theme={null}
await reserveBounty(identity, {
bounty_id: buildBounty.id,
stake_amount: 300_000n, // 0.30 USDC
});
// Stake is locked for 1 hour (builds complete in <10 seconds)
```
#### 4. Automated Build
Your bot performs a deterministic Docker build:
```typescript theme={null}
const result = await verifyBuild(repo, commit_hash, wasm_hash);
// Clones repo, checks out commit, builds in Docker, compares hash
```
#### 5. File Attestation
If the build succeeds, your bot files an on-chain attestation:
```typescript theme={null}
await fileAttestation(identity, {
bounty_id: buildBounty.id,
wasm_id: job.wasm_hash,
attestationData: {
'126:audit_type': 'build_reproducibility_v1',
build_duration_seconds: result.duration,
git_commit: job.commit_hash,
repo_url: job.repo,
},
});
```
#### 6. Claim Reward
Your bot claims the bounty, receiving stake + reward:
```typescript theme={null}
await claimBounty(identity, { bounty_id, wasm_id });
// Stake returned + 0.25 USDC reward transferred to your account
```
**Total time:** Typically 10-60 seconds from detection to reward.
### Security & Accountability
**Staking Mechanism:**
* **Reserve bounty:** Stake 0.30 USDC collateral (held by Audit Hub)
* **1-hour lock period:** Stake is locked while verification is in progress
* **Automated builds complete in under 10 seconds:** Plenty of time buffer
* **Slashing for abandonment:** If you don't submit results within 1 hour, your USDC stake is burned
* **Return on success:** Stake returned + 0.25 USDC reward
**Consensus Ensures Quality:**
* 9 independent verifications required per WASM
* 5 of 9 majority needed for finalization
* Byzantine fault tolerance: Even if minority of verifiers are malicious/incorrect, majority consensus ensures integrity
* Each verifier operates independently—no coordination needed
**Divergence Reports Also Pay:**
Even if a build fails verification, you can file a divergence report and still claim the bounty. This incentivizes honest reporting over success-driven verification.
### Dashboard Management
All verifier operations are managed through the **Verifier Dashboard** at `prometheusprotocol.org/verifiers`:
**Features:**
* **Centralized stake pool:** Deposit USDC once, use it across all verifications
* **Real-time monitoring:** View active stakes, earnings, and performance metrics
* **Instant withdrawals:** Withdraw earnings anytime
* **API credentials:** Generate secure API keys for your bots
* **Multi-bot support:** Run bots on multiple servers, all pulling from one stake pool
* **No wallet management in bots:** Bots use API credentials, funds stay secure in dashboard
**Security:**
* Dashboard is a **canister on ICP** (not a traditional web server)
* **WebAuthn authentication** (same security as Internet Identity)
* **Canister-controlled security:** Transparent, auditable code
* API keys are scoped and revocable
* Multi-signature withdrawals for large amounts (>\$1000)
### Getting Started
Ready to start earning? Check out our [Getting Started Guide](/guides/verifiers/getting-started) for step-by-step instructions on:
1. Setting up your Verifier Dashboard account
2. Depositing initial stake
3. Configuring and running your verifier bot
4. Monitoring earnings and performance
5. Scaling to multiple bots
You can also review the [Reproducible Builds Reference](/reference/reproducible-builds) for technical details on the Docker build process.
***
**Join the verification network and help secure the open agent economy while earning passive income.**
# Introduction
Source: https://docs.prometheusprotocol.org/index
The trust layer for the open agentic web—giving AI agents a passport, a bank account, and a trusted marketplace.
The future of the web will be run by AI agents. But right now, they're trapped.
On the open web, an agent is **blind and broke**. It can't prove who it is, it can't trust who it's talking to, and it has no way to pay for services on-chain. This is the single biggest blocker to a true, open agentic economy—leaving the door open for a future of closed, corporate **"walled gardens."**
**Prometheus Protocol sets them free.** We give every agent three simple things: a secure **Passport**, an on-chain **Bank Account**, and a trusted **Marketplace**.
A production-ready, on-chain OAuth 2.1 provider compliant with the latest MCP specification. This is the universal key that lets agents prove who they are and interact securely with services.
A complete, high-trust software supply chain including an on-chain App Store, automated reproducible build verification with economic incentives, and a DAO of staked auditors ensuring service quality.
Wallet creation and management for AI agents, plus a complete suite of agent-operable DeFi primitives enabling direct, programmable, near-zero fee payments—the fuel for machine-to-machine commerce.
By combining these layers, Prometheus provides the **complete trust stack** for AI agents to finally interact with the world.
### Who is this for?
This documentation is for anyone building or interacting with the open agentic web.
* **Service Developers:** Learn how to build MCP servers, get your code verified through automated reproducible builds, and deploy to the marketplace.
* **AI Agent Developers:** Discover how to find trusted services, authenticate with OAuth/API keys, and enable your agents to transact on-chain.
* **Verifiers:** Run automated bots to perform reproducible builds and earn USDC rewards for securing the ecosystem.
* **Auditors:** Stake USDC to claim security audit bounties and help maintain the integrity of the marketplace.
### How These Docs Are Organized
* **Getting Started:** High-level explanations of the vision, core concepts, and system architecture.
* **Guides:** Practical, step-by-step tutorials tailored to your specific role in the ecosystem.
* **Reference:** Detailed specifications for the CLI, SDKs, protocol endpoints, and open standards we implement.
# Canister IDs
Source: https://docs.prometheusprotocol.org/reference/canister-ids
A comprehensive list of official canister IDs for the core Prometheus Protocol services on the main network.
This page provides the official mainnet canister IDs for the core services of the Prometheus Protocol. Use these principals when interacting with the protocol directly or configuring your services and clients.
### Core Protocol Services
These are the primary backend canisters that orchestrate the protocol's logic.
| Service Name | Description | Canister ID (Principal) |
| :--------------------- | :----------------------------------------------------------------------------------------------------- | :---------------------------- |
| **MCP Registry** | The central on-chain registry for applications, WASM versions, and verification status (ICRC-118/126). | `grhdx-gqaaa-aaaai-q32va-cai` |
| **MCP Orchestrator** | The secure deployer that manages canister deployments, ensuring only verified WASM is used (ICRC-120). | `ez54s-uqaaa-aaaai-q32za-cai` |
| **Auth Server** | The on-chain OAuth 2.1 provider for user and agent authentication. | `bfggx-7yaaa-aaaai-q32gq-cai` |
| **Audit Hub** | The backend service for the bounty and attestation system (ICRC-127). | `eq6xo-cyaaa-aaaai-q32yq-cai` |
| **Usage Tracker** | The "Beacon" service that collects Proof of Usage metrics for the rewards program. | `m63pw-fqaaa-aaaai-q33pa-cai` |
| **Example MCP Server** | A reference implementation of a basic MCP server deployed on the mainnet. | `jcavt-oyaaa-aaaai-q33qq-cai` |
### User-Facing Frontends
These are the web application canisters that provide user interfaces for the protocol.
| Service Name | Description | Canister ID (Principal) |
| :--------------- | :----------------------------------------------------------------------------- | :---------------------------- |
| **App Store UI** | The primary user interface for browsing and discovering verified services. | `jfbth-daaaa-aaaai-q33qa-cai` |
| **Auth UI** | The frontend for the login, consent, and token allowance management dashboard. | `bmfnl-jqaaa-aaaai-q32ha-cai` |
### Token Ledgers
These are the ICRC-1 compliant ledger canisters for the protocol's tokens.
| Service Name | Description | Canister ID (Principal) |
| :------------------- | :---------------------------------------------------------------------------- | :---------------------------- |
| **PMP Token Ledger** | The test Prometheus Protocol (PMP) token ledger for testing paid MCP servers. | `dy3i7-mqaaa-aaaai-q32ja-cai` |
| **preMCPT Ledger** | The ledger for the pre-launch `preMCPT` reward token. | `mz2jc-iiaaa-aaaai-q33pq-cai` |
| **ICP Ledger** | The official Internet Computer (ICP) token ledger. | `ryjl3-tyaaa-aaaaa-aaaba-cai` |
# CLI Commands
Source: https://docs.prometheusprotocol.org/reference/cli-commands
A complete reference for the Prometheus command-line interface tools.
The Prometheus Protocol provides two primary command-line tools for interacting with the ecosystem: the **App Store CLI** for managing the full application lifecycle, and the **Auth CLI** for managing OAuth client registration.
## The App Store CLI
The official CLI for developers, auditors, and community members. It handles everything from submitting an app for verification to performing audits and finalizing governance votes.
### Usage
The way you invoke the CLI depends on your role:
The CLI is included in projects created with `create-motoko-mcp-server`. You interact with it via `npm run` scripts. Note the required `--` to pass arguments.
```bash theme={null}
npm run app-store -- [options]
```
As an external user, you should use `npx` to ensure you are always running the latest version.
```bash theme={null}
npx @prometheus-protocol/app-store-cli [options]
```
***
### Developer Commands
Commands for managing the application lifecycle from within your project.
#### `init`
Initializes a new `prometheus.yml` configuration file in the current directory. This file contains the metadata for your service.
```bash theme={null}
npm run app-store init -y
```
#### `release`
**The recommended all-in-one command for publishing.** Automatically handles the entire workflow:
1. Updates version number in source code
2. Commits and pushes version change to GitHub
3. Updates `prometheus.yml` with commit hash and WASM path
4. Builds WASM using reproducible Docker environment
5. Publishes to registry and creates verification bounties
```bash theme={null}
npm run app-store release 1.0.0
# Advanced options:
npm run app-store release 1.0.0 --skip-git # Manual git control
npm run app-store release 1.0.0 --skip-build # Use pre-built WASM
npm run app-store release 1.0.0 --network ic # Publish to mainnet
```
#### `build`
Builds your WASM file using the reproducible build system (Docker-based). The `release` command calls this automatically.
```bash theme={null}
npm run app-store build
```
#### `status`
Checks the current verification status of your application (e.g., Pending, Auditing, Verified, Rejected).
```bash theme={null}
npm run app-store status
```
#### `publish` (deprecated)
Legacy command for publishing. **Use `release` instead** for the full automated workflow.
```bash theme={null}
npm run app-store publish 1.0.0
```
***
### Auditor & Bounty Commands
Commands for discovering, auditing, and claiming rewards.
#### `bounty list`
Lists all available bounties on the network, showing their status (Open, Reserved, or Claimed).
```bash theme={null}
npx @prometheus-protocol/app-store-cli bounty list
```
#### `bounty reserve `
Reserves an open bounty by staking USDC collateral. This grants you an exclusive lock to perform the audit.
```bash theme={null}
npx @prometheus-protocol/app-store-cli bounty reserve
```
#### `bounty create`
Creates a new bounty to incentivize a specific audit for a WASM.
```bash theme={null}
npx @prometheus-protocol/app-store-cli bounty create --wasm-id --audit-type
```
#### `bounty claim `
Claims the reward for a reserved bounty after your corresponding attestation has been successfully submitted and approved.
```bash theme={null}
npx @prometheus-protocol/app-store-cli bounty claim
```
#### `attest generate`
Generates a template YAML file for a specific audit type (e.g., `security_v1`).
```bash theme={null}
npx @prometheus-protocol/app-store-cli attest generate --type security_v1
```
#### `attest submit `
Submits a completed attestation file for a bounty you have reserved.
```bash theme={null}
npx @prometheus-protocol/app-store-cli attest submit attestation.yml --bounty-id
```
***
## The Auth CLI
This tool manages your service's registration with the Prometheus OAuth provider. It is typically used via `npm run` scripts from within a service developer's project.
#### `register`
Interactively registers your service as a new OAuth client. It saves the output to `.auth_client.json`.
```bash theme={null}
npm run auth register
```
#### `update`
Interactively updates an existing OAuth client registration. This is commonly used to change the redirect URI when moving from a local to a production environment.
```bash theme={null}
npm run auth update
```
#### `list`
Lists all resource servers (OAuth clients) registered by your current identity.
```bash theme={null}
npm run auth list
```
#### `delete`
Deletes an existing resource server registration.
```bash theme={null}
npm run auth delete
```
# ICRC Standards
Source: https://docs.prometheusprotocol.org/reference/icrc-standards
An overview of the powerful composition of ICRC standards that form the Prometheus Protocol's trustless software supply chain.
The Prometheus Protocol is not a single canister, but a composition of several powerful ICRC (Internet Computer Request for Comments) standards working in concert. This architecture creates a transparent, on-chain, and fully auditable lifecycle for decentralized applications.
This page provides a reference for the key standards we use and the role each one plays in the system.
### Core Trust & Verification Standards
These standards form the backbone of the decentralized App Store and the software supply chain.
**The Shelf.** This standard manages application namespaces (`CanisterType`)
and their versioned WASM histories. It's the underlying storage layer for
all application code.
**The Canister Manager.** This standard handles the deployment and
orchestration of canisters. Crucially, it ensures that only WASM that has
been verified by the protocol can be deployed.
**The Immutable Logbook.** This standard provides the immutable ledger for
verification requests and attestations. Verifiers file cryptographic
attestations after performing reproducible builds, creating a permanent
on-chain audit trail. **Key Features:** - **Attestation filing:** Verifiers
submit build verification results with metadata - **Audit type system:**
Supports multiple verification types (build\_reproducibility\_v1,
security\_audit, etc.) - **Consensus tracking:** Records multiple independent
verifications per WASM - **Authorization:** Integrates with ICRC-127 bounty
system to authorize attestations - **Immutable history:** All attestations
stored permanently on-chain via ICRC-3
**The Economic Engine.** This standard powers the decentralized bounty
system that incentivizes both automated build verification and human
security audits. **Key Features:** - **Bounty creation:** Developers fund
verification work with USDC rewards - **Staking mechanism:** Verifiers stake
collateral (0.30 USDC) to reserve bounties - **Slashing protection:** Stakes
are burned if verifiers abandon work (1-hour timeout) - **Automated
payouts:** Smart contracts transfer rewards upon successful verification -
**Multiple verifiers:** Each bounty can be claimed by one verifier, enabling
parallel verification - **Divergence reporting:** Verifiers earn rewards
even for failed builds (honest reporting) - **Consensus-based
finalization:** Majority of verifiers must agree for WASM approval
***
### Token & Identity Standards
These standards provide the foundation for payments, credentials, and on-chain proof of quality.
**The Bank.** These standards are the foundation of the **Direct Payments**
pillar. ICRC-1 is used for all token transfers, while ICRC-2 powers the
user-controlled allowance system.
**The Identity Layer.** While not a formal ICRC standard, this is a critical
component. It issues non-transferable, credential-like tokens to vetted
auditors, ensuring that only qualified experts can perform specific types of
audits.
By composing these standards, the Prometheus Protocol creates a transparent, end-to-end system for verifiable software, from code submission to secure deployment.
### How They Work Together
The standards form an integrated workflow:
1. **ICRC-118 (WASM Registry):** Developer registers a new WASM version with Git commit hash and expected hash
2. **ICRC-127 (Bounty System):** Developer creates verification bounties (\~\$2.25 per version) to incentivize verifiers
3. **Verifier Network:** Automated bots detect pending verifications and reserve bounties by staking USDC
4. **Reproducible Builds:** Verifiers rebuild WASM from source in deterministic Docker environments
5. **ICRC-126 (Attestations):** Verifiers file cryptographic attestations with build results and metadata
6. **Consensus:** System requires 5 of 9 independent verifiers to agree on the same WASM hash
7. **ICRC-127 (Rewards):** Successful verifiers claim bounties and receive USDC + returned stake
8. **ICRC-120 (Deployment):** Once verified, the WASM can be deployed to mainnet via canister orchestration
This creates a **trustless, automated verification ecosystem** with economic incentives ensuring integrity at every step.
# Resources
Source: https://docs.prometheusprotocol.org/reference/mcp-resources
Example MCP servers and useful resources for building on Prometheus Protocol
## Example MCP Servers
### ArcSwap - DEX Wrapper
A wrapper MCP server that orchestrates token swaps on KongSwap DEX.
* **Repository:** [github.com/jneums/arcswap](https://github.com/jneums/arcswap)
* **Pattern:** Wrapper Pattern
* **Features:** Multi-step swap orchestration, ICRC-2 allowances, identity management
* **Use Case:** DeFi, Token Swaps
### Synapse Fund - Portfolio Management
An MCP server for AI-powered portfolio management and DeFi interactions.
* **Repository:** [github.com/jneums/synapse-fund](https://github.com/jneums/synapse-fund)
* **Pattern:** Wrapper Pattern
* **Features:** Portfolio tracking, automated rebalancing, DeFi protocol integration
* **Use Case:** Investment Management, DeFi
### TaskPad - Multi-Tenant Todo List
A simple multi-tenant todo list MCP server demonstrating principal-based data segregation.
* **Repository:** [github.com/jneums/taskpad](https://github.com/jneums/taskpad)
* **Pattern:** Multi-Tenant Pattern
* **Features:** Personal todo lists with isolated storage per user
* **Use Case:** Productivity, Task Management
### Easy Wallet - ICRC Token Wallet
A stateless, non-custodial wallet MCP server for querying balances and executing transfers.
* **Repository:** [github.com/jneums/easy-wallet](https://github.com/jneums/easy-wallet)
* **Pattern:** Stateless Proxy (no identity needed)
* **Features:** ICRC-1 balance queries, ICRC-2 transfers via allowances, no custody
* **Use Case:** Token Management, DeFi Integration
***
## Development Tools
### MCP Motoko SDK
The official Motoko SDK for building MCP servers on the Internet Computer.
* **Repository:** [github.com/prometheusprotocol/mcp-motoko-sdk](https://github.com/prometheus-protocol/motoko-sdk)
* **Documentation:** [SDK Documentation](./sdk-libraries)
* **Features:**
* MCP protocol implementation
* Authentication (API keys, OAuth)
* HTTP handlers
* Tool registration
* Resource management
### MCP Inspector
Debug and test your MCP servers with the official inspector tool.
* **Repository:** [github.com/modelcontextprotocol/inspector](https://github.com/modelcontextprotocol/inspector)
* **Features:**
* Interactive tool testing
* Resource browsing
* Request/response inspection
* Local and remote server support
### Prometheus CLI
Command-line interface for deploying and managing MCP servers.
* **Repository:** [app-store-cli](https://github.com/prometheus-protocol/prometheus-protocol/tree/main/packages/apps/app-store-cli)
* **Documentation:** [CLI Commands](./cli-commands)
* **Features:**
* Deploy to mainnet
* Submit to app store
* Manage API keys
* Monitor usage
***
## Standards & Protocols
### ICRC Standards
Token standards used in Internet Computer MCP servers.
* **ICRC-1:** [Fungible Token Standard](https://github.com/dfinity/ICRC-1)
* **ICRC-2:** [Approve and Transfer From](https://github.com/dfinity/ICRC-1/tree/main/standards/ICRC-2)
* **Documentation:** [ICRC Standards Reference](./icrc-standards)
### Model Context Protocol (MCP)
The protocol specification that Prometheus implements.
* **Repository:** [github.com/modelcontextprotocol/specification](https://github.com/modelcontextprotocol/specification)
* **Website:** [modelcontextprotocol.io](https://modelcontextprotocol.io)
* **Features:**
* Tool definitions (JSON-RPC)
* Resource management
* Prompt templates
* Server discovery
***
## Learning Resources
### Tutorials & Guides
* **[Wrapper Pattern Guide](../guides/service-devs/wrapper-pattern)** - Build orchestration layers for complex workflows
* **[Multi-Tenant Pattern Guide](../guides/service-devs/multi-tenant-pattern)** - Create shared services with data isolation
* **[Quickstart Guide](../guides/service-devs/quickstart)** - Get started in 5 minutes
### Internet Computer Documentation
* **[Motoko Language Guide](https://internetcomputer.org/docs/current/motoko/main/motoko)** - Learn the Motoko programming language
* **[HTTP Gateway](https://internetcomputer.org/docs/current/developer-docs/http-compatible-canisters/custom-http-canisters)** - Serve HTTP from canisters
### Video Tutorials
* **Prometheus Protocol YouTube Channel** - Coming Soon
* **DFINITY Developer Videos** - [youtube.com/@DFINITY](https://youtube.com/@DFINITY)
***
## Package Managers & Libraries
### MOPS - Motoko Package Manager
Install and manage Motoko dependencies.
* **Website:** [mops.one](https://mops.one)
* **Documentation:** [MOPS Documentation](https://docs.mops.one)
* **Popular Packages:**
* `map` - Efficient key-value storage
* `json` - JSON parsing and serialization
* `mcp-motoko-sdk` - MCP server framework
***
## AI Agent Integrations
### Claude Desktop
Use MCP servers with Claude Desktop application.
* **Guide:** [AI Tools - Claude](../ai-tools/claude-code)
* **Download:** [claude.ai/download](https://claude.ai/download)
### Cursor IDE
AI-powered code editor with MCP support.
* **Guide:** [AI Tools - Cursor](../ai-tools/cursor)
* **Website:** [cursor.sh](https://cursor.sh)
### Windsurf IDE
AI development environment with MCP integration.
* **Guide:** [AI Tools - Windsurf](../ai-tools/windsurf)
* **Website:** [codeium.com/windsurf](https://codeium.com/windsurf)
***
## Sample Code Repositories
### Authentication Examples
* **API Key Authentication** - [See ArcSwap](https://github.com/jneums/arcswap)
* **OAuth Integration** - Coming Soon
### Token Operations
* **ICRC-2 Transfer From** - [See ArcSwap swap tool](https://github.com/jneums/arcswap/blob/main/src/tools/dex_swap_submit.mo)
* **Approval Management** - [See ArcSwap](https://github.com/jneums/arcswap)
### Multi-Tenant Storage
* **Principal-Based Maps** - See [Multi-Tenant Guide](../guides/service-devs/multi-tenant-pattern)
* **Quota Management** - Coming Soon
***
## Community & Support
### Discord
Join the Prometheus Protocol community for help and discussion.
* **Link:** [discord.gg/TbqgYERjYw](https://discord.gg/TbqgYERjYw)
### DFINITY Forum
Get help with Internet Computer development.
* **Link:** [forum.dfinity.org](https://forum.dfinity.org)
* **Topics:** Motoko, Canisters, Authentication, Storage
### Social Media
* **X (Twitter):** [@Prometheus9486](https://x.com/Prometheus9486)
* **GitHub:** [github.com/prometheus-protocol](https://github.com/prometheus-protocol)
***
## Contributing
Want to add your MCP server to this list? Submit a pull request!
1. Fork the [docs repository](https://github.com/prometheus-protocol/docs)
2. Add your project to this page
3. Include: name, repo link, pattern used, features, and use case
4. Submit a PR
***
## License & Legal
Most resources are open source under MIT or Apache 2.0 licenses. Check individual repositories for specific licensing terms.
# Reproducible Builds
Source: https://docs.prometheusprotocol.org/reference/reproducible-builds
Technical reference for the deterministic Docker-based build system used for WASM verification.
Prometheus Protocol uses a **deterministic Docker-based build system** to ensure that any developer or verifier can rebuild a WASM file from source and get byte-for-byte identical output. This technical reference explains how the system works.
## Overview
Reproducible builds are the foundation of the verification network. They enable:
* **Build integrity verification:** Proof that deployed code matches source code
* **Independent verification:** Multiple verifiers can confirm the same result
* **Byzantine fault tolerance:** Majority consensus prevents malicious approvals
* **Cryptographic auditability:** Permanent on-chain record of verification attestations
## Architecture
### Build Environment Components
The reproducible build system consists of several layers:
Pre-built image with pinned versions of the Motoko compiler (`moc`), WASM
optimizer (`ic-wasm`), and package manager (`mops-cli`).
A standardized `build.sh` script that compiles Motoko source code to
optimized WASM using locked dependency versions.
Orchestrates the build process with proper dependency ordering and isolated
environments for each verification.
Automated service that clones repositories, triggers Docker builds, computes
hashes, and files on-chain attestations.
## Dockerfile Structure
### Base Image (Dockerfile.base)
The base image is built using Alpine Linux for minimal, reproducible builds:
```dockerfile theme={null}
FROM alpine:latest AS build
# Install build tools
RUN apk add --no-cache curl ca-certificates tar bash
# Create installation directory
RUN mkdir -p /install/bin
# Download and install moc (Motoko compiler)
ARG MOC_VERSION=0.16.0
RUN curl -L https://github.com/dfinity/motoko/releases/download/${MOC_VERSION}/motoko-Linux-x86_64-${MOC_VERSION}.tar.gz -o motoko.tgz \
&& tar xzf motoko.tgz \
&& install moc /install/bin
# Download and install ic-wasm (WASM optimizer)
ARG IC_WASM_VERSION=0.9.3
RUN curl -L https://github.com/research-ag/ic-wasm/releases/download/${IC_WASM_VERSION}/ic-wasm-x86_64-unknown-linux-musl.tar.gz -o ic-wasm.tgz \
&& tar xzf ic-wasm.tgz \
&& install ic-wasm /install/bin
# Download and install mops-cli (package manager)
ARG MOPS_CLI_VERSION=0.2.1
RUN curl -L https://github.com/prometheus-protocol/mops-cli/releases/download/v${MOPS_CLI_VERSION}/mops-cli-linux64 -o mops-cli \
&& install mops-cli /install/bin
# Final runtime image
FROM alpine:latest
RUN apk add bash
COPY --from=build /install/bin/* /usr/local/bin/
WORKDIR /project
```
**Key Features:**
* **Pinned versions:** Every tool version is explicitly specified via `ARG`
* **Deterministic downloads:** Uses official releases with version tags
* **Multi-stage build:** Separates build-time dependencies from runtime
* **Minimal runtime:** Only essential tools in the final image
### Project Image (Dockerfile)
Each project builds on the base image:
```dockerfile theme={null}
ARG MOC_VERSION
FROM motoko-build-base:moc-${MOC_VERSION}
WORKDIR /project
# Copy dependency manifest first (for layer caching)
COPY mops.toml ./
RUN mops-cli install --locked
# Copy source code
COPY src /project/src/
COPY did /project/did/
COPY build.sh /project/
# Build the canister
CMD ["bash", "build.sh"]
```
**Build Process:**
1. Start from versioned base image
2. Install locked dependencies from `mops.toml`
3. Copy source files
4. Execute build script
## Build Script (build.sh)
The build script is a standardized bash script that compiles Motoko to optimized WASM:
```bash theme={null}
#!/bin/bash
set -e
# Configuration
CANISTER_NAME="my_canister"
MAIN_FILE="src/main.mo"
OUTPUT_DIR="out"
OUTPUT_FILE="${OUTPUT_DIR}/out_Linux_x86_64.wasm"
# Create output directory
mkdir -p "$OUTPUT_DIR"
# Compile Motoko to WASM
moc \
--package base $(mops-cli sources) \
-o "${OUTPUT_DIR}/${CANISTER_NAME}.wasm" \
"${MAIN_FILE}"
# Optimize WASM
ic-wasm \
"${OUTPUT_DIR}/${CANISTER_NAME}.wasm" \
-o "${OUTPUT_FILE}" \
shrink
echo "Build complete: ${OUTPUT_FILE}"
sha256sum "${OUTPUT_FILE}"
```
**Optimization Steps:**
* `moc`: Compile Motoko to unoptimized WASM
* `ic-wasm shrink`: Remove debug symbols and optimize for size
* `sha256sum`: Compute hash for verification
## Docker Compose Configuration
The `docker-compose.yml` orchestrates the build:
```yaml theme={null}
version: '3.8'
services:
base:
build:
context: .
dockerfile: Dockerfile.base
args:
MOC_VERSION: ${MOC_VERSION:-0.16.0}
IC_WASM_VERSION: ${IC_WASM_VERSION:-0.9.3}
MOPS_CLI_VERSION: ${MOPS_CLI_VERSION:-0.2.1}
image: motoko-build-base:moc-${MOC_VERSION:-0.16.0}
wasm:
build:
context: .
dockerfile: Dockerfile
args:
MOC_VERSION: ${MOC_VERSION:-0.16.0}
depends_on:
- base
volumes:
- ./out:/project/out
```
**Key Features:**
* **depends\_on:** Ensures base image builds before project image
* **volumes:** Mounts output directory for extracting built WASM
* **environment variables:** Tool versions configured via `.env`
## Verification Workflow
### 1. Developer Builds Locally
Developer publishes with `app-store-cli release`:
```bash theme={null}
# From project directory
app-store-cli release 1.0.0
# This command:
# 1. Updates version in source
# 2. Commits and pushes to GitHub
# 3. Builds WASM locally using Docker
# 4. Computes SHA-256 hash
# 5. Submits to registry with git commit hash
```
### 2. Verifier Bot Detects Pending Verification
Verifier bot polls the registry:
```typescript theme={null}
const pending = await listPendingVerifications();
// Returns: [
// {
// wasm_hash: "0x1234abcd...",
// repo: "https://github.com/user/project.git",
// commit_hash: "abc123...",
// version: "1.0.0"
// }
// ]
```
### 3. Bot Performs Reproducible Build
The verifier bot automates the entire build process:
```typescript theme={null}
export async function verifyBuild(
repo: string,
commitHash: string,
expectedWasmHash: string,
): Promise {
const workDir = `/tmp/verify-${Date.now()}`;
// 1. Clone repository
execSync(`git clone --depth 1 ${repo} ${workDir}`);
execSync(`git -C ${workDir} checkout ${commitHash}`);
// 2. Auto-detect configuration
const canisterName = extractCanisterNameFromDfx(workDir);
const mocVersion = getMocVersionFromMopsToml(workDir);
// 3. Bootstrap build files
bootstrapBuildFiles({
projectPath: workDir,
mocVersion: mocVersion,
});
// 4. Build in Docker (no cache = clean build)
execSync(`docker-compose build --no-cache`, { cwd: workDir });
execSync(`docker-compose run wasm`, { cwd: workDir });
// 5. Compute hash
const wasmBytes = fs.readFileSync(
path.join(workDir, 'out', 'out_Linux_x86_64.wasm'),
);
const actualHash = crypto
.createHash('sha256')
.update(wasmBytes)
.digest('hex');
// 6. Compare
return {
success: actualHash === expectedWasmHash,
wasmHash: actualHash,
buildLog: buildLog.slice(-1000),
duration: duration,
};
}
```
### 4. Bot Files Attestation
If hashes match, the bot files an on-chain attestation:
```typescript theme={null}
await fileAttestation(identity, {
bounty_id: buildBounty.id,
wasm_id: job.wasm_hash,
attestationData: {
'126:audit_type': 'build_reproducibility_v1',
build_duration_seconds: result.duration,
git_commit: job.commit_hash,
repo_url: job.repo,
build_log_excerpt: result.buildLog.slice(0, 500),
},
});
```
## Ensuring Determinism
### Pinned Tool Versions
All toolchain versions are pinned in `docker-compose.yml`:
```yaml theme={null}
args:
MOC_VERSION: 0.16.0
IC_WASM_VERSION: 0.9.3
MOPS_CLI_VERSION: 0.2.1
```
### Locked Dependencies
Dependencies are locked in `mops.toml`:
```toml theme={null}
[dependencies]
base = "0.11.1"
icrc1-types = "0.1.0"
[dev-dependencies]
test = "1.0.0"
```
The `mops-cli install --locked` command ensures exact versions are used.
### Isolated Environment
Each build runs in a fresh Docker container with:
* **No network access** during compilation
* **No host system dependencies**
* **Clean filesystem** (`--no-cache` flag)
* **Consistent timezone and locale**
### Cross-Platform Consistency
Since Motoko compiler version 0.13.4, builds are reproducible across:
* Linux (x86\_64)
* macOS (M1/M2 ARM and Intel)
* Windows (via WSL2)
All platforms produce **byte-for-byte identical WASM** when using the same tool versions.
## Security Considerations
### Supply Chain Security
**Risk:** What if a toolchain binary is compromised?
**Mitigation:**
* Tool binaries are fetched by **version number AND hash verification**
* Base images use SHA-256 pinning: `alpine:latest@sha256:...`
* Build template repo uses GitHub Dependabot and security scanning
* Multiple independent verifiers pulling from different CDN endpoints
* Community monitoring of unexpected hash changes
### Build Environment Tampering
**Risk:** What if a verifier modifies the Docker build process?
**Mitigation:**
* Majority consensus (5 of 9) prevents single verifier attacks
* Each verifier operates independently (no coordination)
* Divergent results trigger manual security audit
* Economic staking disincentivizes dishonest behavior
### Time-of-Check to Time-of-Use (TOCTOU)
**Risk:** What if code changes after verification?
**Mitigation:**
* Verifications are tied to specific Git commit hashes
* WASM hash is cryptographically bound to attestation
* Deployments only accept verified WASM hashes
* On-chain audit trail prevents tampering
## Performance Optimization
### Build Caching
For repeated builds of the same project:
```bash theme={null}
# First build (cold cache)
docker-compose build # ~2-3 minutes
# Subsequent builds (warm cache)
docker-compose build # ~10-30 seconds
```
Layer caching speeds up dependency installation.
### Parallel Verification
Verifier bots can process multiple verifications simultaneously:
```typescript theme={null}
// Process up to 5 concurrent verifications
const pendingJobs = await listPendingVerifications();
const jobs = pendingJobs.slice(0, 5);
await Promise.all(
jobs.map((job) => verifyBuild(job.repo, job.commit_hash, job.wasm_hash)),
);
```
### Resource Management
Recommended verifier server specs:
* **CPU:** 2+ cores (for parallel builds)
* **RAM:** 4GB minimum, 8GB recommended
* **Disk:** 20GB+ SSD (for Docker images and build artifacts)
* **Network:** 100+ Mbps (for fast git clones)
## Troubleshooting
### Hash Mismatch
**Symptoms:** Verifier's hash doesn't match developer's hash
**Common Causes:**
1. **Different tool versions:** Check `MOC_VERSION` in both environments
2. **Modified source code:** Ensure exact commit hash is used
3. **Unlocked dependencies:** Use `mops-cli install --locked`
4. **Platform differences:** Ensure both use Linux x86\_64 or macOS M1+
**Debugging:**
```bash theme={null}
# Compare tool versions
moc --version
ic-wasm --version
mops-cli --version
# Verify git commit
git rev-parse HEAD
# Check dependency lock
cat mops.toml
```
### Build Timeout
**Symptoms:** Docker build exceeds 1-hour stake lock period
**Solutions:**
* Increase server resources (CPU/RAM)
* Use SSD storage for faster I/O
* Pre-pull base images: `docker pull motoko-build-base:moc-0.16.0`
### Dependency Installation Fails
**Symptoms:** `mops-cli install --locked` fails
**Common Causes:**
1. **Network issues:** Check internet connectivity
2. **Rate limiting:** Use GITHUB\_TOKEN for private package access
3. **Invalid mops.toml:** Validate syntax
**Fix:**
```bash theme={null}
# Set GitHub token
export GITHUB_TOKEN=ghp_your_token_here
# Retry installation
mops-cli install --locked
```
## Reference
### Official Build Template
The canonical reproducible build template is maintained at:
* **GitHub:** [research-ag/motoko-build-template](https://github.com/research-ag/motoko-build-template)
* **Container Registry:** `ghcr.io/prometheus-protocol/motoko-build-template`
### Tool Documentation
* **Motoko:** [internetcomputer.org/docs/motoko](https://internetcomputer.org/docs/current/motoko/main/getting-started/motoko-introduction)
* **ic-wasm:** [github.com/research-ag/ic-wasm](https://github.com/research-ag/ic-wasm)
* **mops-cli:** [github.com/prometheus-protocol/mops-cli](https://github.com/prometheus-protocol/mops-cli)
* **Docker:** [docs.docker.com](https://docs.docker.com)
### ICRC Standards
* **ICRC-118:** [WASM Registry](https://forum.dfinity.org/t/icrc-118-wasm-registry-definition-for-version-control-and-history/42589)
* **ICRC-120:** [Canister Orchestration](https://forum.dfinity.org/t/icrc-120-canister-wasm-orchestration-service/42591)
* **ICRC-126:** [Verification & Auditing](https://forum.dfinity.org/t/icrc-126-wasm-verification/42592)
* **ICRC-127:** [Bounty System](https://forum.dfinity.org/t/icrc-127-generic-bounty-system/42594)
***
For questions or issues with reproducible builds, join our [Discord community](https://discord.gg/TbqgYERjYw) or open an issue on [GitHub](https://github.com/prometheus-protocol/prometheus-protocol).
# SDK Libraries
Source: https://docs.prometheusprotocol.org/reference/sdk-libraries
A complete reference for the official and community SDKs for building and consuming services.
This page provides a comprehensive overview of the SDKs available for interacting with the Prometheus Protocol and the underlying Model Context Protocol (MCP).
## For Service Developers (On-Chain)
These SDKs are for developers building services on the Internet Computer that will be listed in the Prometheus App Store.
### Official Motoko SDK
This is the primary, feature-complete SDK for building Prometheus Protocol compliant servers in Motoko. It includes built-in support for the identity, payments, and trust pillars.
* **GitHub Repository:** [prometheus-protocol/motoko-mcp-sdk](https://github.com/prometheus-protocol/motoko-sdk)
* **Package on MOPS:** [`mcp-motoko-sdk`](https://mops.one/mcp-motoko-sdk)
#### Core Concepts
The SDK is declarative. You define your server's capabilities (tools, resources) and pass them to the `Mcp.createServer` function.
#### Monetization & Payments
The SDK has first-class support for token payments for tool invocations. You define the payment requirement on the tool itself, and the SDK handles the allowance check and token transfer before your tool logic is ever executed.
```ts src/main.mo theme={null}
let tools : [Mcp.Tool] = [{
name = "unlock_resource";
// ...
// The tool is what carries the payment details.
payment = ?{
amount = 50_000_000; // Cost per call
ledger = Principal.fromText("ryjl3-tyaaa-aaaaa-aaaba-cai"); // ICRC-1 Ledger
};
}];
```
#### Treasury Management
The SDK automatically exposes secure treasury functions on your canister for managing collected funds.
* `get_owner()`
* `set_owner(new_owner)`
* `get_treasury_balance(ledger_id)`
* `withdraw(ledger_id, amount, destination)`
#### Proof of Usage (Beacon)
The SDK includes a built-in "beacon" to participate in the protocol's Proof of Usage rewards program. By enabling it in your config, the SDK will automatically and securely report authenticated tool usage statistics, making your service eligible for rewards.
```ts src/main.mo theme={null}
transient let beaconContext : ?Beacon.BeaconContext = ?Beacon.init(
Principal.fromText("m63pw-fqaaa-aaaai-q33pa-cai"), // Public beacon canister ID
24 * 60 * 60, // Send a beacon every 24 hours
);
```
### Community Rust SDK
For developers who prefer to build services in Rust, this community-maintained SDK provides compatibility with the Prometheus Protocol.
A Rust framework for building MCP servers on the Internet Computer. It is
compatible with the Prometheus Protocol's authentication and payment systems.
***
## For AI Agent & Client Developers (Off-Chain)
These SDKs are for developers building applications that **consume** tools from services listed in the App Store. They are maintained by the core Model Context Protocol team and provide a standardized way to connect from any environment.